Please follow the steps mentioned on the left side bar for easy setup
Introduction
Yelpify is a powerful business discovery and review platform built using a modern full-stack approach:
Laravel powers the admin panel and public-facing website
Firebase handles real-time data, user management, and cloud functions
Flutter is used for the cross-platform mobile application (Android & iOS)
Yelpify allows users to explore and interact with local businesses, leave reviews, create collections, submit project requests, and much more. Business owners and admins are equipped with robust tools to manage listings, monitor user engagement, handle claims, and process subscriptions.
This platform is modular, scalable, and optimized for performance across web and mobile devices.
Setting up Flutter#
2. Setup Setting up Flutter involves several steps. Here’s a basic guide to get you started:
2.1. System Requirements:
Ensure your system meets the minimum requirements for Flutter development. Flutter supports development on Windows, macOS, and Linux. Make sure your system has the necessary hardware and software requirements as specified by Flutter documentation.
Extract the downloaded file to a location on your system. For example, on macOS or Linux, you can extract it to /usr/local and on Windows to C:\.
Add the Flutter bin directory to your system PATH to run Flutter commands from the command line. This step is important for executing Flutter commands globally in your system.
2.3. Install Development Tools:
For Android: Install Android Studio and configure the Flutter plugin. Android Studio provides the Android SDK, which Flutter uses to develop for Android. Ensure you have the Android SDK and the necessary tools installed through Android Studio.
For iOS: You need a macOS system with Xcode installed to develop and deploy Flutter apps for iOS.
2.4. Set up Android Emulator or iOS Simulator:
For Android development, set up an Android Virtual Device (AVD) using Android Studio’s AVD Manager.
For iOS development, use the iOS Simulator provided by Xcode.
Run flutter doctor:
Open a terminal and run flutter doctor. This command checks your system for any dependencies needed for Flutter development.
It will provide feedback on any missing or outdated components and instructions on how to resolve them.
2.5. Install Flutter and Dart plugins for your preferred IDE:
If you’re using VS Code, install the Flutter and Dart plugins to enhance your development experience.
Android Studio also has built-in support for Flutter, but make sure to install the Flutter plugin if it’s not already installed.
2.6. Create your first Flutter project:
Use the flutter create command to create a new Flutter project.
Navigate to the project directory and explore the file structure. You’ll find the main Dart file (main.dart) in the lib directory, where you’ll write your Flutter code.
2.7. Run your Flutter app:
Connect a device or start an emulator/simulator.
Navigate to your Flutter project directory in the terminal and run flutter run.
This will compile your Flutter app and launch it on the connected device or emulator.
2.8. Start Developing:
Once your app is running, you can start developing your Flutter UI and logic. Flutter’s hot reload feature allows you to see your changes instantly without restarting the app.
2.9. Learn and Explore:
Flutter has an extensive set of widgets and libraries. Explore the official Flutter documentation and community resources to learn more about Flutter development.
Changing the Package Name#
3. Changing the package name (also known as the bundle identifier or application ID) in a Flutter project involves a few steps. Here’s how you can do it:
3.1. Change the Android package name:
Navigate to the android directory within your Flutter project.
Open the AndroidManifest.xml file located in the app/src/main directory.
Find the package attribute in the tag and change its value to your desired package name.
3.2. Change the iOS bundle identifier:
Navigate to the ios directory within your Flutter project.
Open the Runner.xcodeproj project file using Xcode.
In Xcode, select the Runner project from the project navigator.
Go to the Runner target’s settings.
Under the General tab, find the Bundle Identifier field and change it to your desired bundle identifier.
3.3. Update Flutter project configuration:
Open the pubspec.yaml file located in the root directory of your Flutter project.
Update the name field with your new package name.
Update the android: package field under flutter: with your new package name.
3.4. Update Android source code references:
Open the MainActivity.java file located in android/app/src/main/java/com/your_old_package_name.
Replace occurrences of the old package name with the new package name.
3.5. Update iOS source code references:
Open the AppDelegate.swift file located in ios/Runner.
Replace occurrences of the old bundle identifier with the new bundle identifier.
3.6. Clean and rebuild the project:
After making the necessary changes, clean and rebuild the project.
In Android Studio, you can clean the project by selecting Build > Clean Project.
In Xcode, you can clean the project by selecting Product > Clean Build Folder.
3.7. Test your changes:
Run your Flutter app on both Android and iOS devices/emulators to ensure that the changes have been applied successfully.
Verify that the app runs without any issues and that the new package name/bundle identifier is reflected correctly.
Change the launcher icon#
4. To change the launcher icon (app icon) in a Flutter project, you can follow these steps:
4.1. Prepare Your New Icons:
First, prepare the new launcher icon images in the required sizes. Android and iOS have different size requirements. You typically need icons in various sizes to support different screen densities.
Android:
For Android, you need to replace the existing launcher icon files with your new ones. The launcher icons for Android are stored in the mipmap folders inside the android/app/src/main/res directory.
Replace the existing icon files (ic_launcher.png) in the mipmap folders with your new icon files. Make sure to maintain the same file names and sizes.
You may need to replace icons in various drawable folders for different screen densities (e.g., mipmap-hdpi, mipmap-mdpi, mipmap-xhdpi, mipmap-xxhdpi, mipmap-xxxhdpi).
iOS:
For iOS, you need to replace the existing icon files with your new ones. The icons for iOS are stored in the Assets.xcassets directory in the ios/Runner directory.
Open your Flutter project in Xcode by navigating to the ios directory and opening the .xcworkspace file with Xcode.
In Xcode, navigate to Runner > Assets.xcassets.
Replace the existing AppIcon with your new icon files. You’ll typically find different sizes labelled for various devices (e.g., iPhone, iPad).
4.2. Flutter Launcher Icon Package (Optional):
Alternatively, you can use the flutter_launcher_icons package to automate the process of updating launcher icons. This package allows you to define a single source image and generate the required icons for both Android and iOS.
Install the flutter_launcher_icons package by adding it to your pubspec.yaml file:
dev_dependencies:
flutter_launcher_icons:"^0.9.2"
Run the following command in your terminal to generate launcher icons based on your configuration:
flutter pub get
flutter pub run flutter_launcher_icons:main
Follow the prompts to configure the package according to your project’s requirements.
4.3. Test Your Changes:
After replacing the icon files or running the flutter_launcher_icons package, rebuild your Flutter project and run it on both Android and iOS devices/emulators to ensure that the new launcher icon is displayed correctly.
Change the App Name#
5. To change the app name in a Flutter project for Android, iOS, and web platforms, you’ll need to adjust settings in each platform’s configuration. Here’s how you can do it:
5.1. For Android:
5.1.1. Open the android/app/src/main/AndroidManifest.xml file.
5.1.2. Locate the <application> tag.
5.1.3. Change the value of the android:label attribute to your desired app name.
5.2. For iOS:
5.2.1. Open the ios/Runner/Info.plist file.
5.2.2. Locate the <key>CFBundleDisplayName</key> entry.
5.2.3. Change the value associated with <string> to your desired app name.
5.3. For Web:
5.3.1. Open the web/index.html file.
5.3.2. Locate the <key>title</key> tag.
5.3.3. Change the text within the <title> tag to your desired app name.
5.4. Additionally:
In your Flutter project directory, open the pubspec.yaml file and ensure that the name field is set to the desired app name. This is the name that appears in the app store listings, on the device’s home screen, etc.
After making these changes, rebuild your app for each platform to apply the new app name.
5.5. Example:
Let’s say you want to change the app name to “My New App”:
5.5.1. Android:
<application
android:label="My New App" ...>
5.5.2. iOS:
<key>CFBundleDisplayName</key>
<string>My New App</string>
5.5.3. Web:
<title>My New App</title>
5.5.4. Pubspec.yaml:
name: my_new_app
Create Google AdMob Banner#
6. How to Create a Google AdMob Banner Ads Key (Step-by-Step)
7.3.4. Search for Maps SDK for Android → Click Enable.
7.3.5. Go to Credentials → Create or use an existing API key.
7.3.6. Restrict the key for Android with your app’s SHA-1 fingerprint and package name.
7.4. Enable Maps SDK for iOS
7.4.1.In the same Google Cloud project, enable Maps SDK for iOS in the API Library.
7.4.2. Use the same API key or create a new one.
7.4.3. Restrict usage to iOS bundle identifier.
7.5. Enable Maps Embed API
7.5.1. Purpose: Embed static or interactive Google Maps in websites (limited in mobile apps).
7.6. Enable Geolocation API
7.6.1. Enable Geolocation API in the API Library.
7.6.2. Use an HTTP POST request to retrieve location (server-side usage recommended).
To change the Google Maps API key in a Flutter app for both Android and iOS, you need to update the respective configuration files in each platform. Here are the steps:
7.7. For Android:
7.7.1. Navigate to your Flutter project’s android/app/src/main/AndroidManifest.xml file.
7.7.2. Inside the element, locate the tag with the name com.google.android.geo.API_KEY.
7.7.3. Replace the android:value attribute with your new Google Maps API key.
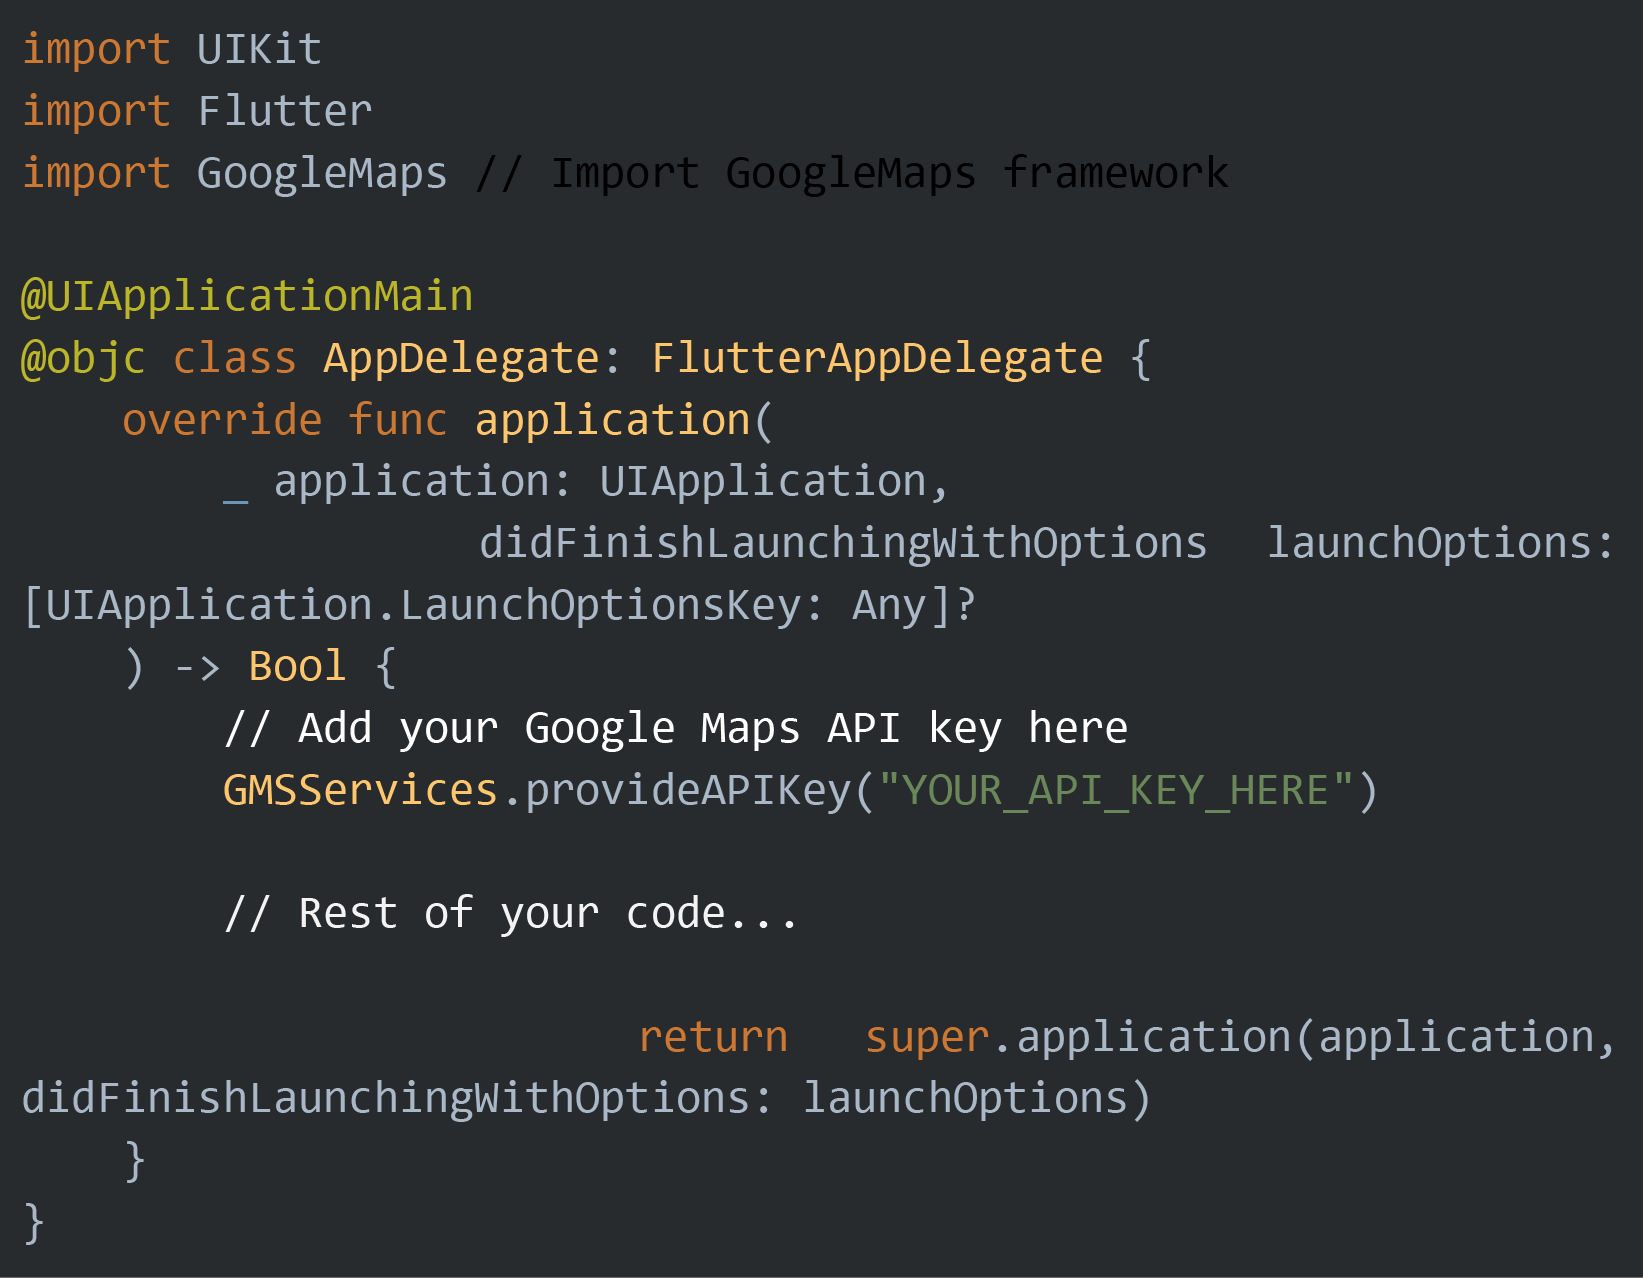
7.8.1. Open your Flutter project in a text editor or IDE.
7.8.2. Navigate to the ios/Runner directory within your Flutter project.
7.8.3. Locate the AppDelegate.swift file.
7.8.4. In the didFinishLaunchingWithOptions method, set the Google Maps API key.
Replace “YOUR_API_KEY_HERE” with your actual Google Maps API key.
After updating the API key in the AppDelegate.swift file, rebuild your Flutter app for iOS to apply the changes.
By following these steps, your Flutter app will use the new Google Maps API key specifically for iOS. Make sure you’ve also updated the API key in the Android configuration as described earlier if you want to apply changes to both platforms.
Set up a Firebase with an Application#
7. Two Ways to set up a firebase with an application(Using Firebase CLI (5.1) OR Manually(5.2)).
8.1. Setting up Firebase for a Flutter project using the Firebase CLI involves several steps. Below is a detailed guide on how to do it:
8.1.1. Install Firebase CLI:
First, you need to install the Firebase CLI if you haven’t already. You can install it via npm (Node Package Manager) by running the following command in your terminal or command prompt:
8.1.2. Login to Firebase:
After installing the Firebase CLI, log in to your Firebase account by running the following command:
This will open a browser window prompting you to log in to your Google account associated with Firebase.
8.1.3. Create a Firebase Project:
If you haven’t already created a Firebase project, you can create one using the Firebase CLI by running:
Follow the prompts to create a new project.
8.1.4. Initialize Firebase in Your Flutter Project:
Navigate to your Flutter project directory in the terminal.
Initialize Firebase in your project by running:
This command will prompt you to select the Firebase features you want to set up. Choose the Firebase services you intend to use, such as Authentication, Firestore, etc.
8.1.5. Configure Firebase:
During the initialization process (firebase init), you’ll be asked to select the Firebase project you created or configured earlier.
Choose the appropriate project from the list.
8.1.6. Install Required Dependencies:
After selecting the Firebase features, Firebase CLI will generate the necessary configuration files for your project.
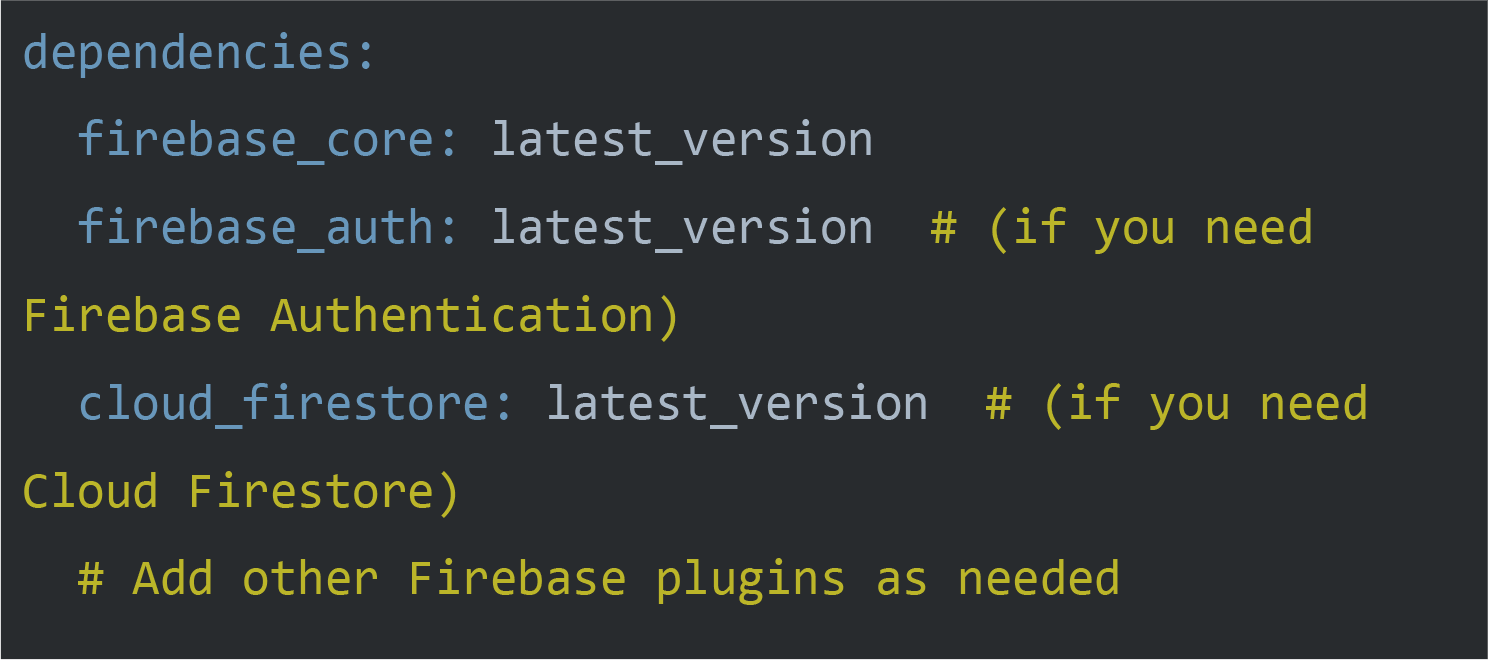
Next, you need to install the required Firebase packages in your Flutter project. You can do this by adding the dependencies to your pubspec.yaml file:
Replace latest_version with the actual version numbers of the Firebase plugins you want to use. You can find the latest versions on pub.dev.
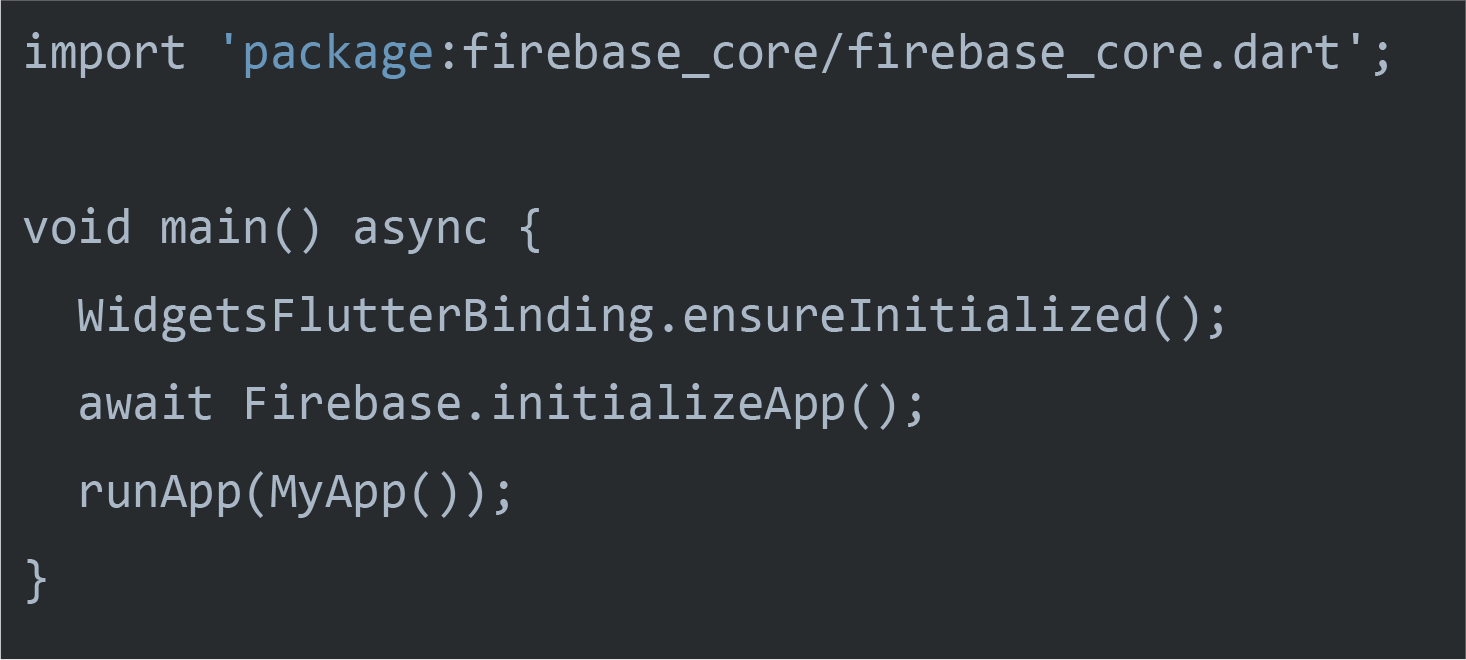
8.1.7. Initialize Firebase in Your Flutter App:
8.1.8. Using Firebase Services:
Now you can use Firebase services in your Flutter app. Import the necessary Firebase packages and follow the respective documentation for each service you want to use (e.g., Firebase Authentication, Cloud Firestore).
8.1.9. Testing:
Run your Flutter app on a device or emulator to verify that Firebase services are correctly integrated and working.
8.2. Configuring and setting up FlutterFire in your Flutter project involves several steps. Here’s a detailed guide on how to do it:
Click on “Add Project” and follow the instructions to create a new project.
Once your project is created, you’ll be redirected to the project dashboard.
8.2.2. Add an App to Your Firebase Project:
In the Firebase console, select your project.
Click on the “Add app” button (usually represented by an Android or iOS icon).
Follow the setup instructions to register your app with Firebase.
Download the google-services.json file for Android or GoogleService-Info.plist file for iOS. These files contain your Firebase project configuration details.
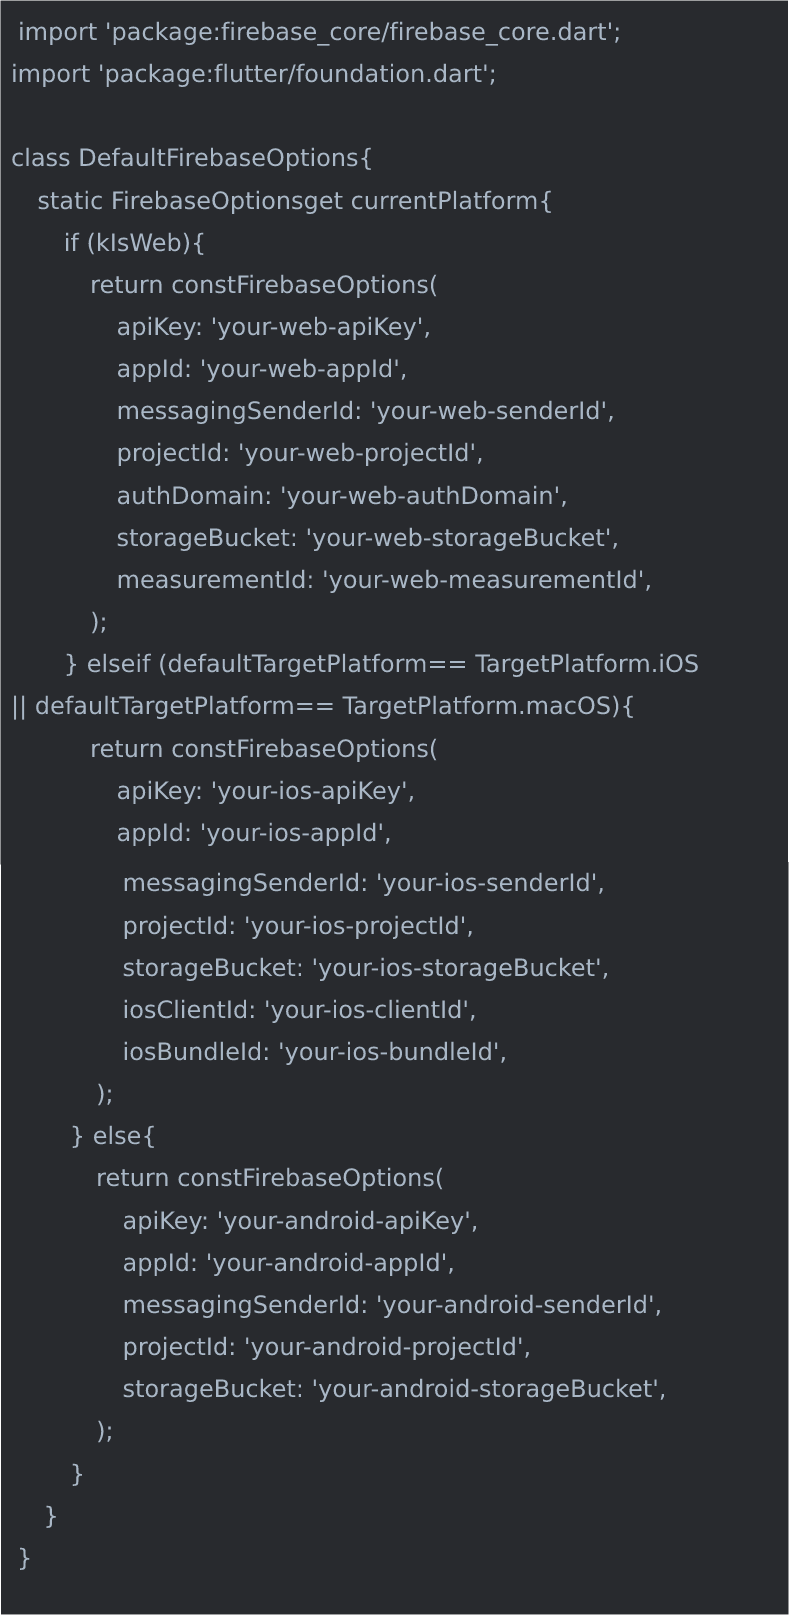
8.2.3. To update the DefaultFirebaseOptions in your Flutter project based on the google-services.json file, follow these steps:
8.2.3.1. Open your lib/firebase_options.dart file.
8.2.3.2. Extract the necessary keys from your google-services.json file, especially fields like apiKey, projectId, appId, etc.
8.2.3.3. Modify the DefaultFirebaseOptions class with the appropriate configuration for each platform.
8.2.4. Flutter Project Setup:
Open your Flutter project in your preferred editor.
Navigate to the android/app directory for Android or ios/Runner directory for iOS, and paste the google-services.json (for Android) or GoogleService-Info.plist (for iOS) file that you downloaded earlier.
8.2.5. Add Firebase SDK to Your Flutter Project:
Open your Flutter project’s pubspec.yaml file.
Add the following dependencies:
Replace latest_version with the latest version numbers of the Firebase plugins you want to use. You can find the latest versions on pub.dev.
8.2.6. Using Firebase Services:
You can now use Firebase services in your Flutter app. Import the necessary Firebase packages and follow the respective documentation for each service you want to use (e.g., Firebase Authentication, Cloud Firestore).
8.2.7. Testing:
Run your Flutter app on a device or emulator to verify that Firebase services are correctly integrated and working.
Creating subscription plans#
9. Creating subscription plans in Android (Google Play) and iOS (App Store)
9.1. Android: Google Play Console – Subscription Setup
10.2.1. keystore: The path where the .jks file will be created (~/my-release-key.jks for Unix/macOS, C:\Users\YourName\my-release-key.jks for Windows) .
10.2.2. keyalg RSA: Algorithm used.
10.2.3. keysize 2048: Key length.
6.3.4. Give your ad unit a name (e.g., Banner_HomePage).
10.2.4. validity 10000: Validity in days (~27 years).
10.2.5. alias my-key-alias: Name of the key within the keystore.
10.3. Enter Required Info
10.3.1. Keystore password
10.3.2. Key password
10.3.3. Your name, organization, city, state, and country code
11. To generate SHA-1 and SHA-256 keys for your Flutter app and add them to your Firebase project, you can follow these steps:
(This important for Phone Auth, Google Sign-In )
11.1. Using Keytool:
11.1.1. Navigate to your JDK’s bin directory in the command line.
11.1.2. Execute the following command to generate the SHA-1 key:
11.1.3. Replace path-to-your-keystore-file with the path to your keystore file (usually debug.keystore for debug builds and a custom keystore for release builds) and your-alias-name with the alias name used to generate the keystore.
11.1.4. Similarly, execute the following command to generate the SHA-256 key:
11.2. Using Gradle (Android Studio):
11.2.1. Open your Flutter project in Android Studio.
11.2.2. In the Android view, navigate to app -> Gradle Scripts -> build.gradle (Module: app).
11.2.3. Add the following lines to the android block
11.2.4. Replace path-to-debug.keystore, password, and key-alias with your keystore file path, password, and key alias respectively.
11.2.5. Sync your project to apply changes.
11.2.6. Run the following Gradle task in the terminal to get the SHA-1 and SHA-256 keys
11.3.3.1. Click on the Android icon to add an Android app.
11.3.3.2. Follow the setup instructions, including adding the google-services.json file to your Flutter project’s android/app directory.
11.3.3.3. During setup, you’ll be asked for your SHA-1 key. Paste the SHA-1 key you generated earlier.
11.3.3.4. After setup is complete, you’ll have the option to download the google-services.json file again. Replace the existing file in your project if needed.
11.3.4. For IOS:
11.3.4.1. Click on the iOS icon to add an iOS app.
11.3.4.2. Follow the setup instructions, including downloading the GoogleService-Info.plist file.
11.3.4.3. There’s no need to add SHA-1 or SHA-256 keys for iOS.
11.3.4.4. Add the downloaded GoogleService-Info.plist file to your Flutter project’s ios/Runner directory.
FAQ#
9.1. What should I do if I get the error message “Missing project_info object” in my Flutter project?
The error message you’re encountering, “Missing project_info object,” typically arises in Flutter projects when there’s a misconfiguration or missing information related to Firebase services. Here’s how you can troubleshoot and potentially resolve this issue.
Solution :
9.1.1. Check google-services.json: If you’re using Firebase services in your Flutter app, ensure that you have the google-services.json file placed in the correct location within your Android project. This file contains important configuration information for Firebase services. It should be located in the android/app directory of your Flutter project.
9.1.2. Verify Firebase Setup: Double-check that you’ve completed all the necessary steps to set up Firebase for your Flutter project. This includes adding your app to the Firebase project using the Firebase Console, downloading and adding the google-services.json file to your Android project, and configuring Firebase services in your Flutter app’s code (if applicable).
9.1.3. Update Google Services Plugin: Ensure that you’re using the latest version of the Google Services Gradle plugin in your Android project. You can check the latest version on the Google Services Gradle Plugin page and update the version number in your android/build.gradle file accordingly.
9.1.4. Check Flutter and Firebase Versions Compatibility: Make sure that you’re using compatible versions of Flutter and Firebase. Sometimes, using outdated versions of either can lead to compatibility issues. Refer to the Firebase Flutter documentation and ensure compatibility with your Flutter version.
9.1.5. Sync Gradle Files: After making any changes to your Android project configuration, such as updating the google-services.json file or modifying the Gradle build files, make sure to sync your Gradle files in Android Studio. This can be done by clicking on the “Sync Project with Gradle Files” button.
9.1.6. Rebuild the Project: After ensuring all configurations are correct, try rebuilding your Flutter project. You can do this by running flutter clean followed by flutter pub get and then rebuilding the project (flutter run or flutter build).
9.1.7. Check for Error Logs: Look for more detailed error messages or stack traces in the console output or build logs. These can provide additional clues about the underlying issue causing the “Missing project_info object” error.
Web Documentation#
Introduction
Yelpify is a powerful business discovery and review platform built using a modern full-stack approach:
Laravel powers the admin panel and public-facing website
Firebase handles real-time data, user management, and cloud functions
Flutter is used for the cross-platform mobile application (Android & iOS)
Yelpify allows users to explore and interact with local businesses, leave reviews, create collections, submit project requests, and much more. Business owners and admins are equipped with robust tools to manage listings, monitor user engagement, handle claims, and process subscriptions.
This platform is modular, scalable, and optimized for performance across web and mobile devices.
Key Features:
2.1. Business Discovery
Search businesses by category, keyword, or location
Filter by rating, distance, availability (open now), and services
Sorting and relevance ranking
2.2. Business Listings
Detailed business profiles (name, address, services, photos, hours)
Ratings, reviews, and user-submitted photos
Business status indicators (open/closed, sponsored)
2.3. Reviews & Ratings
1–5 star rating system
Rich text reviews with optional image uploads
Review moderation and reporting system
Average rating auto-calculation
2.4. Custom Business Collections
Users can create named collections (e.g., “Best Cafes”, “For Wedding”)
Save any business into multiple collections
Manage, rename, or delete collections
All collections synced to Firebase under user profile
2.5. Project Requests (Lead Generation)
Users can submit service requests tied to a category or business
Requests are sent to relevant businesses or open for bidding
Businesses can accept, respond, or quote projects
Admins can moderate and monitor all requests
2.6. Subscription Plans (Business Owners)
Businesses can subscribe to premium tiers (e.g., Basic, Pro, Featured)
Features unlocked per plan (e.g., sponsored listing, photo uploads, analytics)
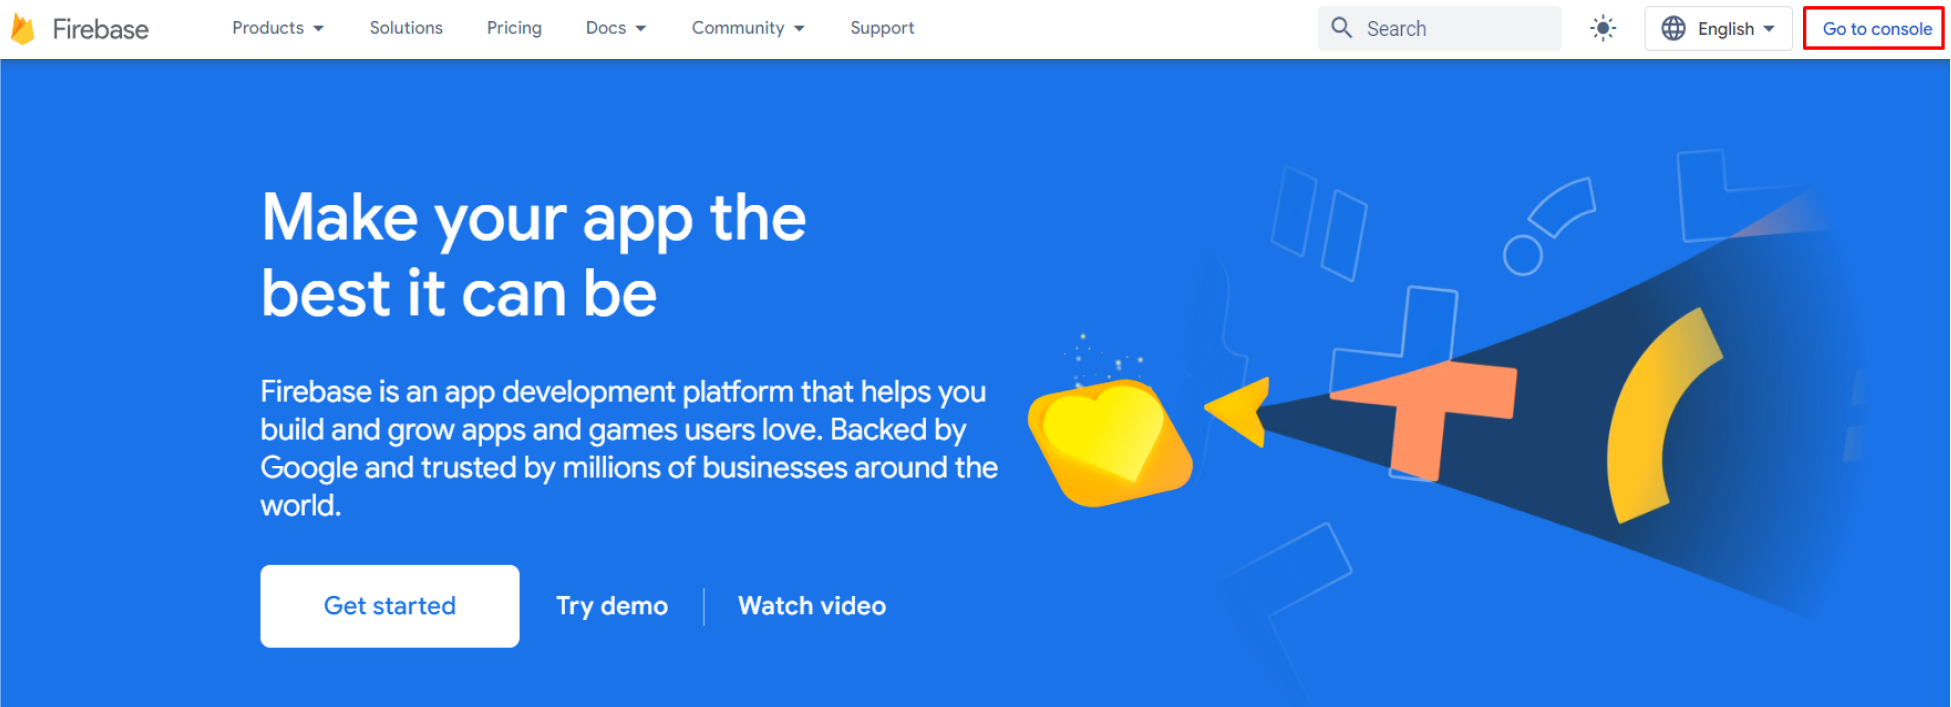
4.2 : Click on “Go to console” in the top right corner.
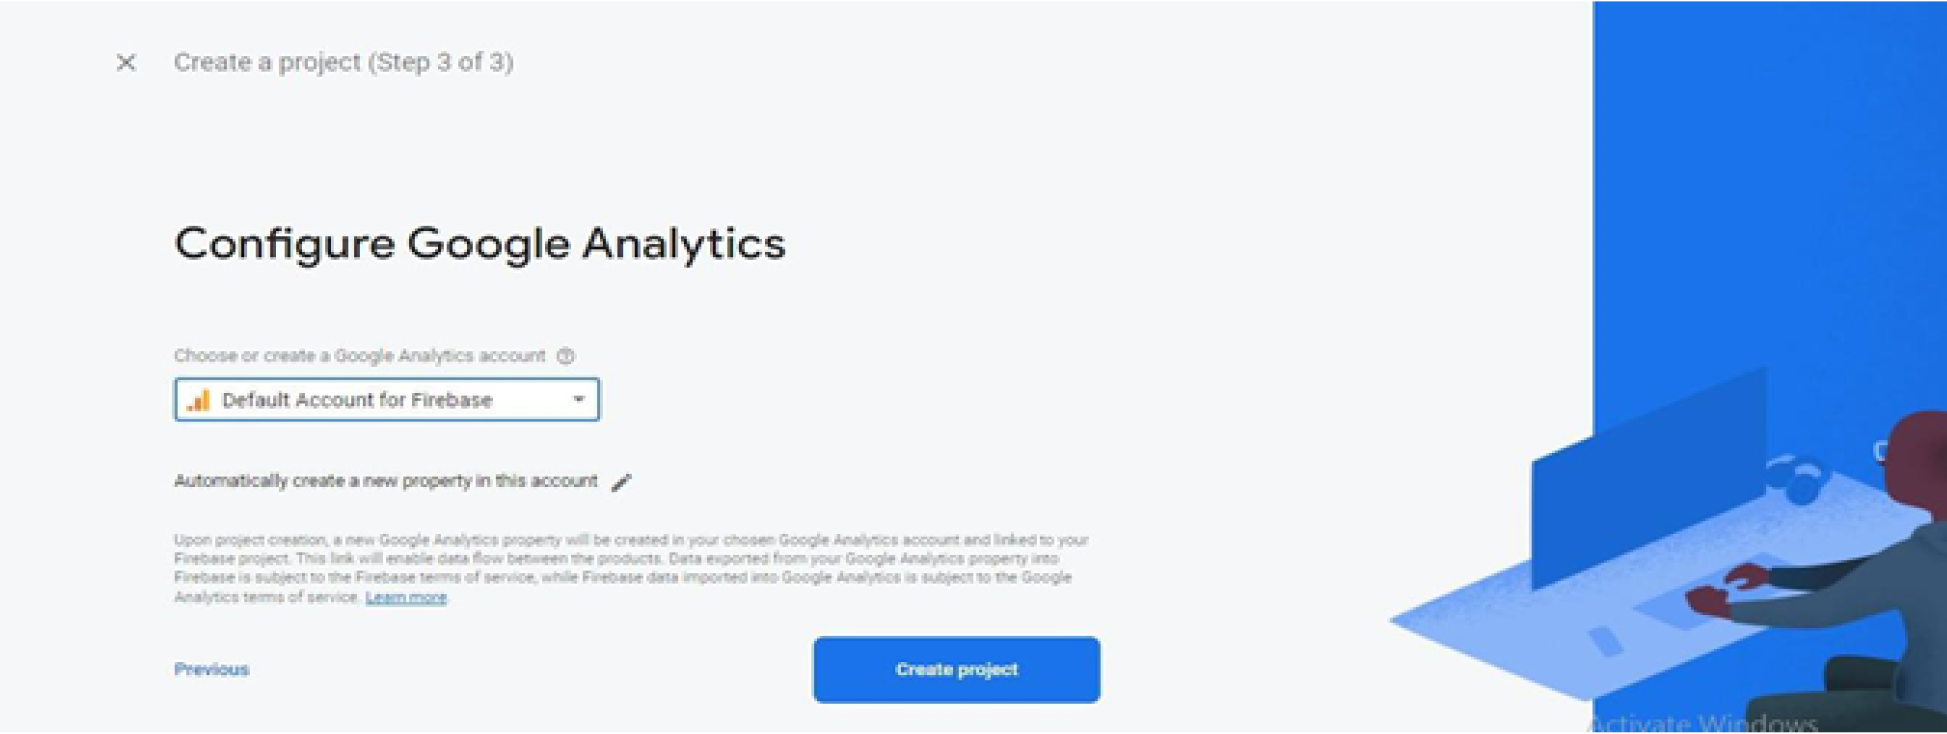
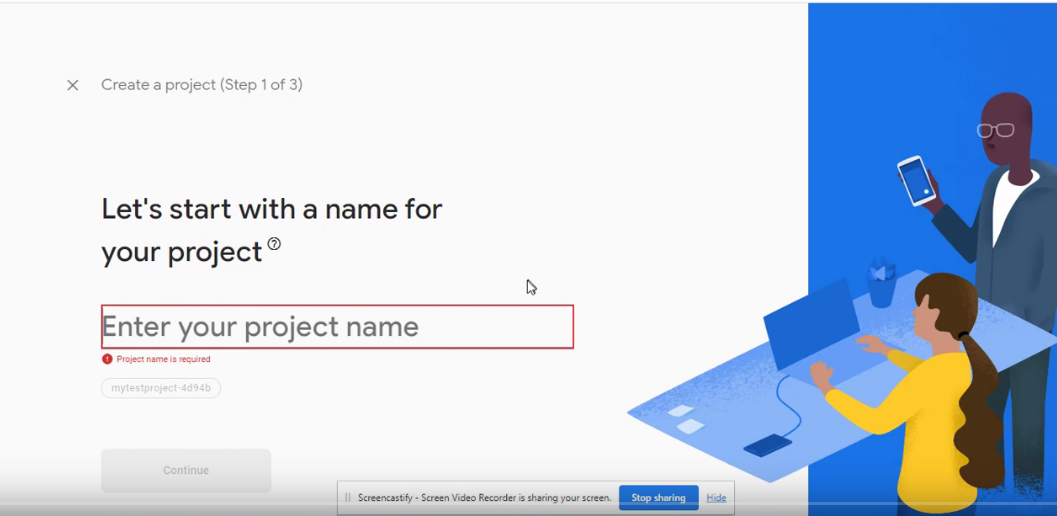
4.3 : Click on “Add project”, it will redirect you to the new project creation page Enter your project name and click on “Continue” again click on “Continue” after that select “Default Account fo firebase” and then click on “Create Project”
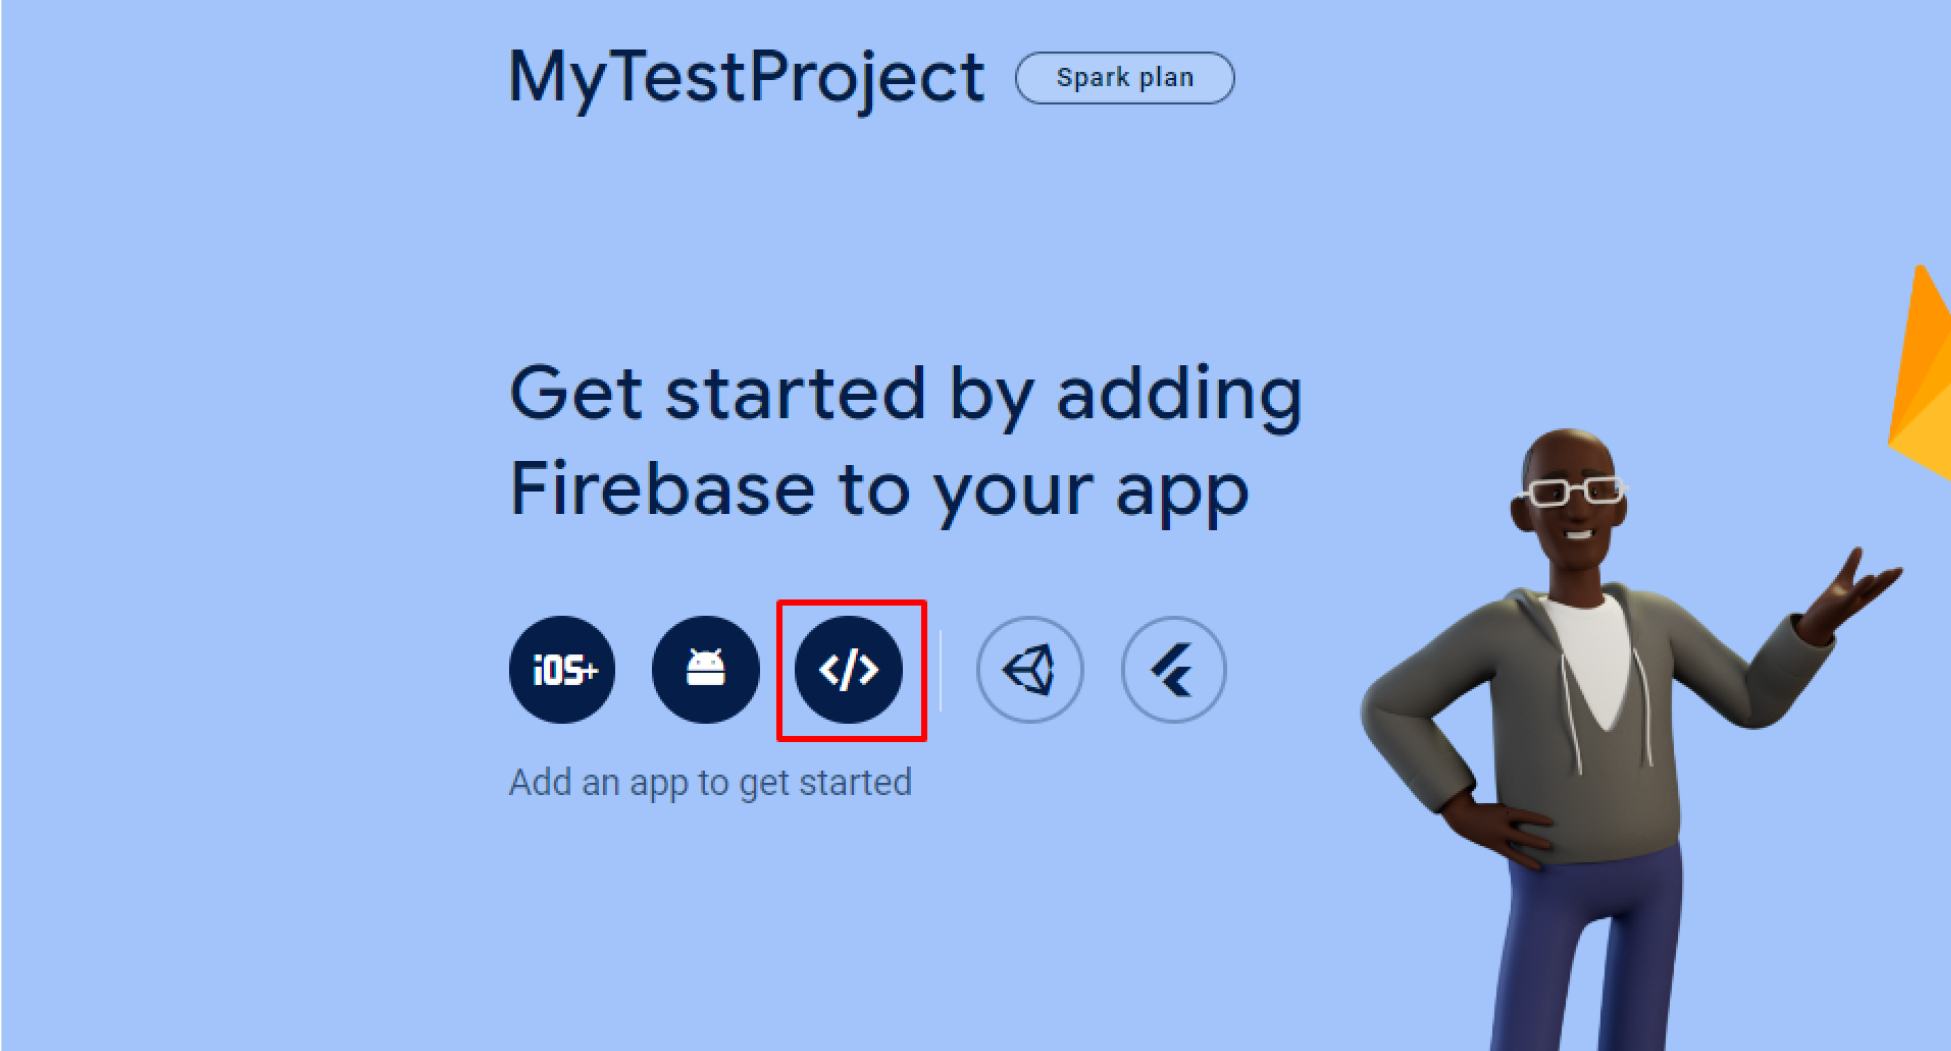
4.4 : After successfully creating a new project, you will be directed to the overview page. From there, simply navigate to the icons link to proceed further.
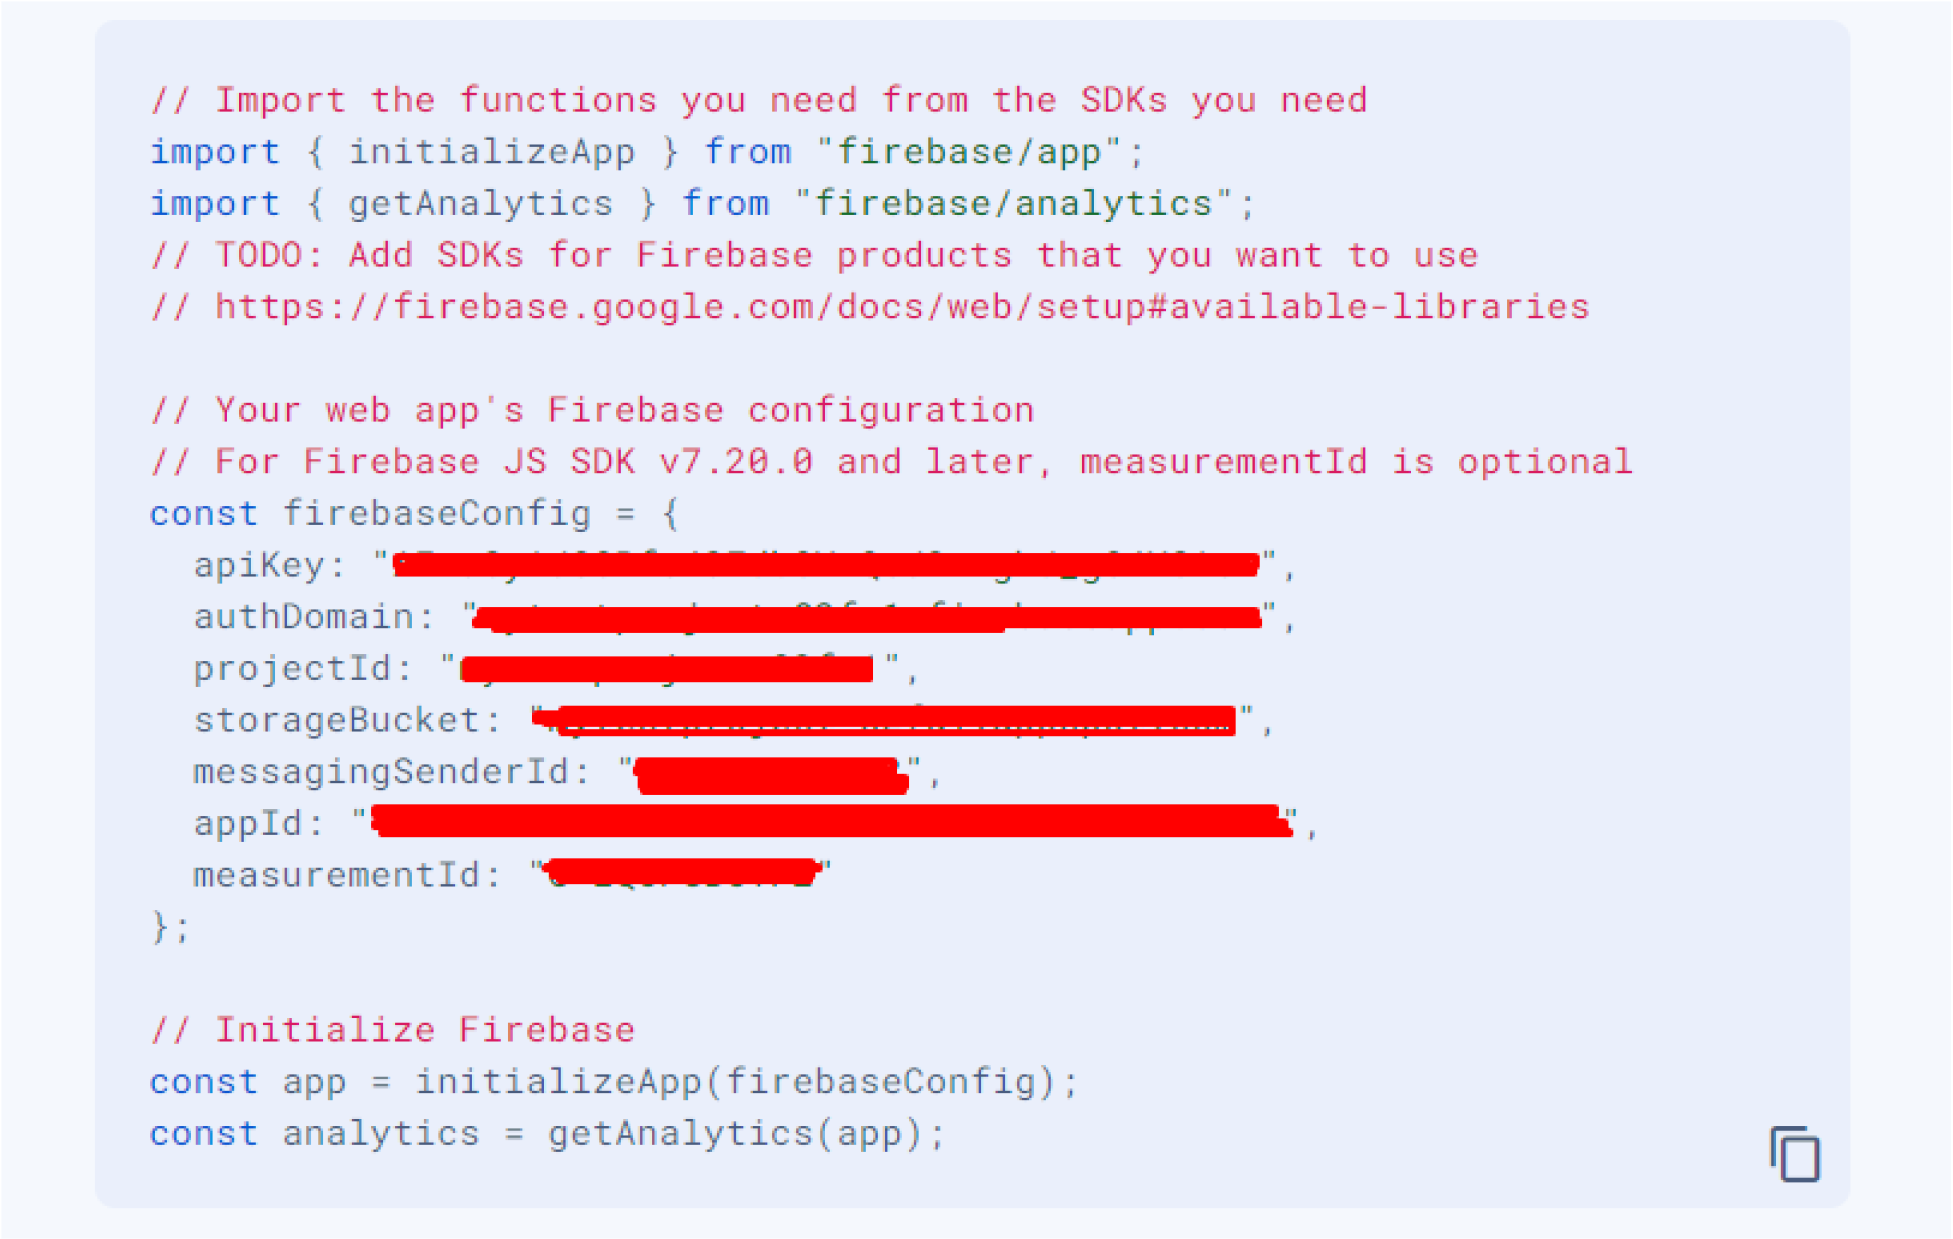
Upon redirection, you’ll land on the ‘Add Firebase to your web app’ page. Here, input your app’s nickname and proceed by clicking ‘Register app’. Afterward, scroll down to find detailed information as outlined below.
All of these details will be incorporated into both the app and admin panel documentation for comprehensive reference and seamless integration.
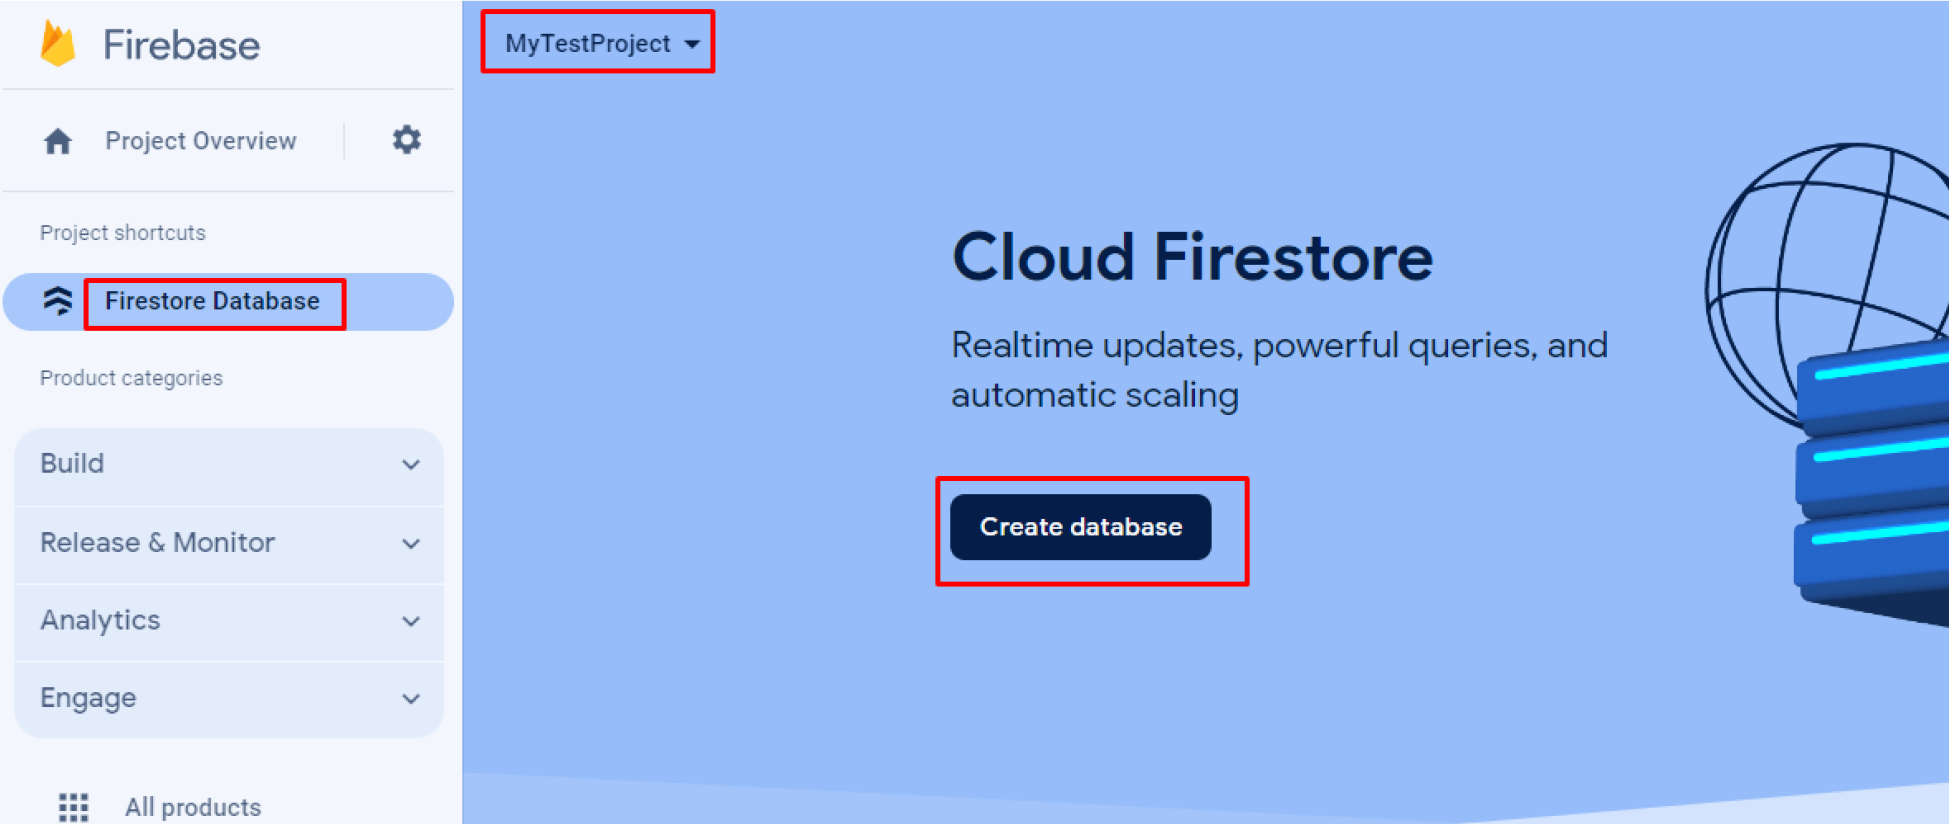
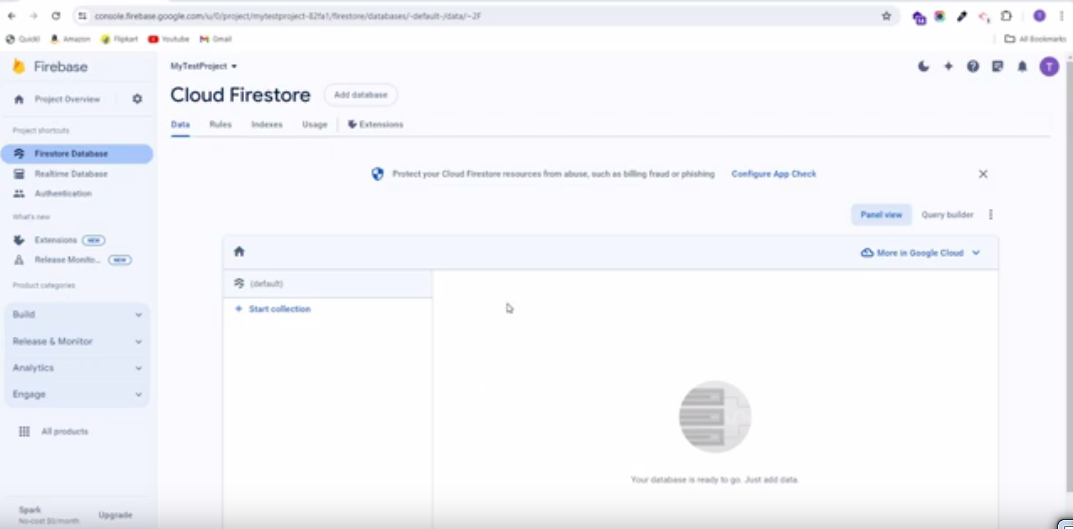
4.5 : Next, navigate to ‘Firestore Database’ in the left sidebar. Select your project name from the drop-down menu, and then proceed by clicking on ‘Create database’.
4.6 : Choose your preferred option and click on the ‘Next’ button. Subsequently, proceed by clicking on “Enable”
4.7 : Following that, locate “Realtime Database” in the left sidebar. Select your project name from the drop-down menu, and proceed by clicking on “Create Database”
4.8 : Choose your preferred option and proceed by clicking the “Next” button, then click on “Enable” to activate the selected feature.
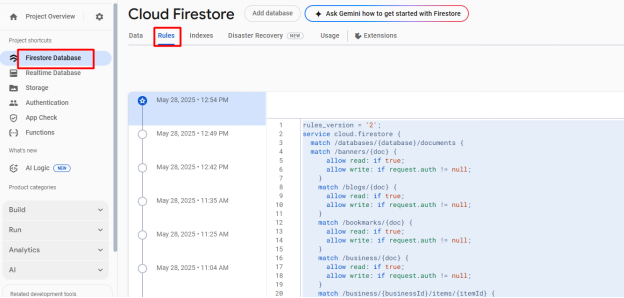
4.9 : Firstore Database Rules Update.
Important Notes:
Please update the following rules in your firestore database.
rules_version = '2';
service cloud.firestore {
  match /databases/{database}/documents {
	match /banners/{doc} {
      allow read: if true;
      allow write: if request.auth != null;
    }
    match /blogs/{doc} {
      allow read: if true;
      allow write: if request.auth != null;
    }
    match /bookmarks/{doc} {
      allow read: if true;
      allow write: if request.auth != null;
    }
    match /business/{doc} {
      allow read: if true;
      allow write: if request.auth != null;
    }
    match /business/{businessId}/items/{itemId} {
      allow read: if true;
      allow write: if request.auth != null;
    }
    match /business_highlight_options/{doc} {
      allow read: if true;
      allow write: if request.auth != null;
    }
    match /categories/{doc} {
      allow read: if true;
      allow write: if request.auth != null;
    }
    match /category_add_to_plan/{doc} {
      allow read: if true;
      allow write: if request.auth != null;
    }
    match /checkIn/{doc} {
      allow read: if true;
      allow write: if request.auth != null;
    }
    match /claimed_business/{doc} {
      allow read: if true;
      allow write: if request.auth != null;
    }
    match /claimed_documents/{doc} {
      allow read: if true;
      allow write: if request.auth != null;
    }
    match /cms_pages/{doc} {
      allow read: if true;
      allow write: if request.auth != null;
    }

    match /complain_and_report/{doc} {
      allow read: if true;
      allow write: if request.auth != null;
    }
    match /compliment/{doc} {
      allow read: if true;
      allow write: if request.auth != null;
    }
    match /documents/{doc} {
      allow read: if true;
      allow write: if request.auth != null;
    }
    match /email_templates/{doc} {
      allow read: if true;
      allow write: if request.auth != null;
    }
    match /languages/{doc} {
      allow read: if true;
      allow write: if request.auth != null;
    }
    match /project_request/{doc} {
      allow read: if true;
      allow write: if request.auth != null;
    }
    match /project_request/{projectId}/chat/{chatId} {
      allow read: if true;
      allow write: if request.auth != null;
    }
    match /recommend_business/{doc} {
      allow read: if true;
      allow write: if request.auth != null;
    }
    match /reviews/{doc} {
      allow read: if true;
      allow write: if request.auth != null;
    }

    match /services/{doc} {
      allow read: if true;
      allow write: if request.auth != null;
    }
    match /settings/{doc} {
      allow read: if true;
      allow write: if request.auth != null;
    }
    match /sponsored_request/{doc} {
      allow read: if true;
      allow write: if request.auth != null;
    }
    match /subscription_ads/{doc} {
      allow read: if true;
      allow write: if request.auth != null;
    }
    match /subscription_ads_history/{doc} {
      allow read: if true;
      allow write: if request.auth != null;
    }
    match /user_chat/{doc} {
      allow read: if true;
      allow write: if request.auth != null;
    }
    match /photos/{doc} {
      allow read, write: if true;
    }
		match /users/{userId} {
      allow read: if true;
      allow write: if request.auth != null;
    }
		match /{document=**} {
      allow read, write: if request.auth != null;
    }
  }
}
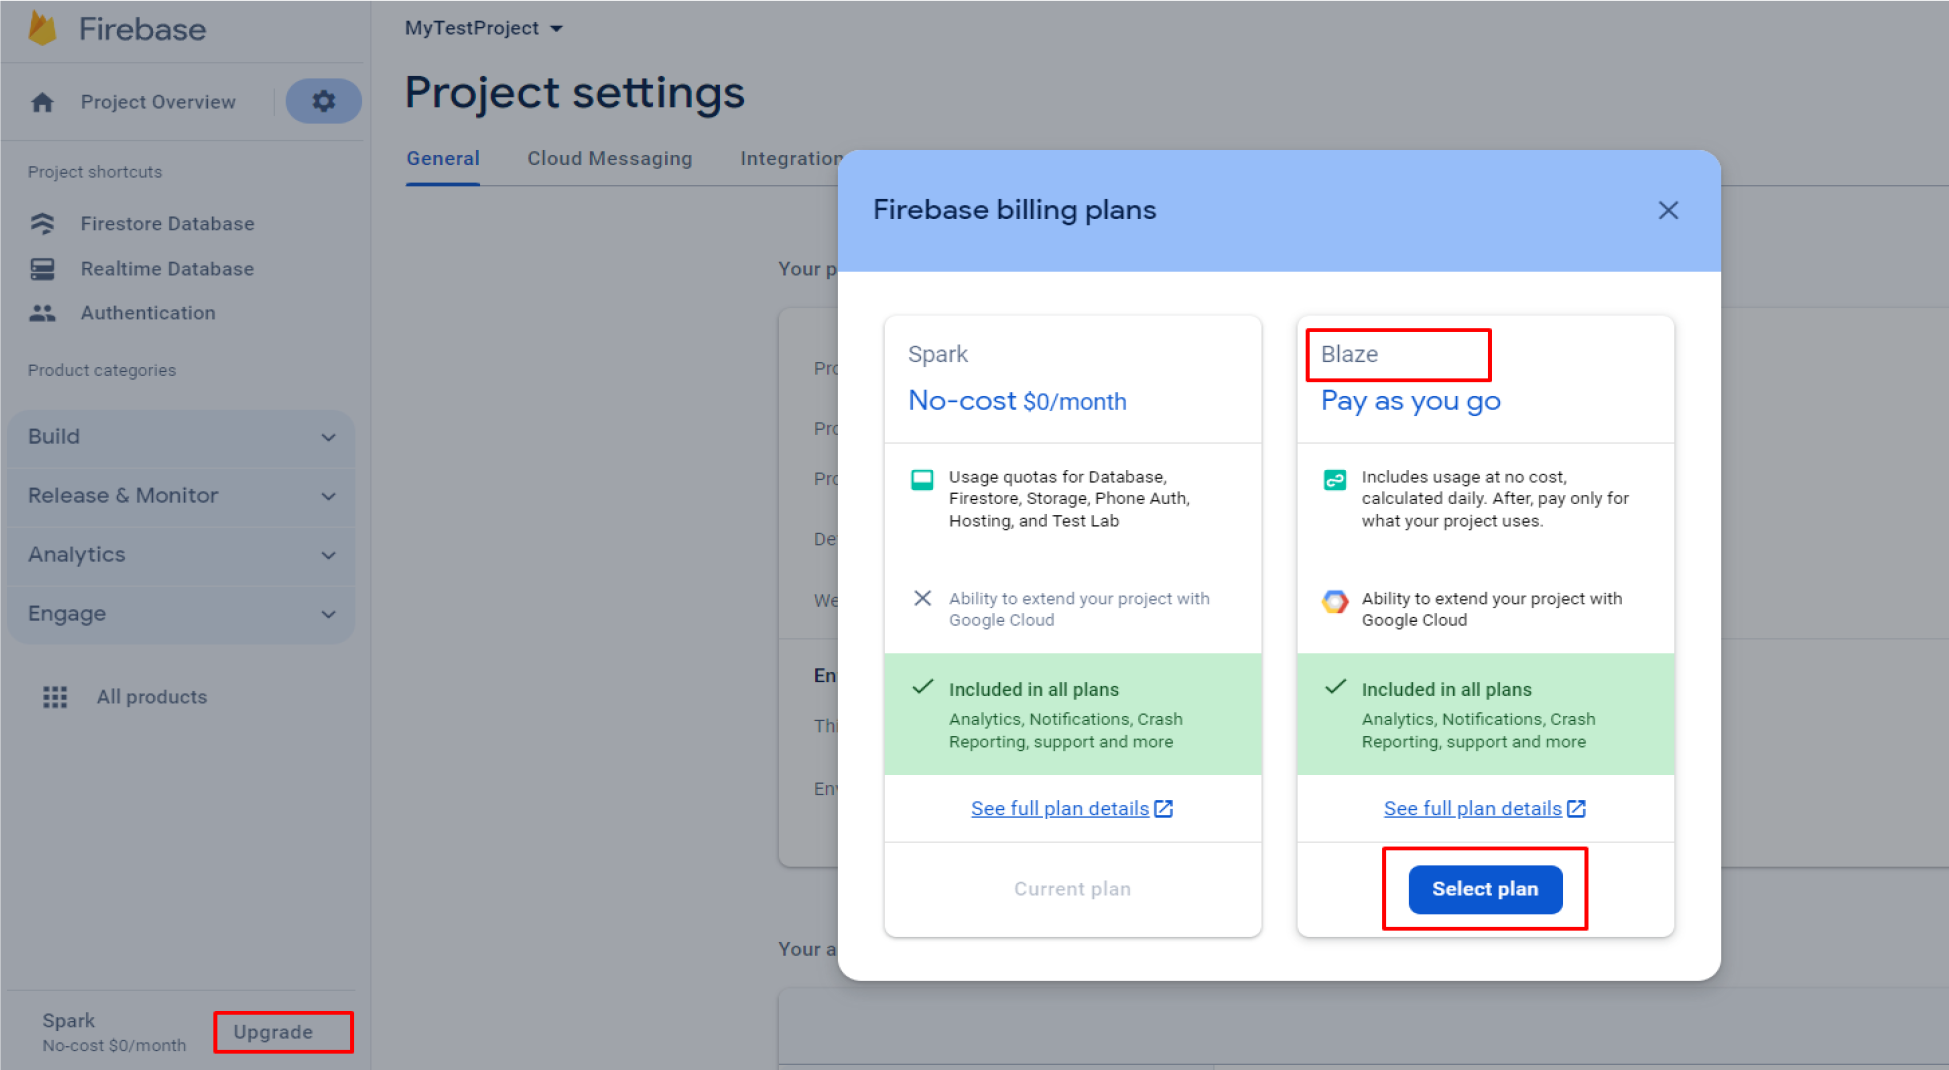
4.10 : Upgrade your firebase plan.
See Video:
Firestore Collection Import Export#
5. Firestore Database Collection Import Export
To perform Firebase Collection Import Export, follow these straightforward steps:
5.1 : To set up NPM on your computer, download Node.js from the following link: https://nodejs.org/en/download/ Node.js Download Page.
5.2 : Unzip the source code file named “Firebase Import Export Collections.zip”
5.3 : If you haven’t already created a Firebase project, set it up now.
5.4 : Configure the credentials.json file, which you can obtain from your Firebase Project settings. Then navigate to the Service account, then select Node.js. Generate a new private key and wait until the key is created. It will automatically download and replace the current credentials.json file.
5.5 : Navigate to the extracted Firebase Import Export Collections zip file path and then press and hold the Ctrl+Shift buttons. While holding them, right-click the mouse button, and select “Open PowerShell window here” from the context menu. This will open a PowerShell window where you can run the import/export command.
5.6 : Execute the following commands to perform import/export operations for collections:
To import all collections, execute the following command:
To export all collections, execute the following command:
Once the export command is executed, the collections.json file will be downloaded.
Important Notes:
Prior to executing the above command, ensure that you have correctly updated your Firebase credentials in the credentials.json file.
See Video:
Deploy Firebase Cloud Functions#
6. Deploy Firebase Cloud Functions
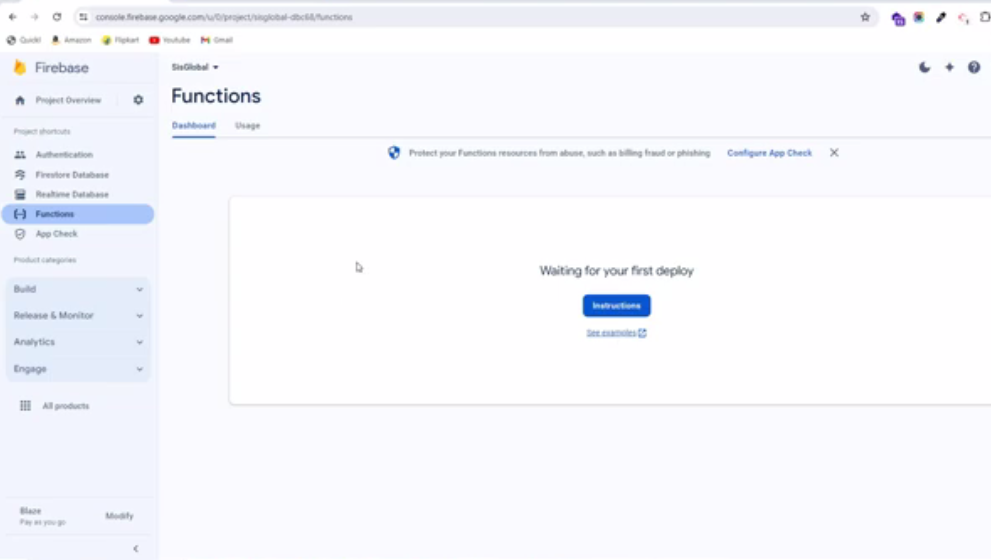
All the necessary Firebase Functions have been initially coded by us, you just need to deploy these functions to your own Firebase account. This means that you need to upload the source code inside the Firebase Functions folder to your account. If a Firebase account has been created, find a Firebase project, and 2 apps (iOS and Android).
6.1 : Setting up Node.js and the Firebase CLI
For comprehensive guidance, refer to the official Firebase documentation on getting started: “Write, test, and deploy your first functions” in Cloud Functions for Firebase.
You’ll need Node.js and the Firebase CLI to write functions and deploy them to Cloud Functions.
To set up NPM on your computer, download Node.js from the following link: Node.js download. Once Node.js is installed, proceed to install the Firebase CLI.
Use the following command to install the CLI via npm:
If you’ve already set up the Firebase tools, you can simply run the following command:
These steps will ensure you’re ready to start writing and deploying functions with Firebase. If you encounter any issues, consult the Firebase documentation for troubleshooting assistance.
6.2 : Initialize your project
To initialize the project, authenticate the Firebase tool by running the following command. You’ll be prompted to log in to your account via your web browser:
6.3 : Implementing Cloud Functions
Since we’re providing the complete source code for your Firebase Cloud Functions:
Extract the zip file Order Tracking Firebase Function folder.zip.
Fill in the necessary credentials in the following files located within the zip:
1. .firebaserc (Add your Firestore Project ID)
2. index.js (Add your Firestore database URL)
3. serviceAccountKey.json (Add your Firebase service account credentials)
With these steps, you’ve successfully set up the required credentials.
6.4 : Deploy Firebase Functions
Simply run the following command in the Order Tracking Firebase Function > functions directory.
Now you can go to your Firebase Console and check, as the functions have been deployed. It is possible to see the logs for each function, understand the output, and know when it gets called.
See Video:
Firestore Database Indexing#
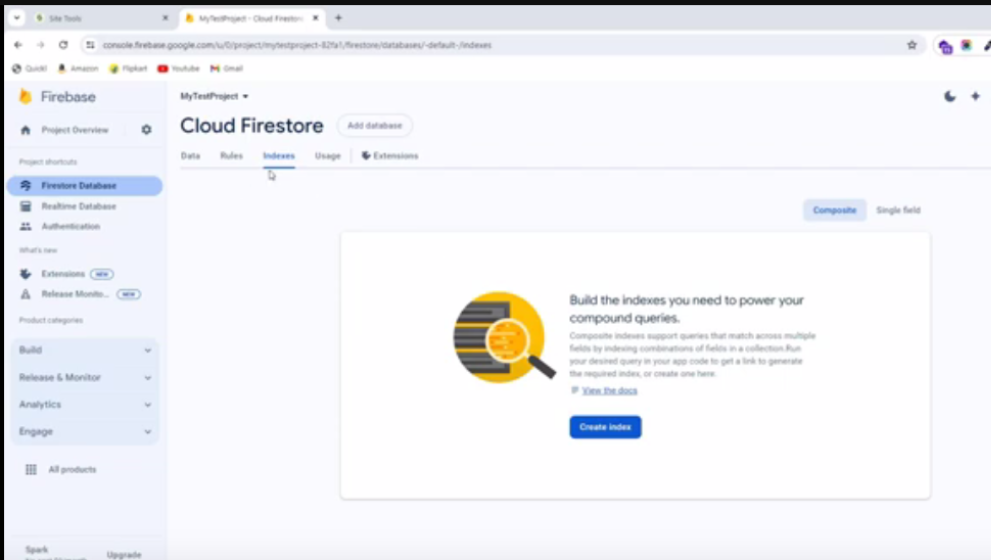
7. Firestore Database Indexing
To perform Firebase indexing, follow these straightforward steps:
7.2 : Unzip the source code file named “Firebase Indexing.zip” here.
7.3 : Navigate to the extracted directory of “Firebase Indexing” zip file. Press and hold the ctrl+shift buttons, then right-click the mouse button. From the context menu, select “Open PowerShell window here” to launch Windows PowerShell and execute import/export commands.
7.4 : Execute the command firebase login to log in to Firebase, if you haven’t already done so.
7.5 : Execute the command firebase init
7.6 : Proceed with Y and press the enter button.
7.7 : Choose the Option > Firestore: Configure security rules and index files for Firestore.
Important Notes:
Please Note: Choose the arrow down key to navigate and select options, and press the space button to confirm your selection.
7.8 : Choose the Option > Use an existing project
7.9 : Choose your project
7.10 : Press Enter > ? What file should be used for Firestore Rules? firestore.rules
7.11 : Press Enter > ? What file should be used for Firestore indexes? (firestore.indexes.json)
7.12 : Now, the firestore.indexes.json file will be downloaded. Open this file and copy all the code from firestore_indexes.json file, then paste it into firestore.indexes.json file.
7.13 : Now execute the command firebase deploy --only firestore:indexes to import indexing in firestore.
See Video:
Admin Panel#
8. Admin Panel Setup
Ensure that your server meets the requirements outlined in the documentation’s Server Requirement section. Upon downloading the code, upload the admin zip file to your server and extract it. The admin panel can be installed on either a domain or a subdomain.
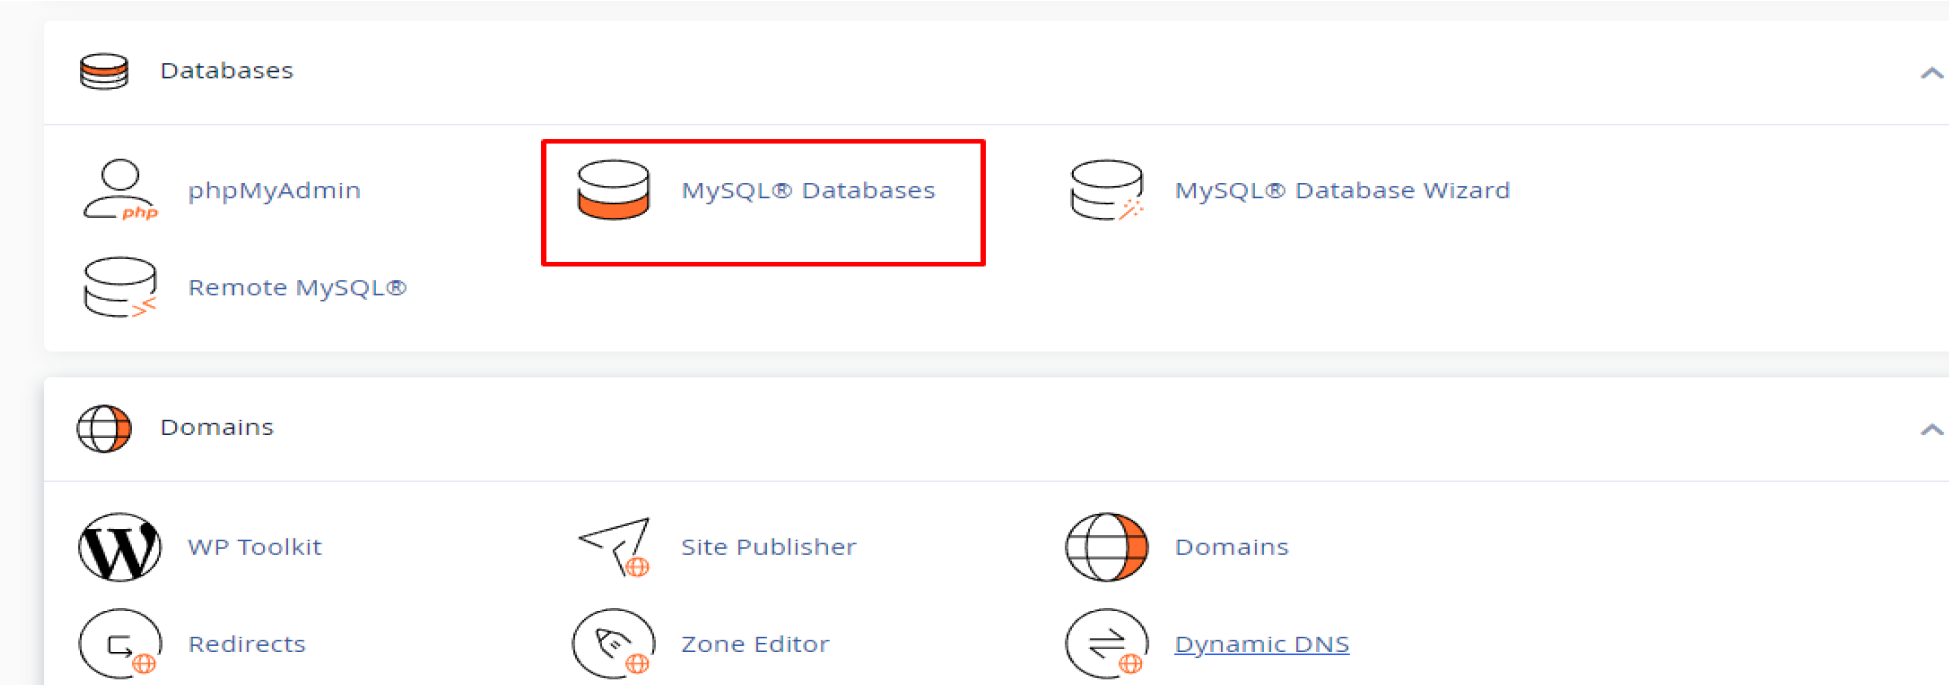
8.1 Create Database
8.1.1 : Create a new database from your server’s MYSQL database.
8.1.2 : Create New Database
8.1.3 : Create a new database user
8.1.4 : Connect the database to the newly created database user.
8.1.5 : Grant all privileges to your user by selecting “All PRIVILEGES” and then clicking on “Make Changes”
8.2 Configure Admin Panel
8.2.1 : Once you’ve downloaded the code, upload the admin zip file to your server and extract it. The admin panel can be installed on either a domain or subdomain.
9.3. Run the following command one by one.
composer install
php artisan key: generate
php php artisan migrate: fresh --see
npm install
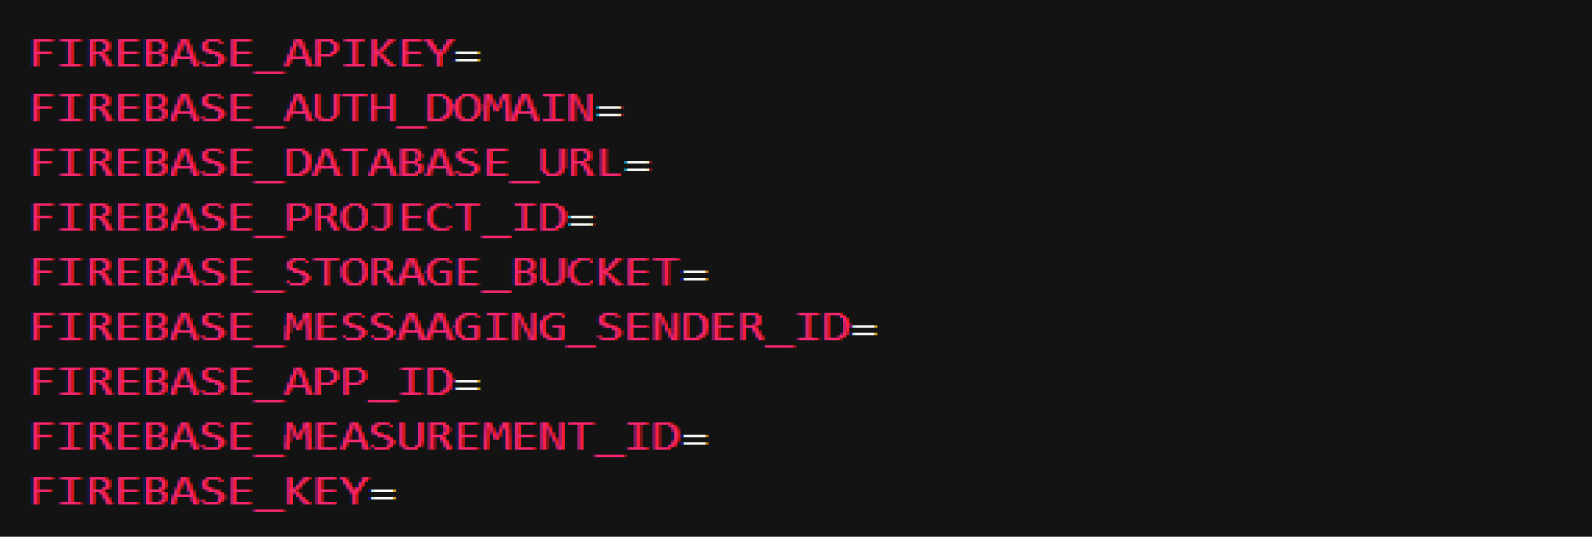
8.2.3. Next, you’ll need to configure the following settings in your .env file: Database host, Database name, Database username, Database password, and your Firebase project credentials.
To obtain Firebase credentials, navigate to Project Settings > General > Web apps, then select your web app.
Important Notes:
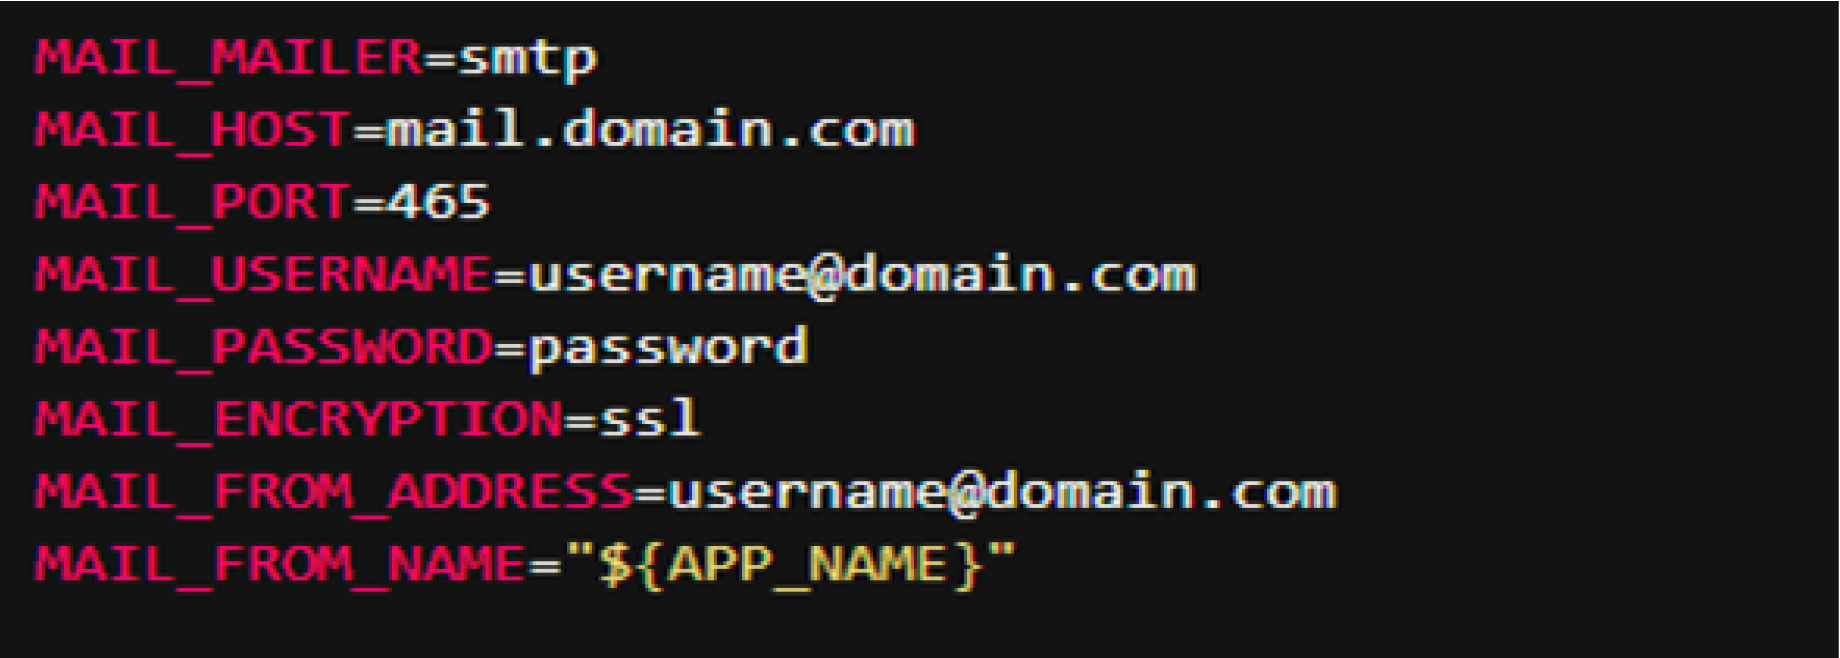
Please ensure to update your mail SMTP credentials in the .env file of your admin panel. Failure to do so will result in the mail functionality not working. Refer to the following snapshot for guidance.
8.2.4. Important: Run the “npm install” command (if not already run) from the root directory of your admin panel terminal to install Firebase dependency modules required for scheduler functions.
Setup Node Js Path
Please update the NODE_PATH variable value in the .env file of your admin panel directory.
Please update the APP_TIMEZONE variable value based on your timezone in the .env file of your admin panel directory.
To get the Node path from the terminal, you typically want to determine the location of Node.js or a specific file related to Node. Here are common ways to do this from the terminal:
To find out where Node.js is installed on your system, you can use the which command (on Linux/macOS):
which node
This will return the full path to the Node.js binary. For example:
/usr/local/bin/node
See this example: In our case, the Node.js path is something like the one below.
Copy this path and update it in your NODE_PATH variable.
8.2.5. Please Note: To work firebase push notification feature functions correctly, please upload your Firebase credentials file in the Admin Panel by navigating to Settings > Global Settings > Notifications Settings.
Admin Panel Menus#
9. Admin Panel Menus Overview
9.1. Dashboard
Overview of business analytics — listings, users, reviews, promotions etc.
9.2. Access
Admin Roles Create/manage admin permission groups (e.g., Editor, Super Admin).
Admin Users Add/manage backend admin accounts.
Customer Users List and manage end-users registered via mobile/web
9.3. Businesses Listings
All Listings View and manage all registered businesses.
Claimed Listings Businesses claimed by owners — pending approval or verified.
Claiming Documents Required documents for ownership proof for business claim.
Business Collections User and admin created business collections (e.g., bookmarks).
Project Requests Customer service requests submitted to businesses.
9.4. Business Setup
Main Categories Industry/category management (e.g., Restaurants, Plumbers).
Category Services Service-level details linked to each main category.
9.5. Business Promotions
Highlight Options Configure promotion types (e.g., Featured, Top Rated).
Sponsored Requests Requests for sponsored business placements (paid).
9.6. Customer Feedback
Complaints Complaints submitted by customers against listings.
Report Types Admin-defined reasons for reporting content/users.
Support History View past support interactions (chat).
9.7. Ads & Subscription Plans
Plans Create/manage subscription plans for businesses.
Plan Purchase History View plan purchase history.
9.8. Blog & Articles
Manage blog content pages for SEO and content marketing.
9.9. CMS Pages
Custom pages (About Us, FAQ, etc.) editable by admin.
9.10. Banners Items
Manage promotional banners for the homepage.
9.11. Email Templates
Configure dynamic email content for system notifications.
9.12. General Settings
Global Settings System-wide settings like app name, contact info.
Footer Template Customize footer sections, links, and social icons.
Website User Panel#
10. Website Panel Setup
10.1. Once you’ve downloaded the code, upload the web panel zip file to your server and extract it. You can install the web panel on your main domain.
10.2. Now you’ll need to configure the .env file with your Database host, Database name, Database username, Database password, and your Firebase project credentials.
10.3. Run the following command one by one.
composer install
php artisan key: generate
php artisan migrate:fresh --seed
10.4. Now the website panel is ready to run.
Setup CRON#
11. Setup CRON JOB
A cron job is a scheduled task in Unix-based operating systems that runs scripts or commands at specified intervals. Here’s how to set up a cron job on a server:
Steps to Set Up a Cron Job:
11.1. Log in to cPanel or in your web server 11.2. Navigate to the “Cron Jobs” Section 11.3. Add a New Cron Job
In the command field, enter the command or the path to the script you want to run.
Ensure the script you’re running has the correct permissions and is executable. You need to specify the correct PHP path (/usr/local/bin/php is common but may vary depending on your server setup) and please use your admin panel path in the CRON JOB command.
13. Admin, Business, User & Service Provider Panel Updates
To update the Admin Panel, Business Owner Panel and User Panel, upload the latest source code package to the root directory of each respective panel and extract the contents.
If your project includes custom modifications, we strongly recommend performing the update using Git. This approach helps preserve your customizations while safely integrating the latest changes from the new release.
13.1 Updating via Git (Recommended)
Commit and push your existing changes to a dedicated Git branch.
Download the latest source code package from CodeCanyon.
Create a new branch using the latest release source code.
Merge the latest branch into your existing project branch.
Resolve any merge conflicts resulting from custom modifications.
Thoroughly test the Admin Panel, Business Owner Panel and User Panel to ensure they function as expected before deploying the update to the production environment.
13.2 Replacing the Source Code
If you have not modified the source code, you can update the web panels by following these steps:
Download the latest source code package from CodeCanyon.
Replace the existing web panel files with the files from the latest release.
Run composer install and php artisan migrate on each panel to apply any new dependencies and database changes.
Verify that the Admin Panel, Business Owner Panel and User Panel are functioning correctly after the update.
Mobile Application Update#
14. Mobile Application Update
To update the User App and Business Owner App, replace the existing source code with the latest release and rebuild the applications.
If you have customized the application source code, we strongly recommend using Git to safely merge your custom changes with the latest release.
14.1 Updating via Git (Recommended)
Commit and push your existing application source code to a dedicated Git branch.
Download the latest source code package from CodeCanyon.
Create a new branch using the latest release source code.
Merge the latest branch into your existing project branch.
Resolve any merge conflicts resulting from custom modifications.
Run flutter pub get to install the latest dependencies.
Thoroughly test the User App and Business Owner App to ensure all functionalities are working as expected.
Generate new build files (APK, AAB, or IPA) and deploy the updated applications.
14.2 Replacing the Source Code
If you have not modified the application source code, follow these steps:
Download the latest source code package from CodeCanyon.
Replace the existing application source code with the files from the latest release.
Run flutter pub get to install or update the required dependencies.
Verify the application configuration files and ensure all required credentials (Firebase, Google Maps, etc.) are correctly configured.
Test the User App and Business Owner App thoroughly.
Generate new build files (APK, AAB, or IPA) and publish the updated applications to the respective app stores.
Changelog#
Version 1.5 — Jun 30, 2026
Support for Flutter version 3.41.6 added.
Modern UI implemented following the latest design trends.
Project Dependencies upgraded to the latest stable versions for improved performance, compatibility, and security.
No changes were made to the web panels
Version 1.4 — Mar 16, 2026
Dynamic Localisation implemented for improved multi-language support (Deepl & AI/ML).
Shimmer Loading Effect added to enhance the UI loading experience.
Various Bug Fixes and Performance Improvements implemented.
Support for the latest Flutter version (3.41.4) added.
Version 1.3 — Jan 12, 2026
Created a separate Business Owner application and Business Web Panel.
Updated CSV bulk import to automatically assign all business listings to the Admin user as created_by and removed the user email field from the CSV format.
Integrated AI-powered business creation, including automatic AI-generated reviews for newly added businesses.
Implemented auto-suggestions for businesses during search, displaying nearby results based on the user’s current or selected location.
Added voice-to-text search functionality in the mobile application.
Updated the home page category flow to display only main (parent) categories when accessing the More button and category list page.
Implemented dynamic country code selection across the application.
Enabled guest access for browsing businesses without login.
Fixed field mismatch issues when adding a new business.
Fixed image stretching issue on Web Panel business listing page.
Resolved Google login claim issue via WebView.
Enabled application maintenance mode.
Numerous improvements on the app, web and admin panel.
Fixed other known issues.
Made the Flutter apps compatible with Flutter v3.38.5.
Version 1.2 — Aug 07, 2025
Bug fixes & performance improved.
Display Email braces/Tags in the Email Template manager.
No updates or changes were made to the mobile apps.
Version 1.1 — Jul 18, 2025
Slug and meta keyword options added for both admin and customers to improve SEO visibility.
Made the Flutter apps compatible with Flutter v3.32.7.