Please follow the steps mentioned on the left side bar for easy setup
Introduction
eBasket is a one-stop solution for single-vendor delivery systems developed using Flutter, Firebase, and Laravel Framework with an expressive and elegant syntax. This product has two apps which are Customer and Driver apps. This documentation will be helpful in setting up the eBasket applications.
Setting up Flutter#
2. Setup Setting up Flutter involves several steps. Here’s a basic guide to get you started:
2.1. System Requirements:
Ensure your system meets the minimum requirements for Flutter development. Flutter supports development on Windows, macOS, and Linux. Make sure your system has the necessary hardware and software requirements as specified by Flutter documentation.
Extract the downloaded file to a location on your system. For example, on macOS or Linux, you can extract it to /usr/local and on Windows to C:\.
Add the Flutter bin directory to your system PATH to run Flutter commands from the command line. This step is important for executing Flutter commands globally in your system.
2.3. Install Development Tools:
For Android: Install Android Studio and configure the Flutter plugin. Android Studio provides the Android SDK, which Flutter uses to develop for Android. Ensure you have the Android SDK and the necessary tools installed through Android Studio.
For iOS: You need a macOS system with Xcode installed to develop and deploy Flutter apps for iOS.
2.4. Set up Android Emulator or iOS Simulator:
For Android development, set up an Android Virtual Device (AVD) using Android Studio’s AVD Manager.
For iOS development, use the iOS Simulator provided by Xcode.
Run flutter doctor:
Open a terminal and run flutter doctor. This command checks your system for any dependencies needed for Flutter development.
It will provide feedback on any missing or outdated components and instructions on how to resolve them.
2.5. Install Flutter and Dart plugins for your preferred IDE:
If you’re using VS Code, install the Flutter and Dart plugins to enhance your development experience.
Android Studio also has built-in support for Flutter, but make sure to install the Flutter plugin if it’s not already installed.
2.6. Create your first Flutter project:
Use the flutter create command to create a new Flutter project.
Navigate to the project directory and explore the file structure. You’ll find the main Dart file (main.dart) in the lib directory, where you’ll write your Flutter code.
2.7. Run your Flutter app:
Connect a device or start an emulator/simulator.
Navigate to your Flutter project directory in the terminal and run flutter run.
This will compile your Flutter app and launch it on the connected device or emulator.
2.8. Start Developing:
Once your app is running, you can start developing your Flutter UI and logic. Flutter’s hot reload feature allows you to see your changes instantly without restarting the app.
2.9. Learn and Explore:
Flutter has an extensive set of widgets and libraries. Explore the official Flutter documentation and community resources to learn more about Flutter development.
Changing the Package Name#
3. Changing the package name (also known as the bundle identifier or application ID) in a Flutter project involves a few steps. Here’s how you can do it:
3.1. Change the Android package name:
Navigate to the android directory within your Flutter project.
Open the AndroidManifest.xml file located in the app/src/main directory.
Find the package attribute in the <manifest> tag and change its value to your desired package name.
3.2. Change the iOS bundle identifier:
Navigate to the ios directory within your Flutter project.
Open the Runner.xcodeproj project file using Xcode.
In Xcode, select the Runner project from the project navigator.
Go to the Runner target’s settings.
Under the General tab, find the Bundle Identifier field and change it to your desired bundle identifier.
3.3. Update Flutter project configuration:
Open the pubspec.yaml file located in the root directory of your Flutter project.
Update the name field with your new package name.
Update the android: package field under flutter: with your new package name.
3.4. Update Android source code references:
Open the MainActivity.java file located in android/app/src/main/java/com/your_old_package_name.
Replace occurrences of the old package name with the new package name.
3.5. Update iOS source code references:
Open the AppDelegate.swift file located in ios/Runner.
Replace occurrences of the old bundle identifier with the new bundle identifier.
3.6. Clean and rebuild the project:
After making the necessary changes, clean and rebuild the project.
In Android Studio, you can clean the project by selecting Build > Clean Project.
In Xcode, you can clean the project by selecting Product > Clean Build Folder.
3.7. Test your changes:
Run your Flutter app on both Android and iOS devices/emulators to ensure that the changes have been applied successfully.
Verify that the app runs without any issues and that the new package name/bundle identifier is reflected correctly.
Change the launcher icon#
4. To change the launcher icon (app icon) in a Flutter project, you can follow these steps:
4.1. Prepare Your New Icons:
First, prepare the new launcher icon images in the required sizes. Android and iOS have different size requirements. You typically need icons in various sizes to support different screen densities.
Android:
For Android, you need to replace the existing launcher icon files with your new ones. The launcher icons for Android are stored in the mipmap folders inside the android/app/src/main/res directory.
Replace the existing icon files (ic_launcher.png) in the mipmap folders with your new icon files. Make sure to maintain the same file names and sizes.
You may need to replace icons in various drawable folders for different screen densities (e.g., mipmap-hdpi, mipmap-mdpi, mipmap-xhdpi, mipmap-xxhdpi, mipmap-xxxhdpi).
iOS:
For iOS, you need to replace the existing icon files with your new ones. The icons for iOS are stored in the Assets.xcassets directory in the ios/Runner directory.
Open your Flutter project in Xcode by navigating to the ios directory and opening the .xcworkspace file with Xcode.
In Xcode, navigate to Runner > Assets.xcassets.
Replace the existing AppIcon with your new icon files. You’ll typically find different sizes labelled for various devices (e.g., iPhone, iPad).
4.2. Flutter Launcher Icon Package (Optional):
Alternatively, you can use the flutter_launcher_icons package to automate the process of updating launcher icons. This package allows you to define a single source image and generate the required icons for both Android and iOS.
Install the flutter_launcher_icons package by adding it to your pubspec.yaml file:
dev_dependencies:
flutter_launcher_icons:"^0.9.2"
Run the following command in your terminal to generate launcher icons based on your configuration:
flutter pub get
flutter pub run flutter_launcher_icons:main
Follow the prompts to configure the package according to your project’s requirements.
4.3. Test Your Changes:
After replacing the icon files or running the flutter_launcher_icons package, rebuild your Flutter project and run it on both Android and iOS devices/emulators to ensure that the new launcher icon is displayed correctly.
Change the Google Maps API key#
5. To change the Google Maps API key in a Flutter app for both Android and iOS, you need to update the respective configuration files in each platform. Here are the steps:
5.1. For Android:
5.1.1. Navigate to your Flutter project’s android/app/src/main/AndroidManifest.xml file.
5.1.2. Inside the element, locate the tag with the name com.google.android.geo.API_KEY.
5.1.3. Replace the android:value attribute with your new Google Maps API key.
5.2.1. Open your Flutter project in a text editor or IDE.
5.2.2. Navigate to the ios/Runner directory within your Flutter project.
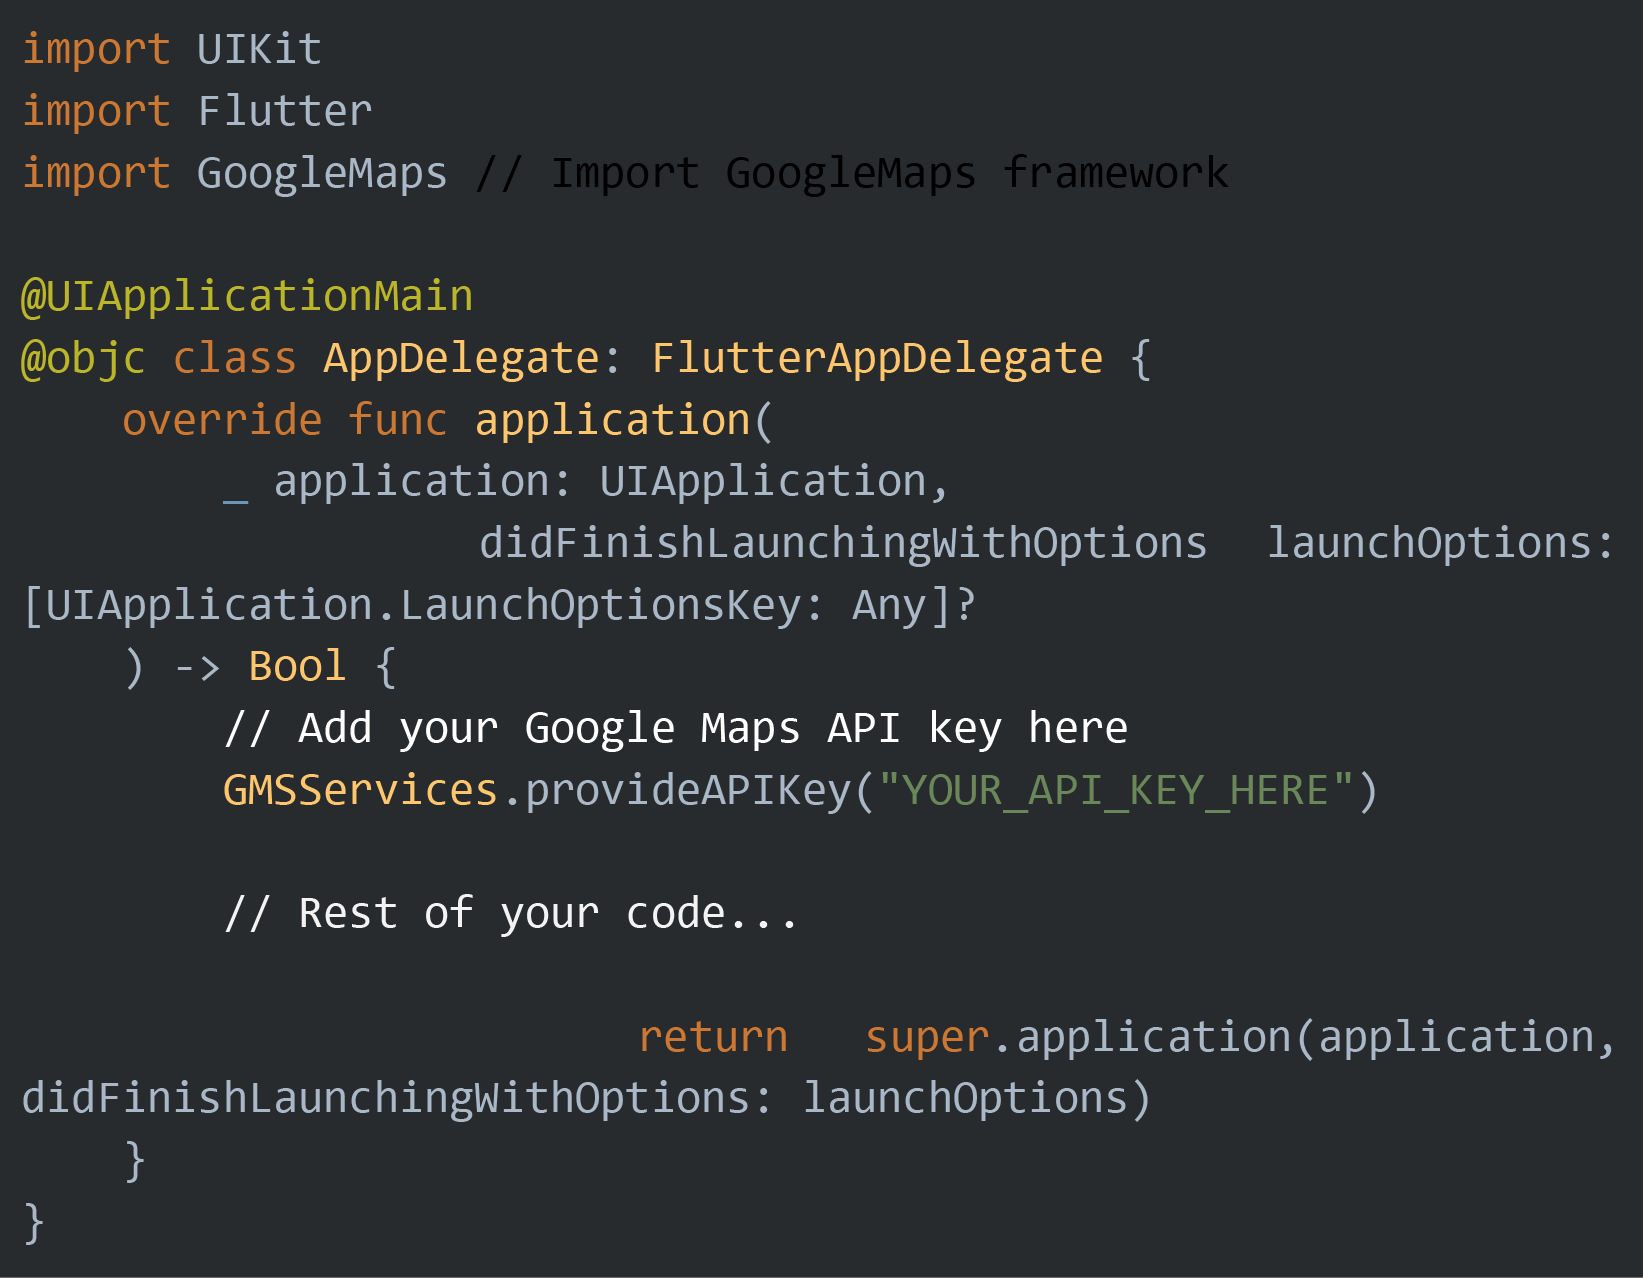
5.2.3. Locate the AppDelegate.swift file.
5.2.4. In the didFinishLaunchingWithOptions method, set the Google Maps API key.
Replace “YOUR_API_KEY_HERE” with your actual Google Maps API key.
After updating the API key in the AppDelegate.swift file, rebuild your Flutter app for iOS to apply the changes.
By following these steps, your Flutter app will use the new Google Maps API key specifically for iOS. Make sure you’ve also updated the API key in the Android configuration as described earlier if you want to apply changes to both platforms.
Change the App Name#
6. To change the app name in a Flutter project for Android, iOS, and web platforms, you’ll need to adjust settings in each platform’s configuration. Here’s how you can do it:
6.1. For Android:
6.1.1. Open the android/app/src/main/AndroidManifest.xml file.
6.1.2. Locate the <application> tag.
6.1.3. Change the value of the android:label attribute to your desired app name.
6.2. For iOS:
6.2.1. Open the ios/Runner/Info.plist file.
6.2.2. Locate the <key>CFBundleDisplayName</key> entry.
6.2.3. Change the value associated with <string> to your desired app name.
6.3. For Web:
6.3.1. Open the web/index.html file.
6.3.2. Locate the <key>title</key> tag.
6.3.3. Change the text within the <title> tag to your desired app name.
6.4. Additionally:
In your Flutter project directory, open the pubspec.yaml file and ensure that the name field is set to the desired app name. This is the name that appears in the app store listings, on the device’s home screen, etc.
After making these changes, rebuild your app for each platform to apply the new app name.
6.5. Example:
Let’s say you want to change the app name to “My New App”:
6.5.1. Android:
<application
android:label="My New App" ...>
6.5.2. iOS:
<key>CFBundleDisplayName</key>
<string>My New App</string>
6.5.3. Web:
<title>My New App</title>
6.5.4. Pubspec.yaml:
name: my_new_app
Set up a Firebase with an Application#
7. Two Ways to set up a firebase with an application(Using Firebase CLI (5.1) OR Manually(5.2)).
7.1. Setting up Firebase for a Flutter project using the Firebase CLI involves several steps. Below is a detailed guide on how to do it:
7.1.1. Install Firebase CLI:
First, you need to install the Firebase CLI if you haven’t already. You can install it via npm (Node Package Manager) by running the following command in your terminal or command prompt:
7.1.2. Login to Firebase:
After installing the Firebase CLI, log in to your Firebase account by running the following command:
This will open a browser window prompting you to log in to your Google account associated with Firebase.
7.1.3. Create a Firebase Project:
If you haven’t already created a Firebase project, you can create one using the Firebase CLI by running:
Follow the prompts to create a new project.
7.1.4. Initialize Firebase in Your Flutter Project:
Navigate to your Flutter project directory in the terminal.
Initialize Firebase in your project by running:
This command will prompt you to select the Firebase features you want to set up. Choose the Firebase services you intend to use, such as Authentication, Firestore, etc.
7.1.5. Configure Firebase:
During the initialization process (firebase init), you’ll be asked to select the Firebase project you created or configured earlier.
Choose the appropriate project from the list.
7.1.6. Install Required Dependencies:
After selecting the Firebase features, Firebase CLI will generate the necessary configuration files for your project.
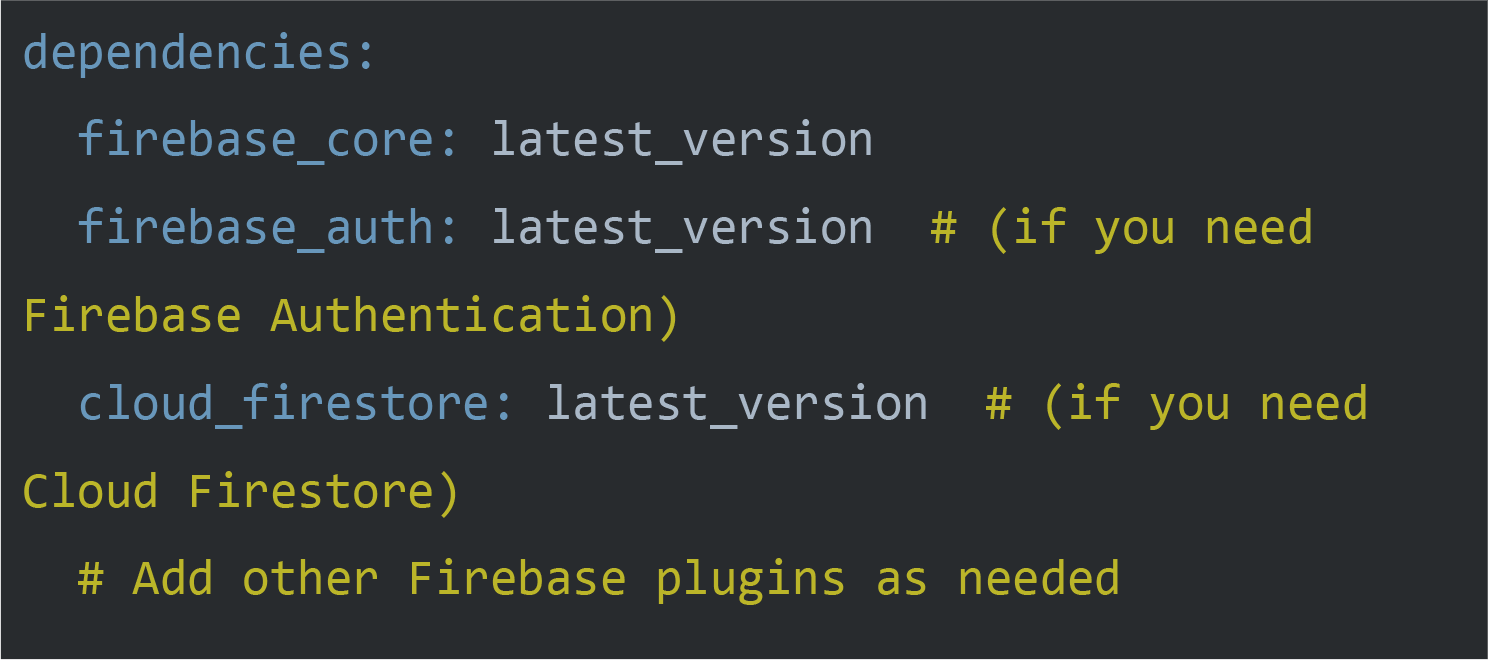
Next, you need to install the required Firebase packages in your Flutter project. You can do this by adding the dependencies to your pubspec.yaml file:
Replace latest_version with the actual version numbers of the Firebase plugins you want to use. You can find the latest versions on pub.dev.
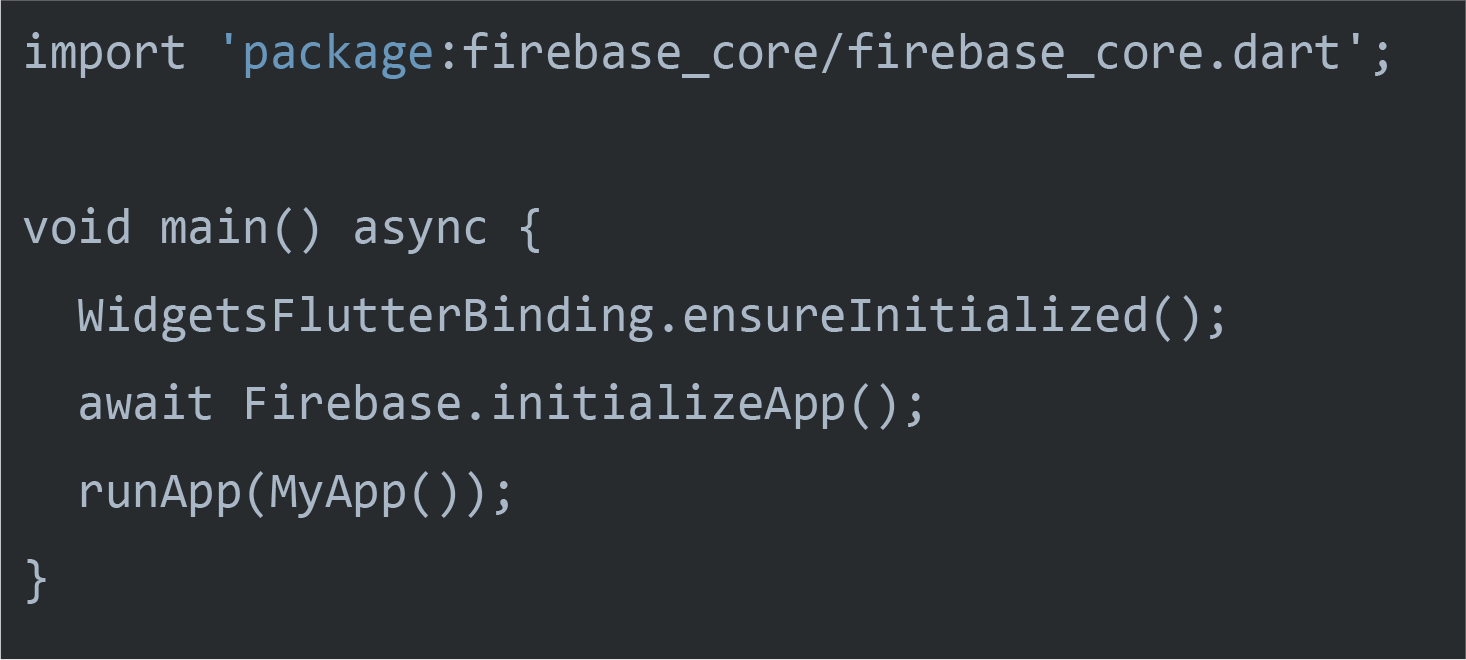
7.1.7. Initialize Firebase in Your Flutter App:
7.1.8. Using Firebase Services:
Now you can use Firebase services in your Flutter app. Import the necessary Firebase packages and follow the respective documentation for each service you want to use (e.g., Firebase Authentication, Cloud Firestore).
7.1.9. Testing:
Run your Flutter app on a device or emulator to verify that Firebase services are correctly integrated and working.
7.2. Configuring and setting up FlutterFire in your Flutter project involves several steps. Here’s a detailed guide on how to do it:
Click on “Add Project” and follow the instructions to create a new project.
Once your project is created, you’ll be redirected to the project dashboard.
7.2.2. Add an App to Your Firebase Project:
In the Firebase console, select your project.
Click on the “Add app” button (usually represented by an Android or iOS icon).
Follow the setup instructions to register your app with Firebase.
Download the google-services.json file for Android or GoogleService-Info.plist file for iOS. These files contain your Firebase project configuration details.
7.2.3. Flutter Project Setup:
Open your Flutter project in your preferred editor.
Navigate to the android/app directory for Android or ios/Runner directory for iOS, and paste the google-services.json (for Android) or GoogleService-Info.plist (for iOS) file that you downloaded earlier.
7.2.4. Add Firebase SDK to Your Flutter Project:
Open your Flutter project’s pubspec.yaml file.
Add the following dependencies:
Replace latest_version with the latest version numbers of the Firebase plugins you want to use. You can find the latest versions on pub.dev.
7.2.5. Using Firebase Services:
You can now use Firebase services in your Flutter app. Import the necessary Firebase packages and follow the respective documentation for each service you want to use (e.g., Firebase Authentication, Cloud Firestore).
7.2.6. Testing:
Run your Flutter app on a device or emulator to verify that Firebase services are correctly integrated and working.