To use facebook authentication register your app on Facebook Devloper Console Create an app using app id .After that open facebook dev console and navigate to Settings/basic there you will get App ID and App secret copy both value to clipboard. Now open firebase console and navigate to Authentication/ Sign-in method, click on edit icon and submit value in respective fields.
For Android:
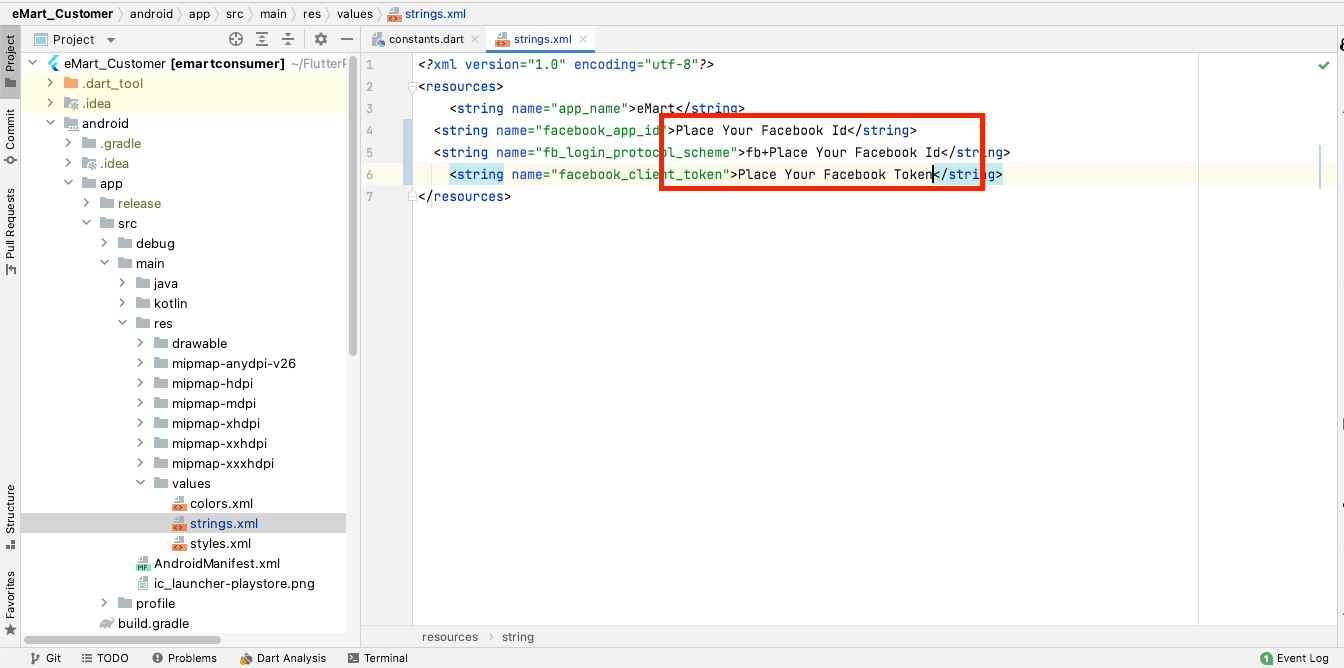
- open file :\android\app\src\main\res\values\strings.xml
- Put app id at facebook_app_id and write “fb+app id” at fb_login_protocol_scheme.
For iOS:
- Open file: Foodie_Customer/ios/Runner/Info.plist
- Put app id at FacebookAppID and write “fb+app id” at CFBundleURLSchemes.
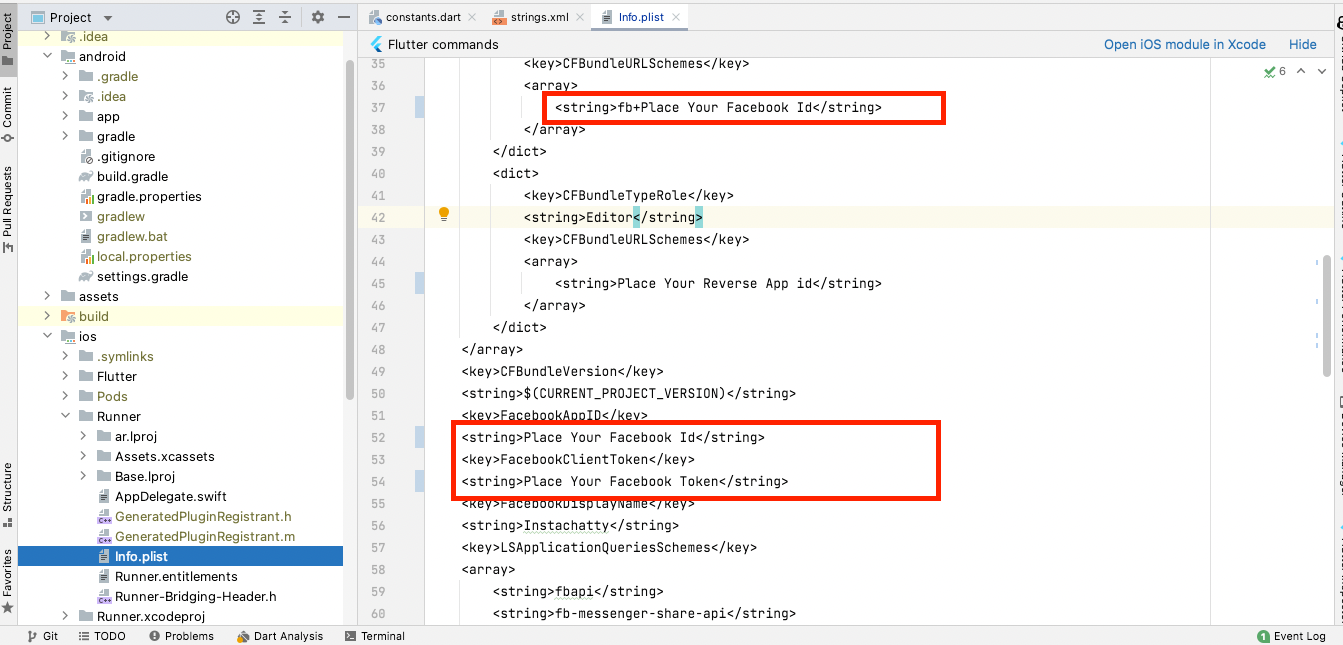
For Example your facebook id is 12345 then your fb_login_protocol_scheme and CFBundleURLSchemes will be fb12345.
Now facebook is set up.
Running on Android
Follow these simple steps to run Flutter templates on Android
Step 1:Plugin your Android device or open an emulator
Step 2:Open a Terminal window and run:
- 1. cd ~/path/to/template
- 2. flutter run
Replace ~/path/to/template with the correct path to the folder where you extracted the archive downloaded from our server. To make sure you are in the right folder, you can run “pwd” to see the current path. It must be the folder with the template, otherwise, the app won’t run.
> flutter run with this one flutter run --no-sound-null-safety
Plug in an Android device or emulator
In order to run Flutter apps on Android, you need an Android device or an emulator. If you have an Android phone or tablet, simply plug it in. You might need to enable USB debugging in Device Settings, under Developer Tools. Follow the Android Installation Guide.
Android emulators are bundled into Android Studio, so please install Android Studio, open it, go to Tools -> AVD Manager, and start an emulator of your choosing: You can also create new emulators of your own, with your own hardware requirements. Once you have an emulator up and running, proceed to the next step.
Run the Flutter App
For MacOS / UNIX simply run the two commands we described above:
- 1.
cd ~/path/to/template - 2. flutter run
If you are using Flutter >= 2.0 or Dart version >=2.12 with Null Safety you might want to replace this command
> flutter run with this one flutter run –no-sound-null-safety
Visual Studio Code can be used that’s directly located at the right folder. With it you can simply run “flutter run” and the app will just start.
Note:
If you are using Flutter >= 2.0 or Dart version >=2.12 with Null Safety you might want to replace this command
> flutter run with this one flutter run –no-sound-null-safety
Running on iOS
You would need Mac OS and Xcode to run a Flutter app on iOS, but there’s no need for an Apple developer account or an iPhone – you can simply run an Xcode project on the iOS simulator.
If you are not new to iOS / Flutter development, and you already have the dev environment set up, simply do the following steps:
- Be sure you have the latest STABLE Xcode version (DO NOT USE XCODE BETA)
- Run “flutter run” in the root folder of the downloaded project:
1. flutter run
Note that if you are using Flutter >= 2.0 or Dart version >=2.12 with Null Safety you might want to run
1. flutter run –no-sound-null-safety
- If the project did not start, open the .xcworkspace file in Xcode, which got generated at the previous step (you can find it in the ios folder). Also, make sure a Pods folder got generated.
- In Xcode, select the iOS simulator/device and build and run the app (Command + R) If this is the first time you are running an iOS project on your machine, you need to set up your environment first. We recommend you follow the Flutter Guide.
- There are a few prerequisites that are iOS specific (you don’t need them for Android):
Follow these steps to get your app running on an iOS device or iOS simulator.
1. Run “flutter run” in the project root directory
if the “flutter run” command fails, you might want to run : > flutter run –no-sound-null-safety
2. Locate the ios folder and run “pod update“ This will install all the pods that the Flutter app depends on, such as Firebase Auth, Storage, etc. Make sure you have Cocoapods installed beforehand.
3. Open the .xcworkspace file in Xcode Simply double click on the file in the terminal (make sure you are in the ios folder).
4. Run Xcode project
Choose a simulator or device in Xcode then go to Product -> Run, or simply press Command + R. This will build and run the chat project in the selected device/simulator.