CabMe is an advanced and scalable taxi/cab booking application built with secure, modern technologies:
Flutter for Android & iOS mobile applications
Laravel/PHP Framework for the powerful Admin Panel
CabMe empowers startups, entrepreneurs, and established cab companies to efficiently manage their fleets, drivers, and bookings in real-time. With multi-service support (Ride, Parcel, Rental), it enables businesses to expand beyond just passenger transport.
Server requirement#
To run CabMe smoothly, your server must meet the following minimum requirements:
2.1. Prerequisites
Web Server: Apache or NGINX
PHP: Version 8.0 or above
Database: MySQL 5.7+
Composer: For managing PHP dependencies
Domain: Specify your domain name (e.g., example.com) for the application to function properly.
SSL Certificate: Required for secure connections (HTTPS)
FTP: Used for transferring files between local and server environments.
Cron Job: Required for running Laravel scheduled tasks automatically.
2.2. APIs & External Services
Google Maps API Key for Accurate Search Result Required for map display, geolocation, and business search Enable Places, Maps JavaScript, and Geocoding APIs
Admin Panel Setup#
3. Admin Panel Setup (Laravel)
Ensure that your server meets the requirements outlined in the documentation’s Server Requirement section. Upon downloading the code, upload the admin zip file to your server and extract it. The admin panel can be installed on either a domain or a subdomain.
3.1 Connect to FTP and Setup
Follow these instructions to connect to your server using FTP and complete the application setup:
3.1.1: Connect to the server using FTP: Use an FTP client like FileZilla to connect to your server. Enter the server’s IP address, username, and password. Use port 21 for FTP or port 22 for SFTP.
3.1.2: Transfer the ZIP file: Upload your admin panel’s ZIP file to the server’s local path (e.g., /var/www/html).
3.1.3: Unzip the file: Navigate to the file’s location on the server and run the following command to extract the ZIP file: “sudo unzip your-application.zip” or you can do it from cpanel directly.
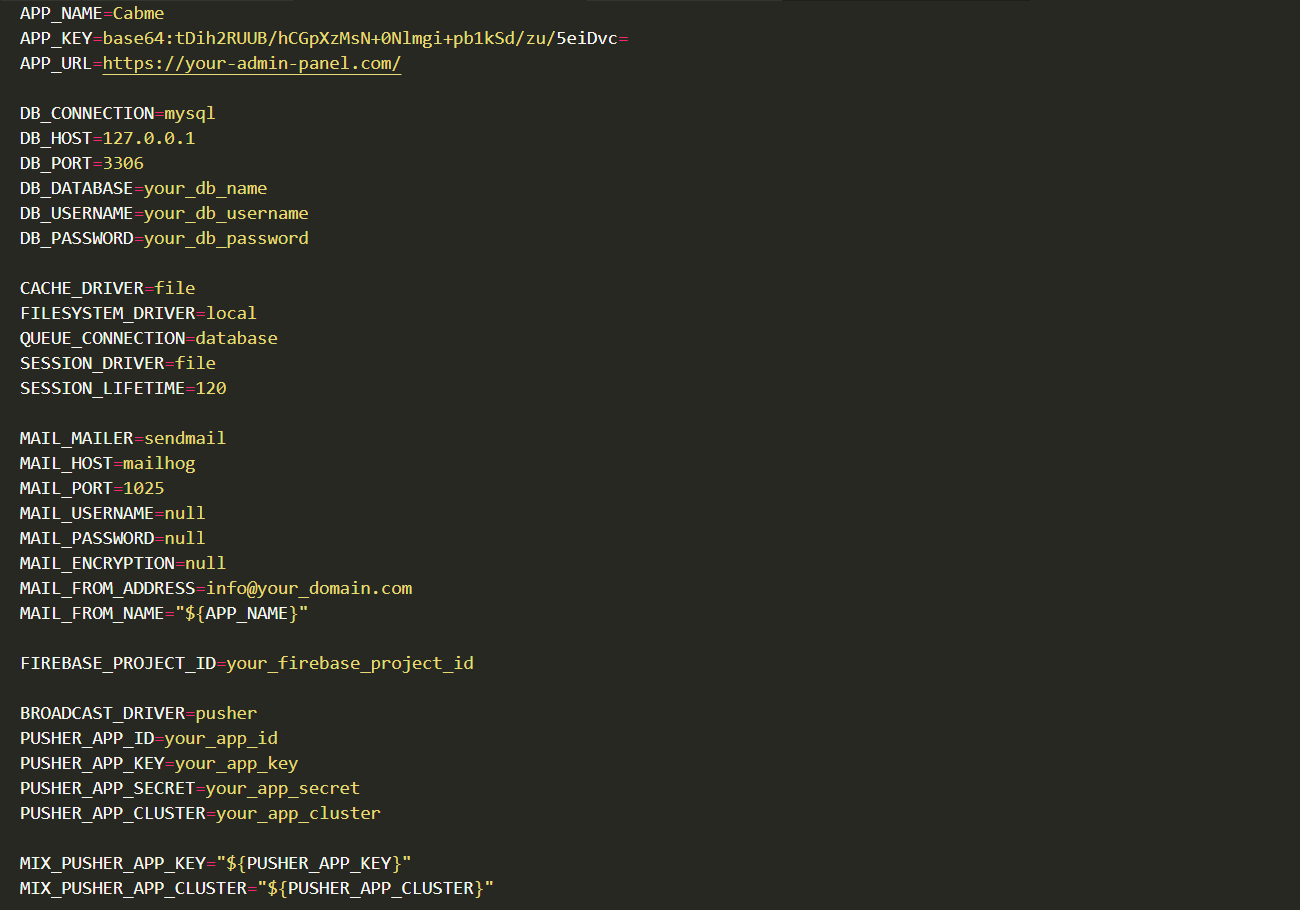
3.1.4: Update the .env file with your configuration: Modify the database and application settings which are mentioned in the .env file. Below is an example configuration:
3.1.5: Run the following command one by one.
If you encounter any errors while creating a key, please run the following command to update all system packages.
Now you can find the generated application key in the .env file located at the root path of the admin panel.
3.2 Pusher Setup
Please ensure to update your pusher credentials in the .env file. To use realtime updates in the application.
Click Sign Up (or log in if you already have an account)
Verify your email and log in to the Pusher Dashboard
3.2.2. Create a New App
In the dashboard, click Create New App
Enter your App Name (e.g., CabMe)
Choose the Cluster/Region closest to your server (e.g., ap2 for Asia, us2 for US East, etc.)
Select Laravel as the backend technology (frontend can be anything)
Click Create App
3.2.3. Copy Your Credentials
After creating, you will get these values:
App ID
Key
Secret
Cluster
3.3 CRON Job Setup
A cron job is a scheduled task in Unix-based operating systems that runs scripts or commands at specified intervals. Here’s how to set up a cron job on a server:
Steps to Set Up a Cron Job:
3.3.1: Log in to cPanel or in your web server
3.3.2: Navigate to the “Cron Jobs” Section
3.3.3: Add a New Cron Job
In the command field, enter the command or the path to the script you want to run.
Ensure the script you’re running has the correct permissions and is executable. You need to specify the correct PHP path (/usr/local/bin/php is common but may vary depending on your server setup) and please use your admin panel path in the CRON JOB command.
3.4 Map Configuration
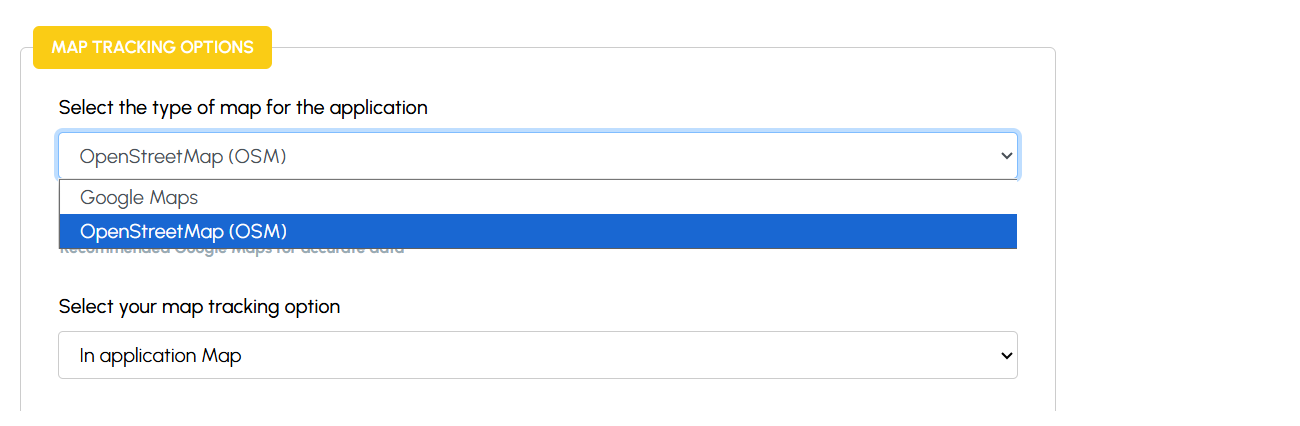
Please choose your preferred map by navigating to the Admin Panel > General Settings > Map Tracking Options.
Please Note:
Recommended Google Map for accurate location and mapping results.
3.5.2: Click on “Go to console” in the top right corner.
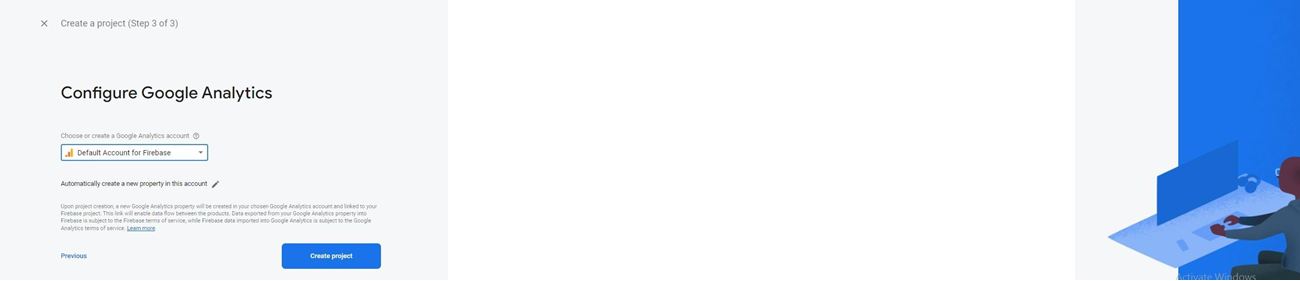
3.5.3: Click on “Add project”, it will redirect you to the new project creation page Enter your project name and click on “Continue” again click on “Continue” after that select “Default Account fo firebase” and then click on “Create Project”
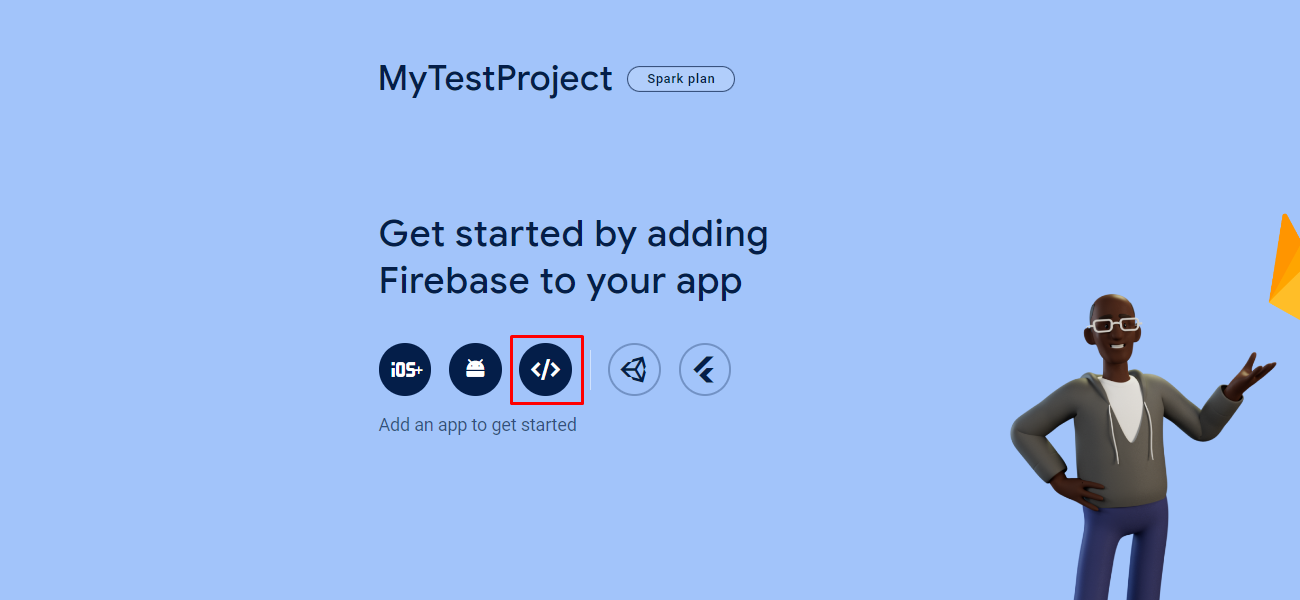
3.5.4: After successfully creating a new project, you will be directed to the overview page. From there, simply navigate to the icons link to proceed further.
Upon redirection, you’ll land on the ‘Add Firebase to your web app’ page. Here, input your app’s nickname and proceed by clicking ‘Register app’.
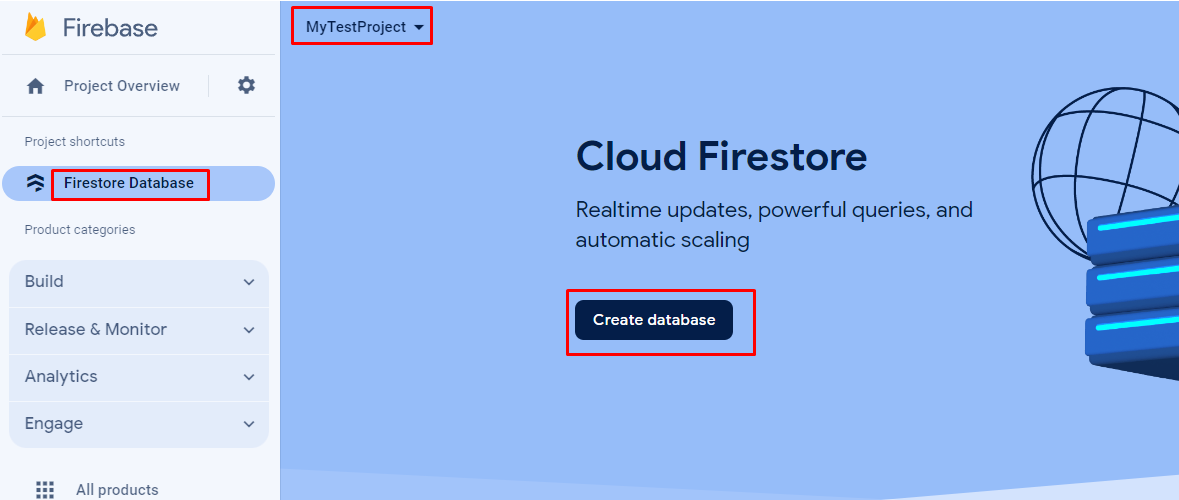
3.5.5: Next, navigate to ‘Firestore Database’ in the left sidebar. Select your project name from the drop-down menu, and then proceed by clicking on ‘Create database’.
3.5.6: Choose your preferred option and click on the ‘Next’ button. Subsequently, proceed by clicking on “Enable”
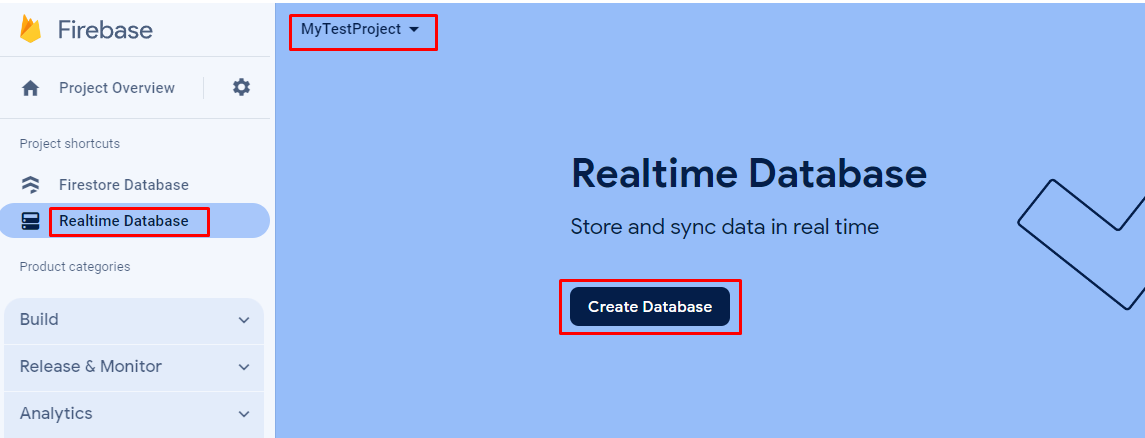
3.5.7: Following that, locate “Realtime Database” in the left sidebar. Select your project name from the drop-down menu, and proceed by clicking on “Create Database”
3.5.8: Choose your preferred option and proceed by clicking the “Next” button, then click on “Enable” to activate the selected feature.
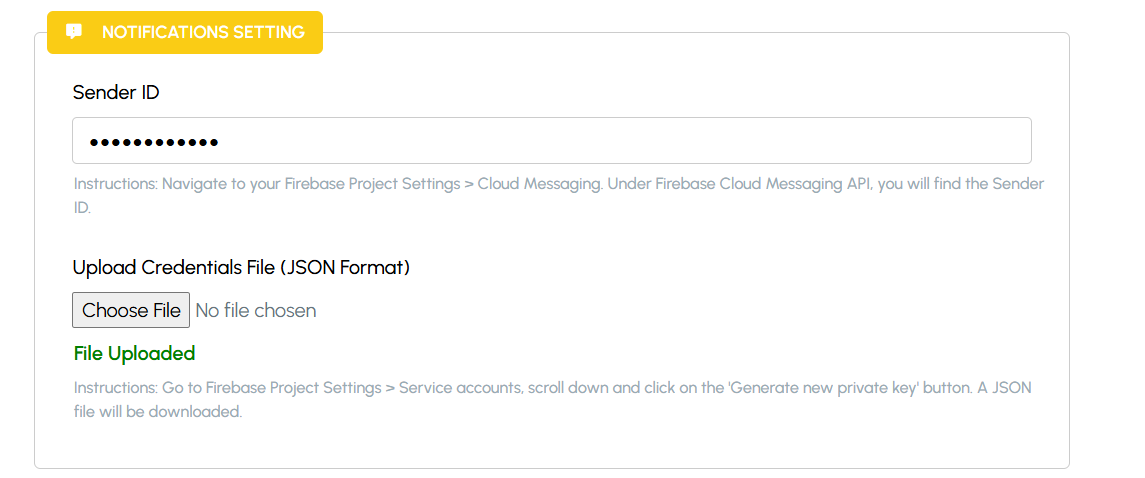
3.5.9: Navigate to your Firebase Project Settings > Cloud Messaging. Under Firebase Cloud Messaging API, you will find the Sender ID.
3.5.10: Go to Firebase Project Settings > Service accounts, scroll down and click on the ‘Generate new private key’ button. A JSON file will be downloaded.
3.6 Notifications Settings
To work firebase push notification feature functions correctly, please upload your Firebase credentials file in the Admin Panel by navigating to General Settings > Notifications Settings.
3.7 Accessing the Admin Panel
Default Admin User Credentials
URL: Your desired URL where the admin panel is set up.
Email: admin@cabme.com
Password: 12345678
Admin Panel Menus#
4. Admin Panel Menus Overview
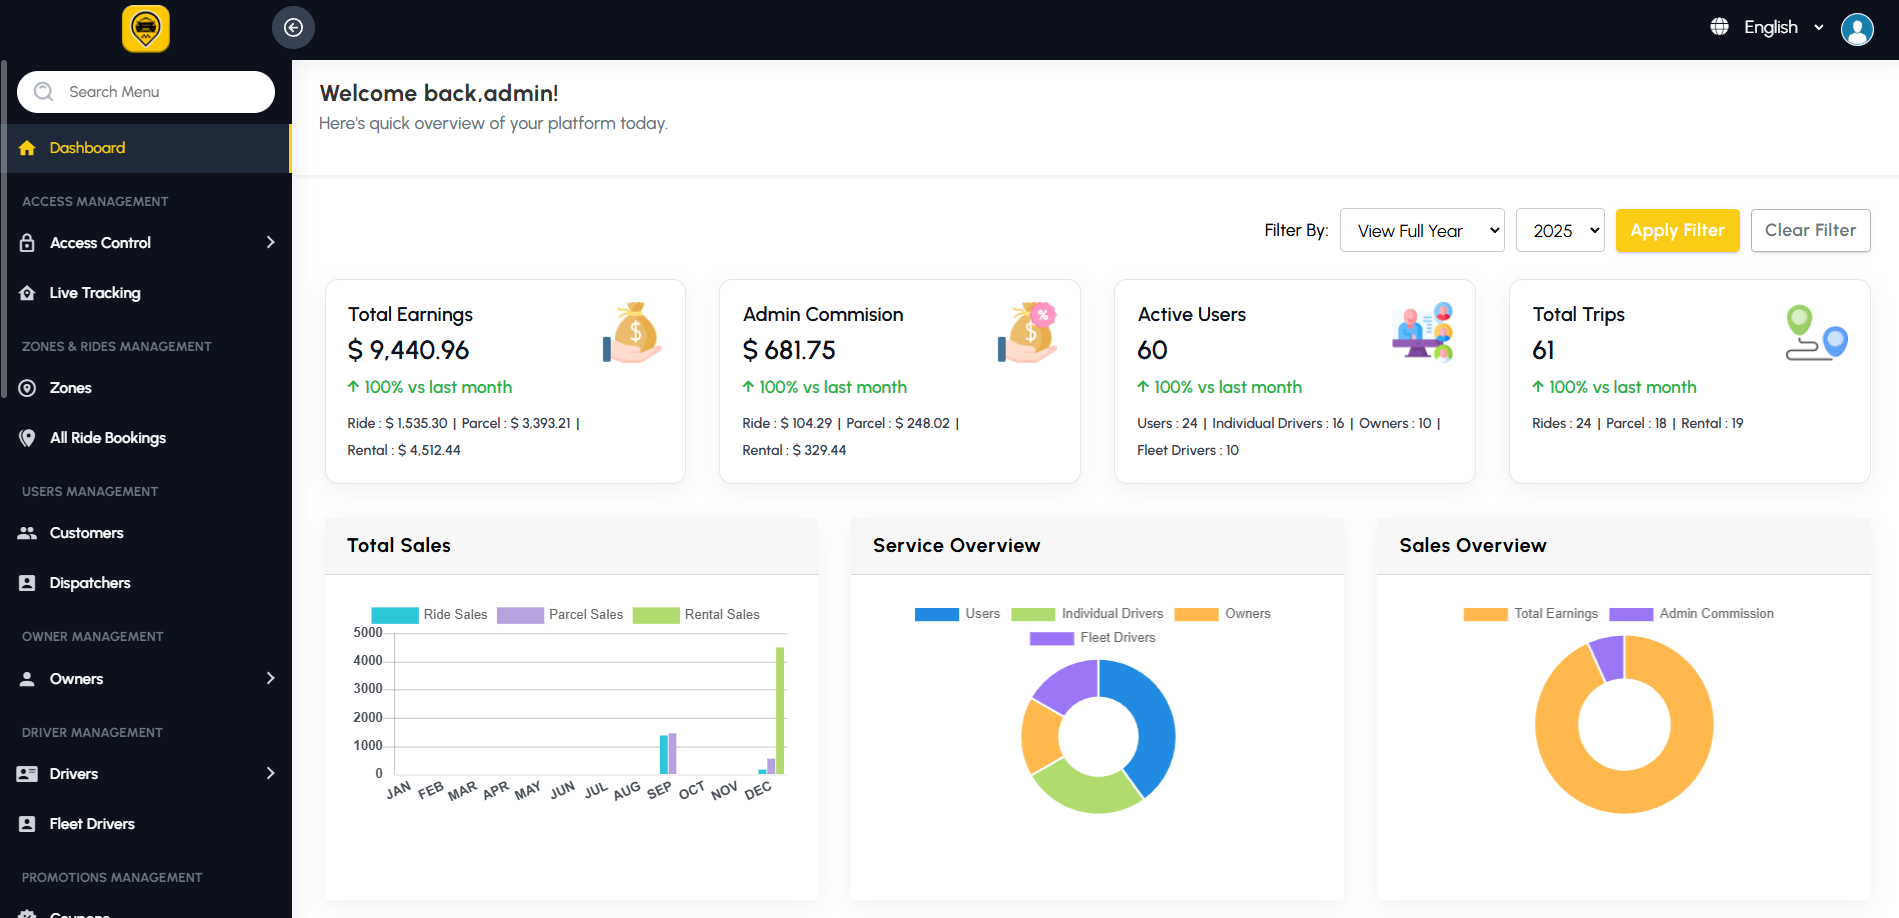
4.1: Dashboard
Provides an at-a-glance overview of the business. Displays analytics such as total customers, registered drivers, completed rides, parcels, rentals, latest rides, top drivers, and overall earnings overview. Helps admins quickly monitor performance.
4.2: Access Management
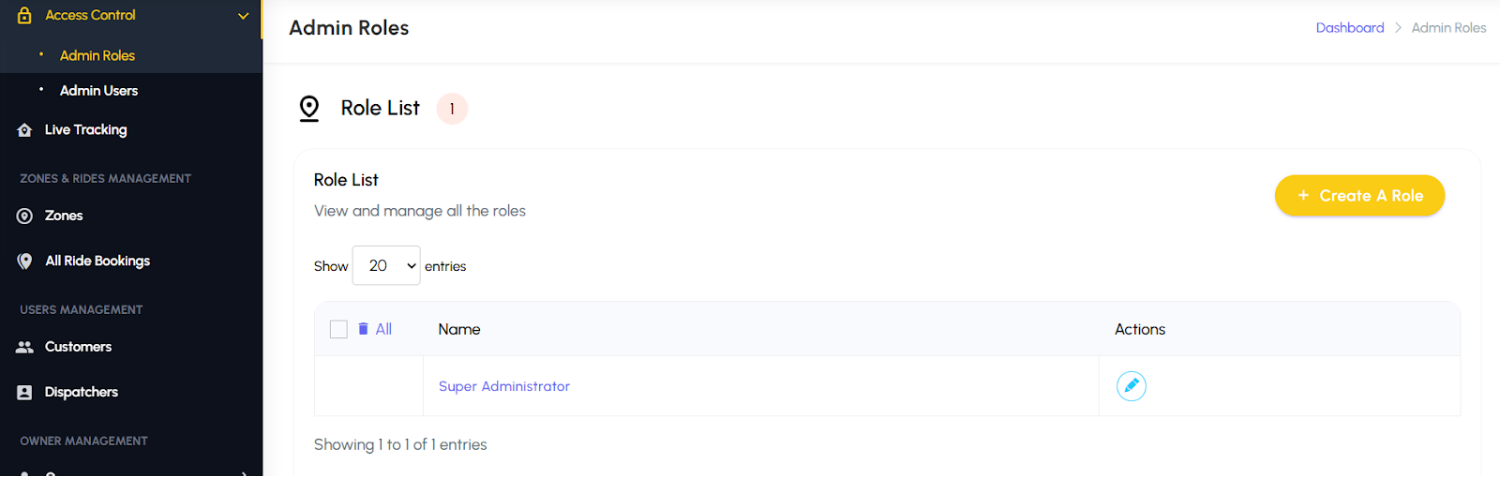
Access Control
Create and manage admin permission groups (e.g., Super Admin, Editor, Dispatcher). Control what each admin role can view or edit within the system.
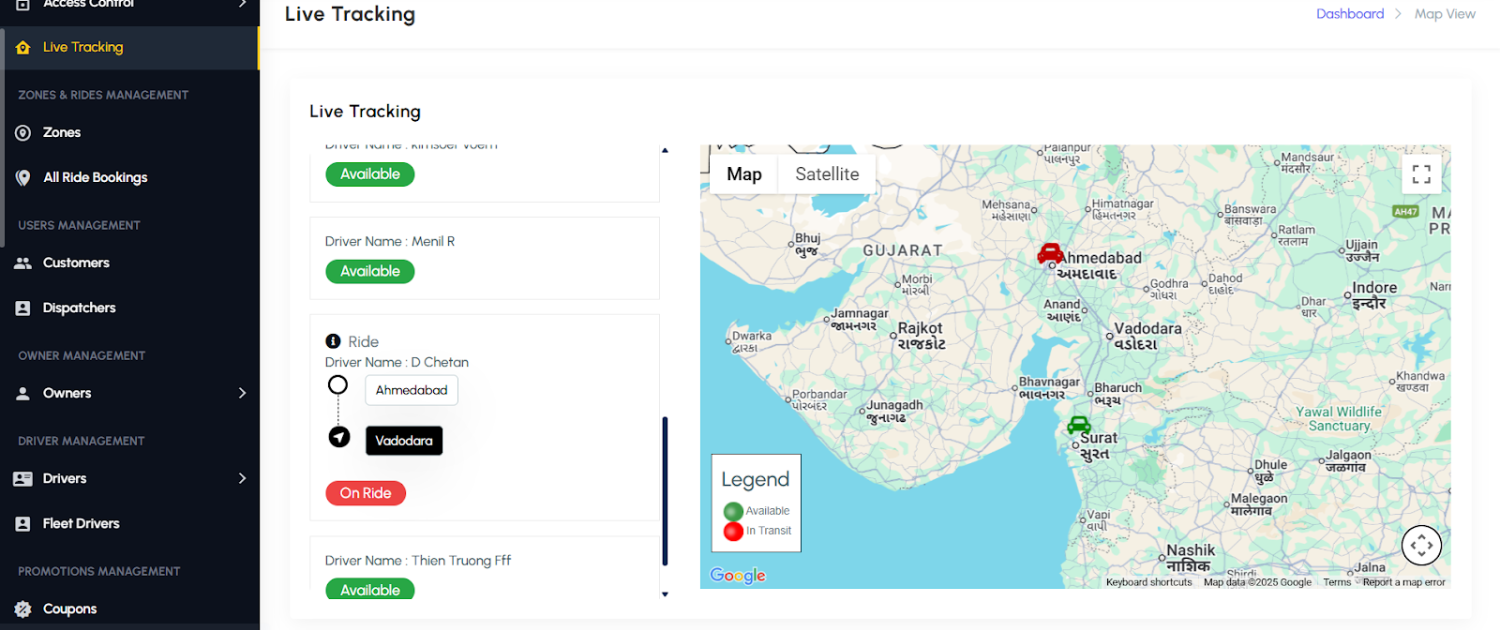
Live Tracking
Monitor drivers and vehicles in real time on the map. Useful for managing rides, ensuring driver accountability, and providing live support.
4.3: Zones & Rides Management
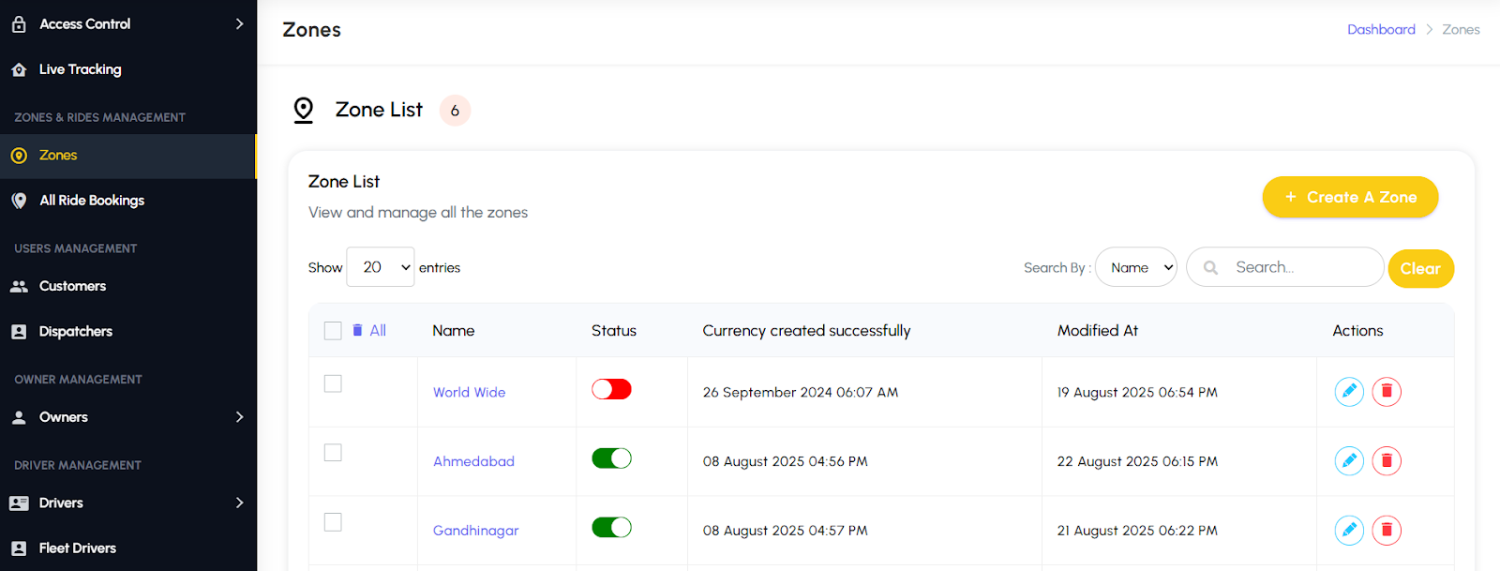
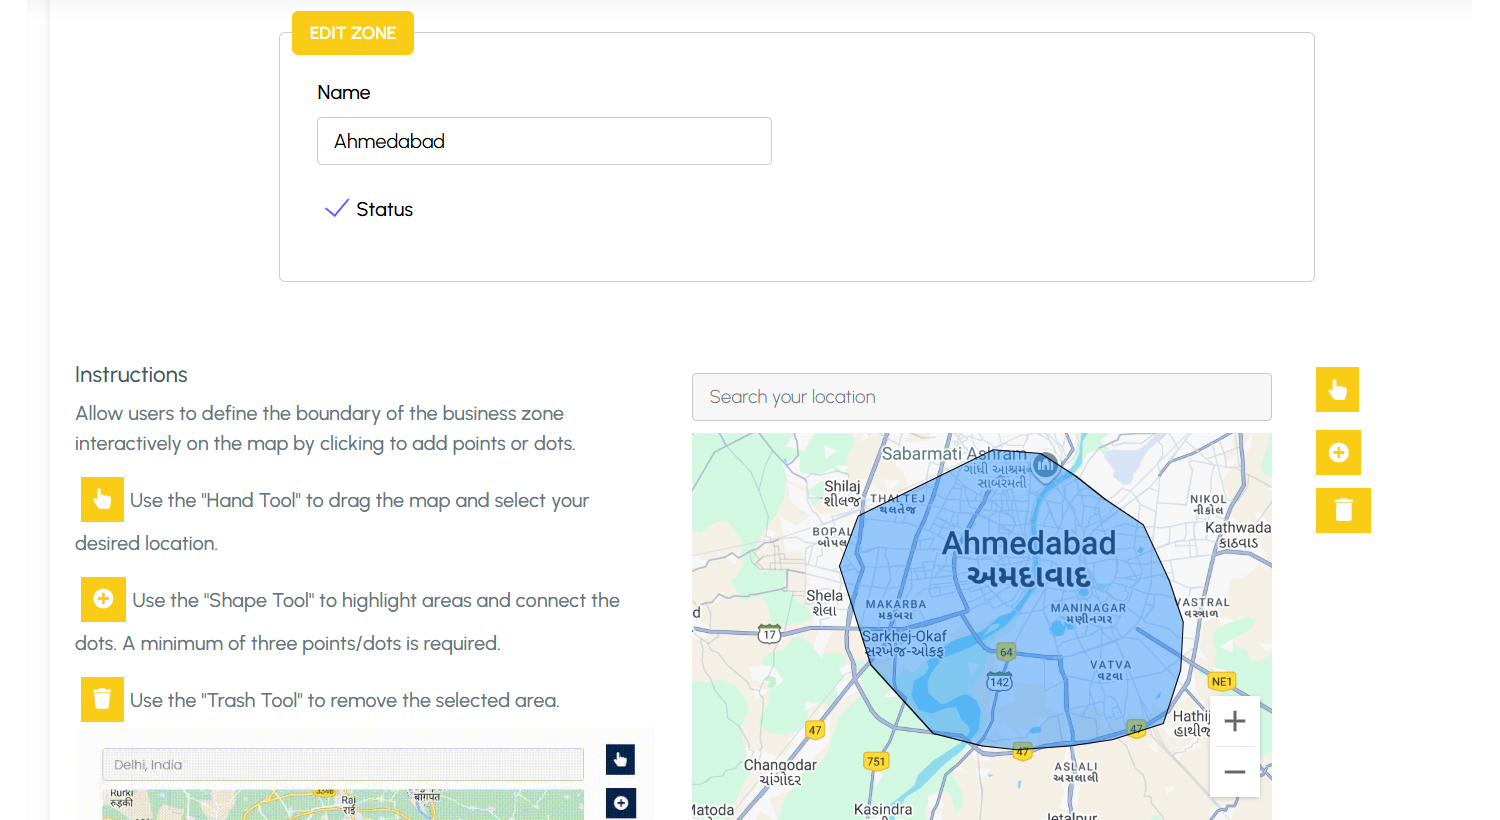
Zones
Service zones allow you to define the exact areas where your platform operates, such as specific cities, regions, or neighborhoods. Within each zone, Additionally, zone-based policies give you flexibility to apply different operational rules for each area, ensuring a more accurate, efficient, and localized service experience.
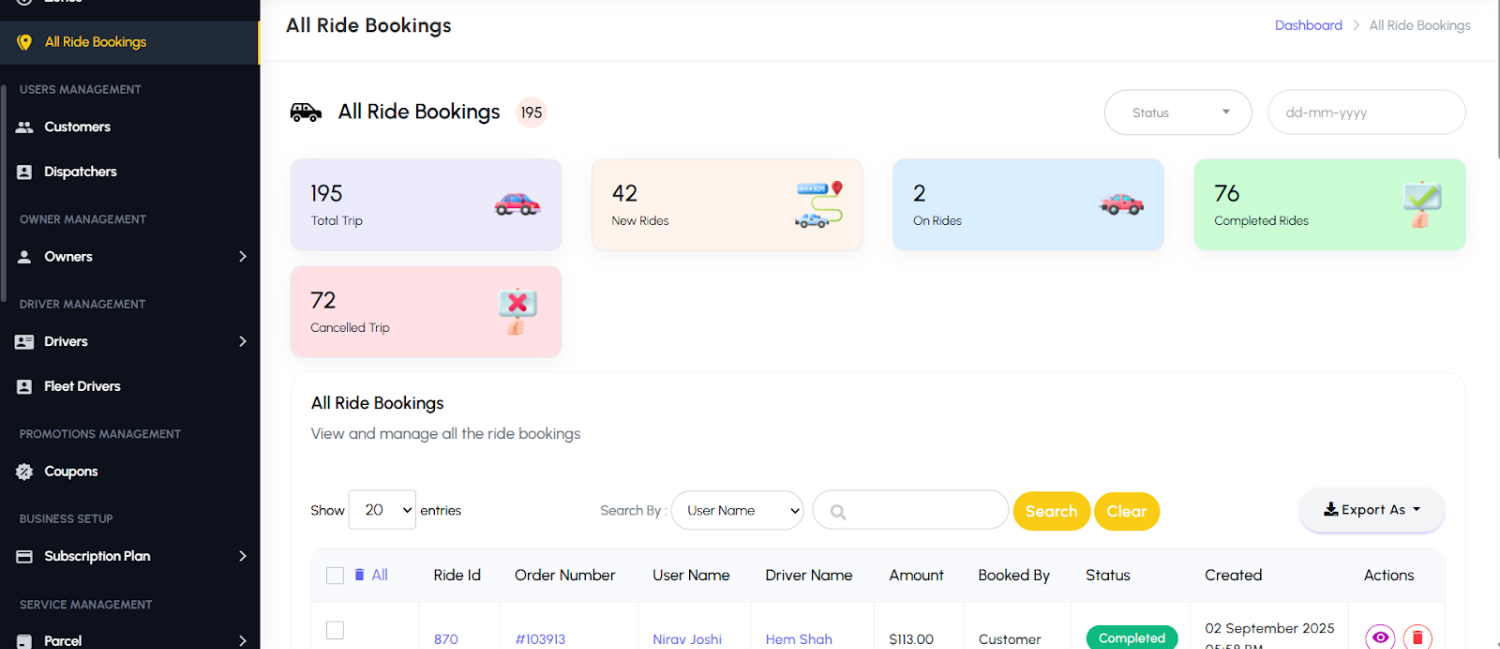
All Ride Bookings
The ride bookings page provides a centralized view to monitor and manage all customer rides, whether they are completed, canceled, or currently ongoing. Administrators can access detailed trip information, including route, timing, and status, along with a clear fare breakdown for transparency. It also allows easy tracking of driver assignments and customer details, ensuring smooth coordination and efficient ride management.
4.4: Users Management
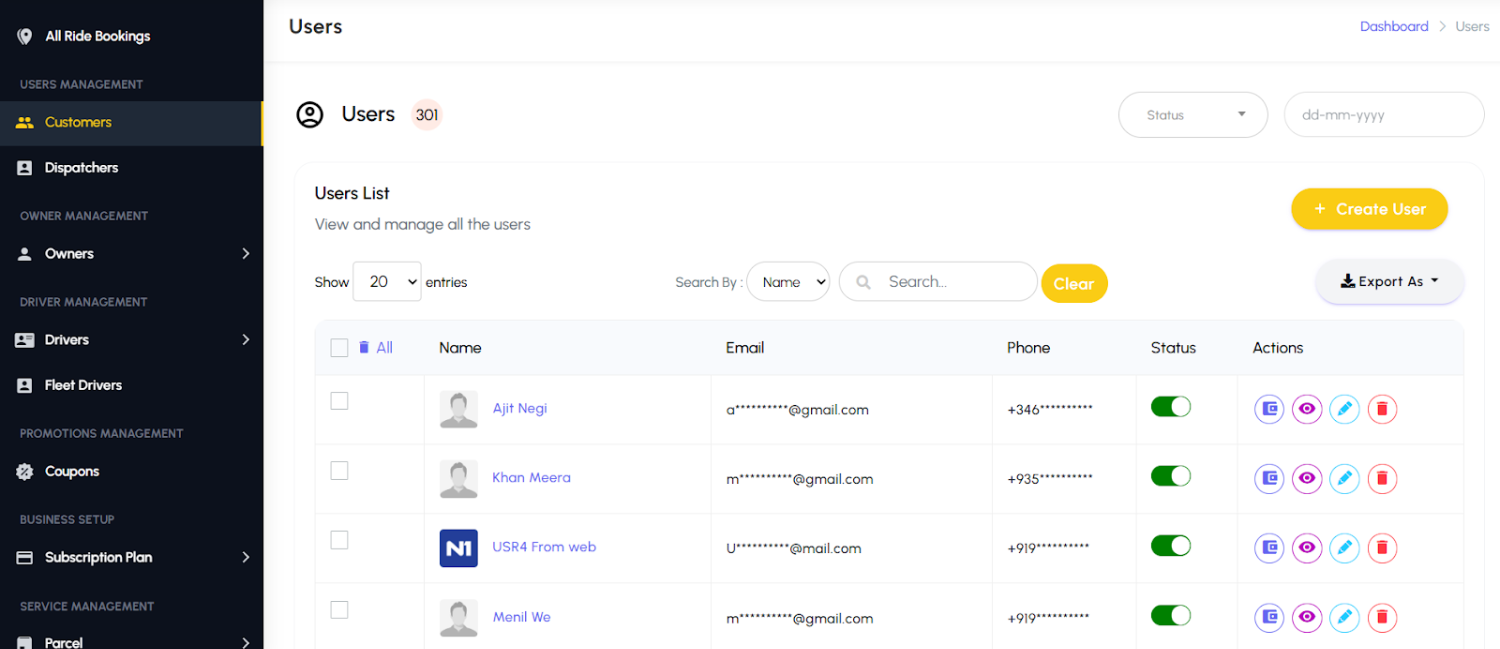
Customers
The Customers page allows administrators to view and manage all customer accounts registered through the mobile application. Each profile displays essential details such as personal information, contact data, and account status. Admins can review a customer’s complete ride history, including completed, canceled, and ongoing bookings, to monitor activity and resolve issues quickly. Ensuring better coordination and customer support. This page also provides the ability to edit or deactivate accounts, helping maintain a secure and well-managed user base.
Dispatchers
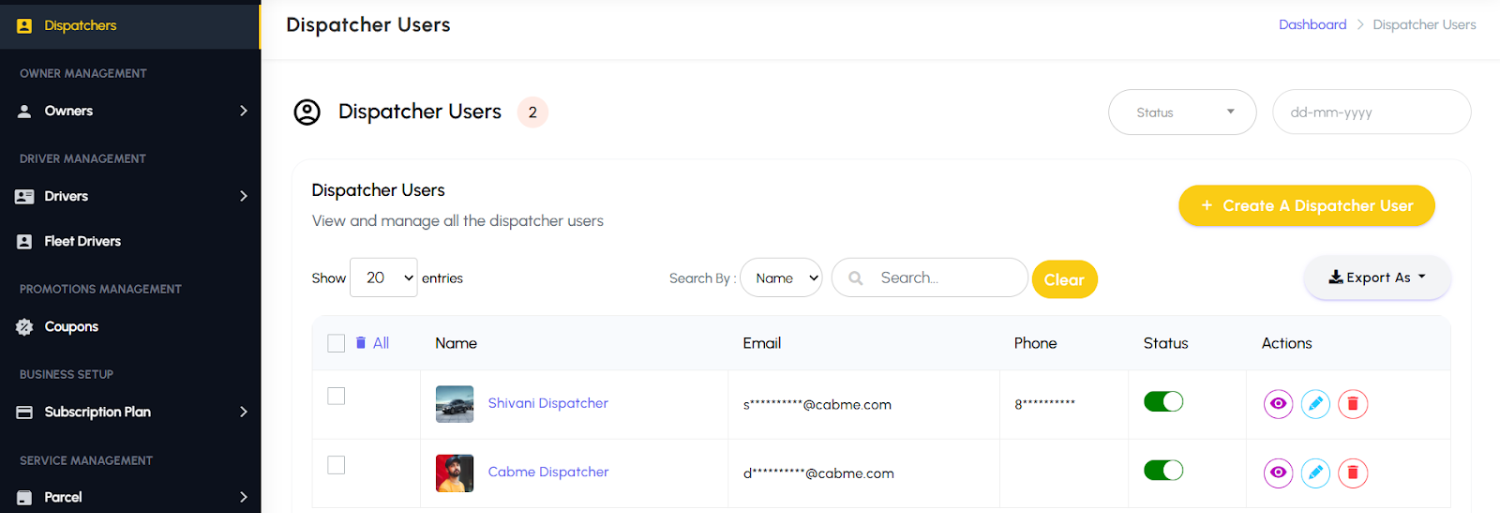
The Dispatchers page enables administrators to manage dispatcher accounts, who play a key role in assisting customers with booking requests. Dispatchers are responsible for creating and managing bookings on behalf of customers, especially in cases where customers face technical issues or require direct assistance. From this page, admins can add new dispatchers, update their details, and monitor their activity. It also provides insights into the bookings created by each dispatcher, ensuring accountability and smooth coordination between customers, drivers, and support staff.
4.5: Owner Management
Owners
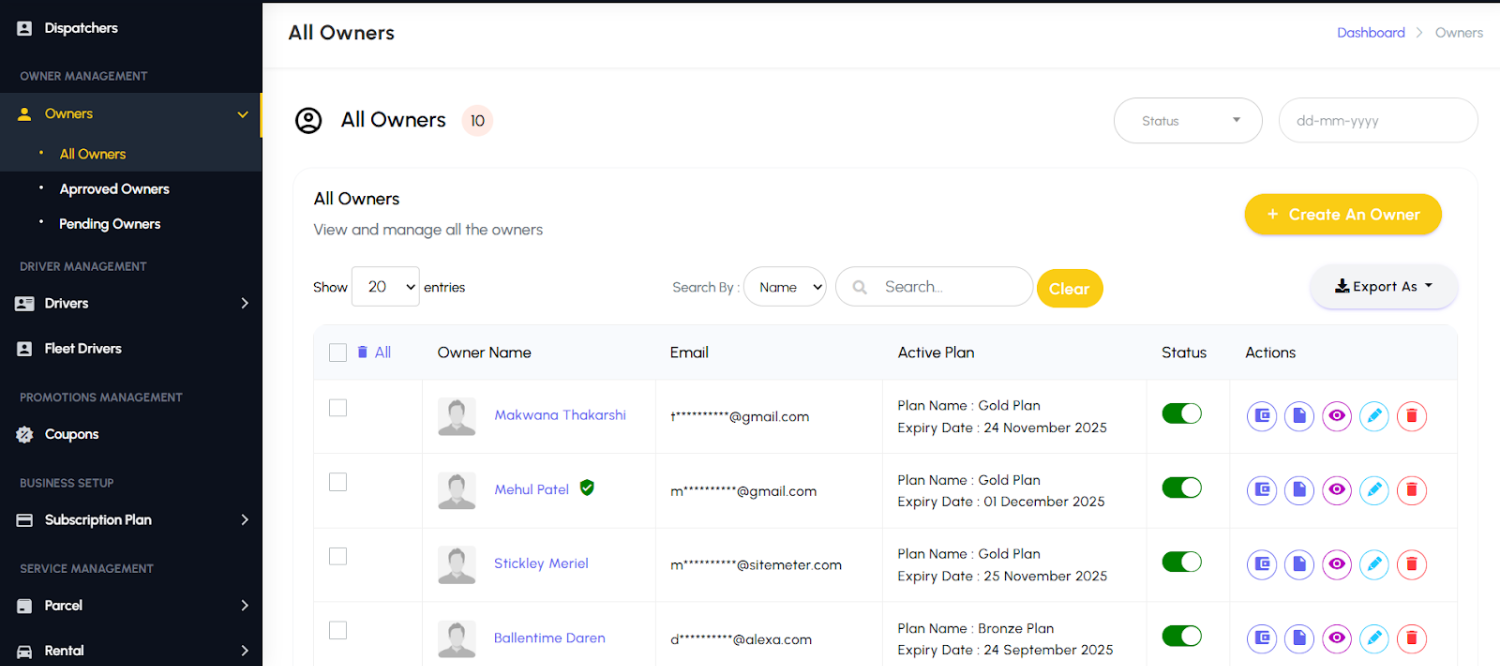
The Owners page allows administrators to manage fleet owners who register and oversee multiple drivers and vehicles within the platform. Each owner profile includes essential details such as contact information, registered vehicles, and assigned drivers. Admins can monitor the performance of each fleet, including trip activity, availability, and vehicle status. The page also provides a breakdown of owner earnings, platform commission, and payout history, ensuring financial transparency. With this centralized view, administrators can easily track fleet operations, resolve issues, and maintain strong relationships with fleet partners.
4.6: Driver Management
Drivers
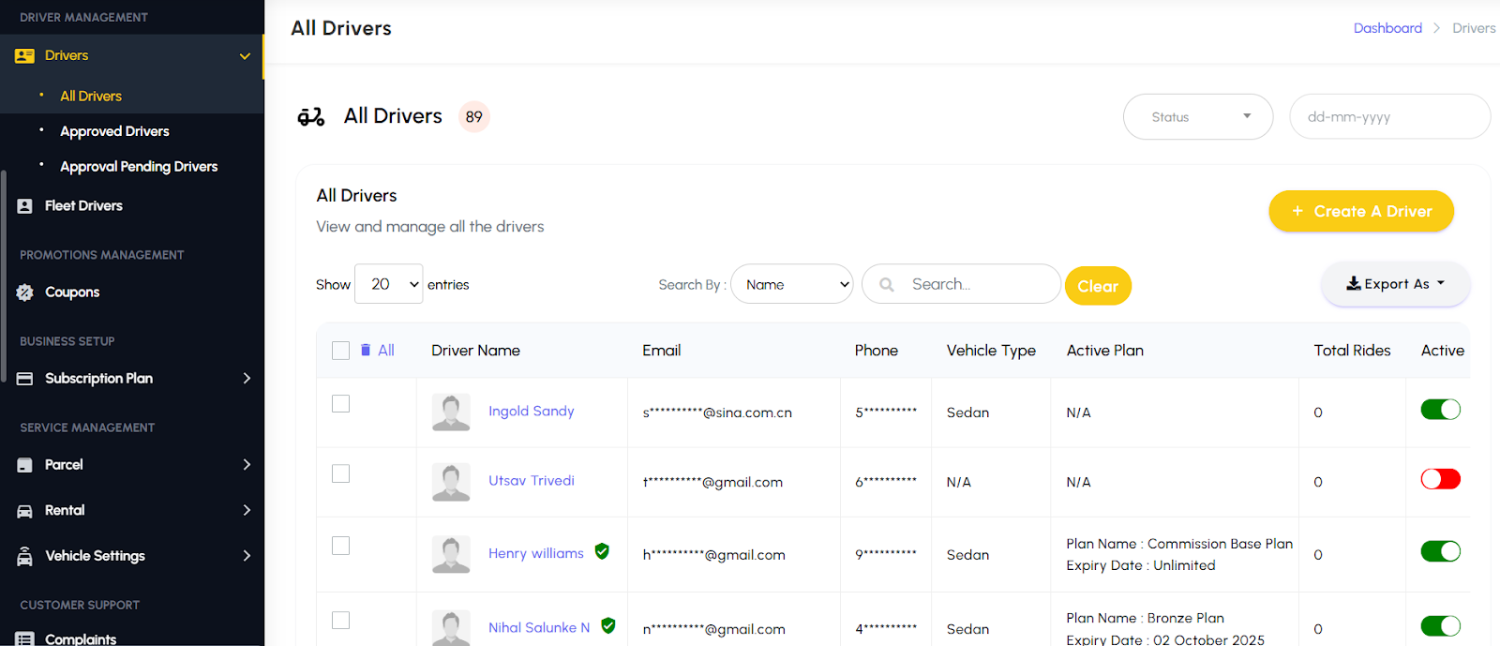
The Drivers page provides administrators with full control over managing individual driver accounts on the platform. Each driver profile displays personal details, uploaded documents, and verification status to ensure compliance and safety. From this page, admins can review and approve driver applications, track their current availability, and monitor active or completed trips. The system also offers insights into driver earnings, commission deductions, and payout history for transparent financial management. Additionally, admins can update driver information, suspend accounts if necessary, and maintain a reliable pool of professional drivers for smooth operations.
Fleet Drivers
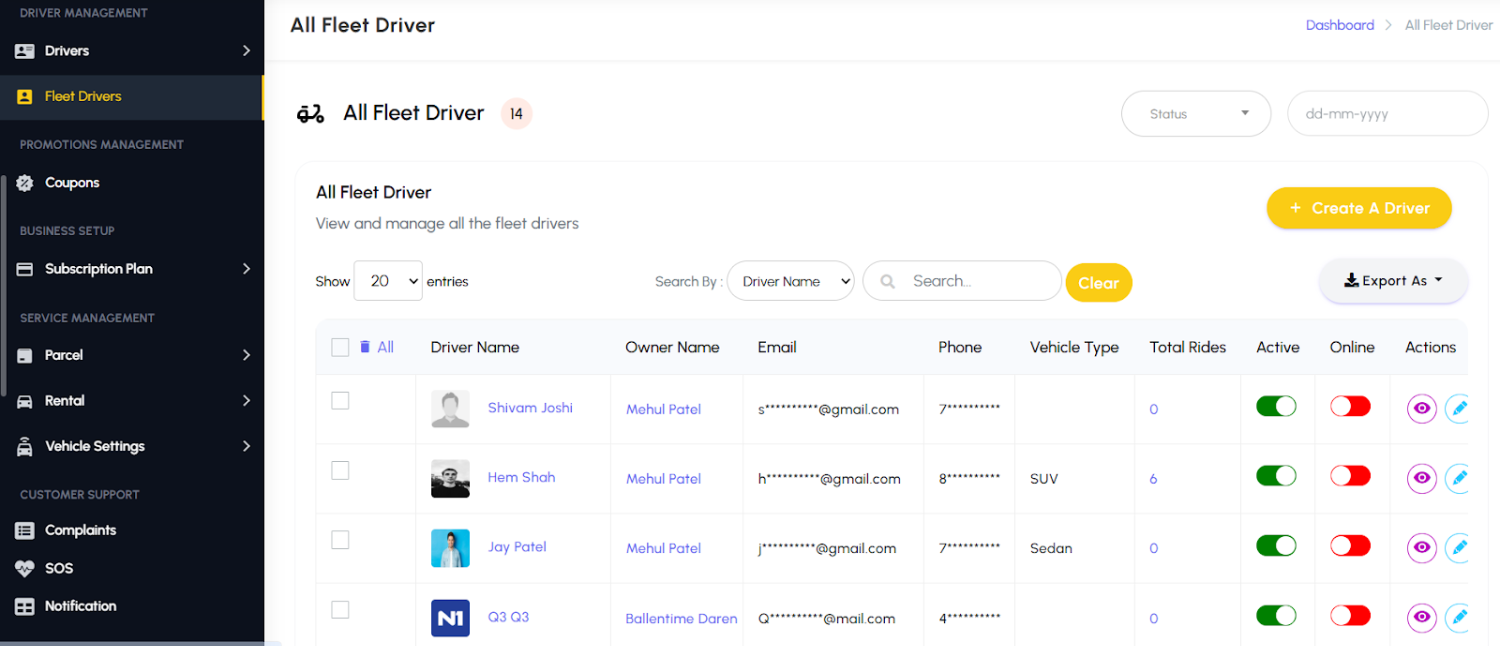
The Fleet Drivers page is designed to manage drivers who are associated with registered fleet owners. Unlike independent drivers, these drivers operate under a specific owner’s fleet, allowing for organized group management. Administrators can view detailed profiles of fleet-linked drivers, including assigned vehicles, and ride activity. This page also provides visibility into each driver’s earnings and commission, ensuring accurate revenue tracking between drivers, fleet owners, and the platform. By centralizing fleet-based driver management, the page helps maintain accountability and smooth coordination within larger transportation networks.
4.7: Promotions Management
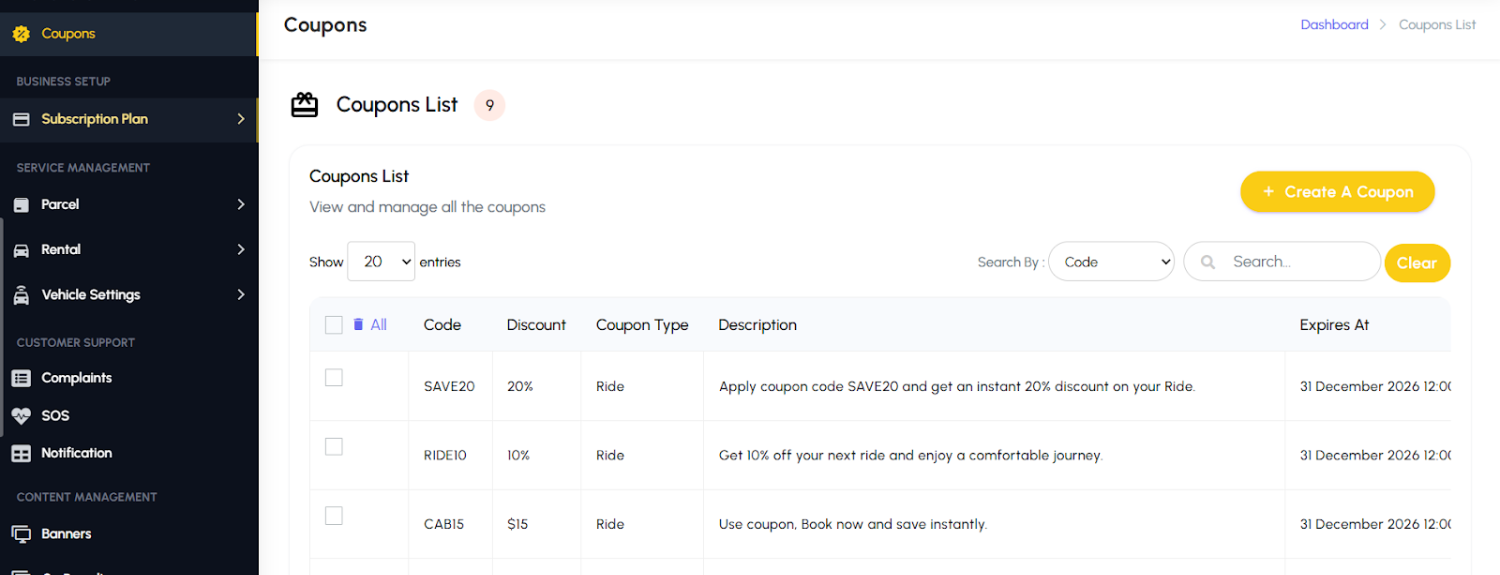
Coupons
The Coupons page enables administrators to create, manage, and monitor discount coupons and promotional codes that customers can apply during bookings. Each coupon can be configured with specific details such as discount type (percentage or fixed amount), validity dates. Admins can also define which services the coupon applies to, such as ride, parcel, or rental, allowing for targeted promotions.
4.8: Business Setup
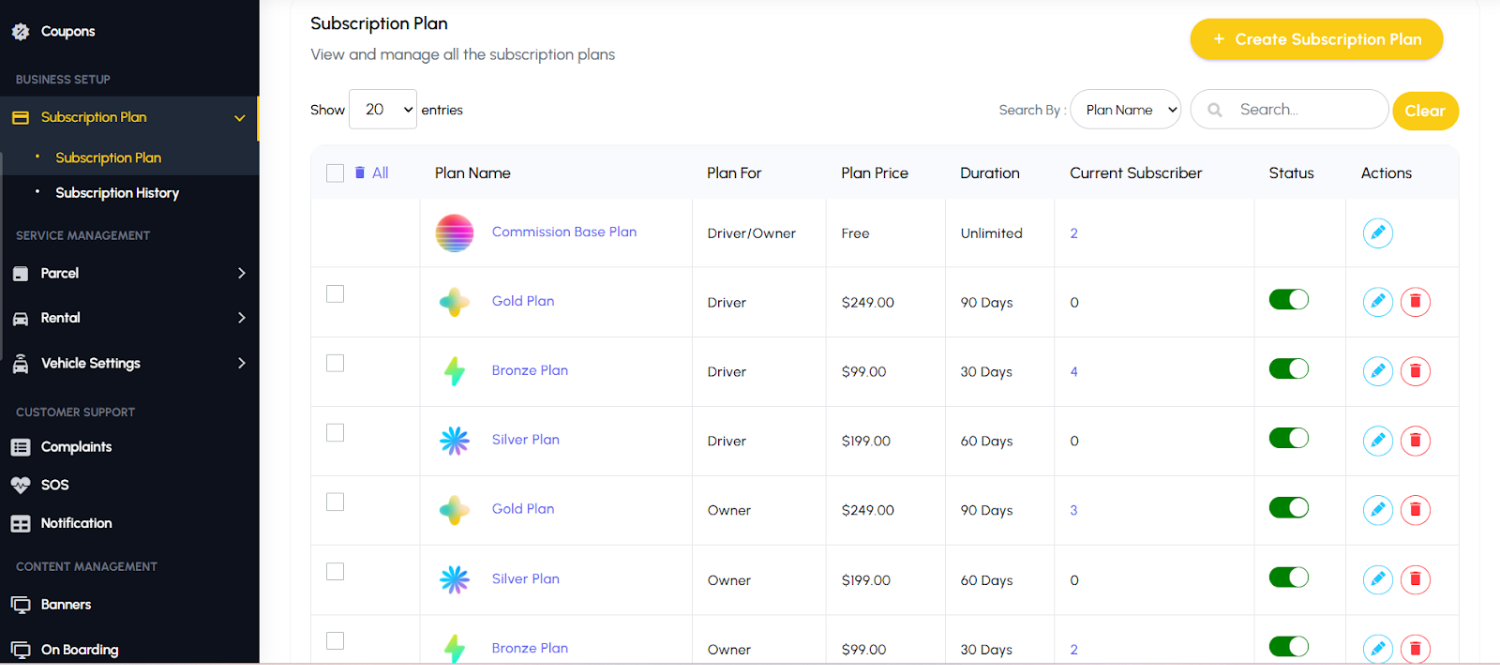
Subscription Plan
The Subscription Plan page allows administrators to create and manage subscription packages for drivers and fleet owners. These plans define recurring fees that drivers or owners pay to access the platform’s services, replacing or supplementing commission-based models. Each plan can include details such as pricing, validity by days, benefits, and usage limits. Admins can track which drivers or owners are subscribed, monitor their subscription history & payment status.
4.9: Service Management
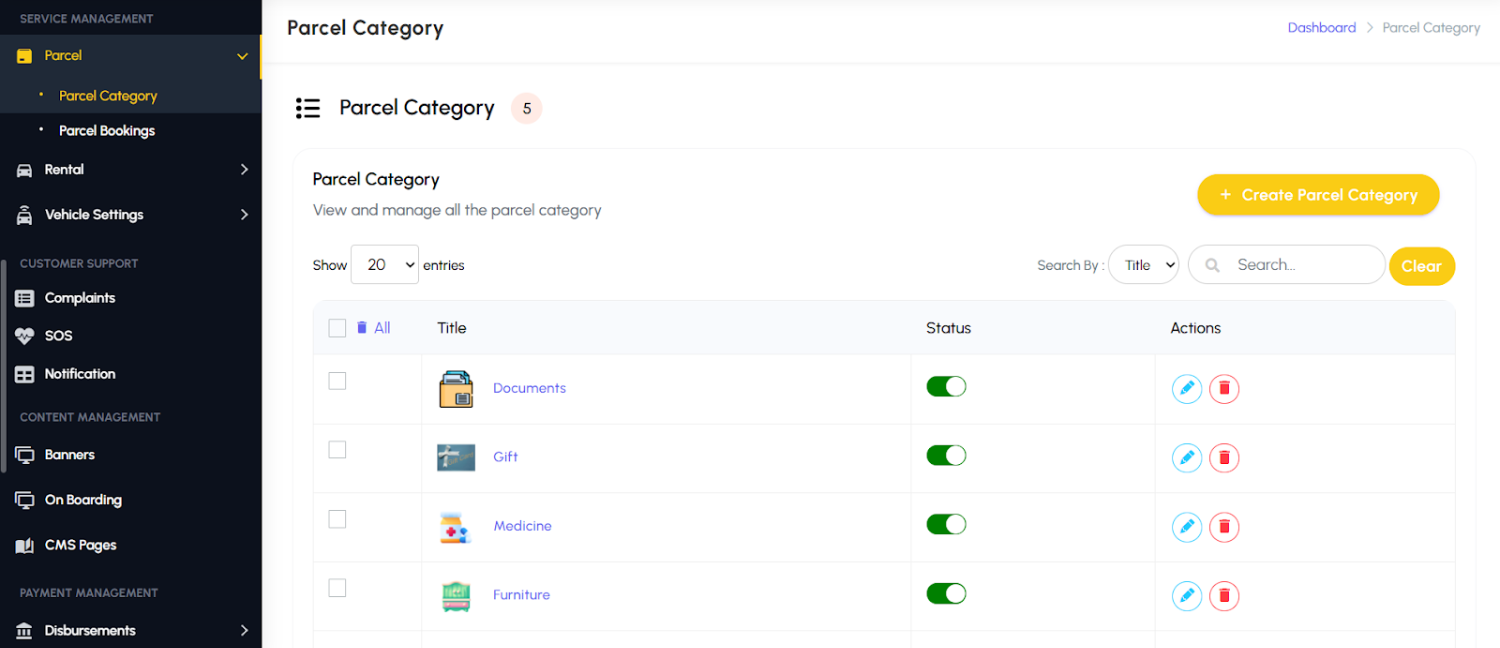
Parcel
The Parcel Service Management page allows administrators to oversee and configure parcel delivery services within the platform. From this page, admins can create and manage parcel categories (such as small, medium, or large packages). Additional options include setting delivery policies, enabling/disabling parcel service availability, and assigning drivers or vehicle types suitable for parcel transport. This ensures flexibility in handling different package requirements while maintaining transparent pricing and efficient service delivery for customers.
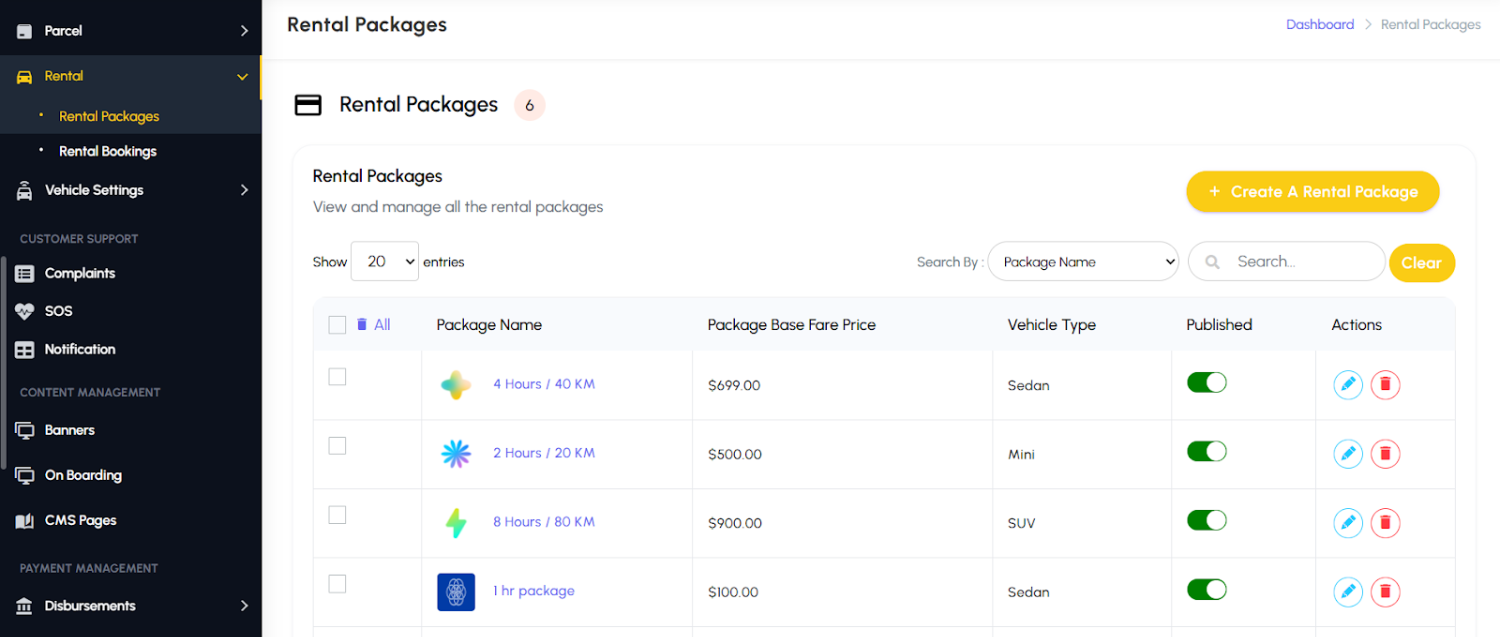
Rental
The Rental Service Management page enables administrators to manage ride bookings where customers hire vehicles for extended durations instead of point-to-point trips. Admins can define rental packages with flexible options, such as hourly rates, distance-based pricing. Each package can include details like vehicle type, maximum allowed hours or kilometers, and additional charges for extra usage.
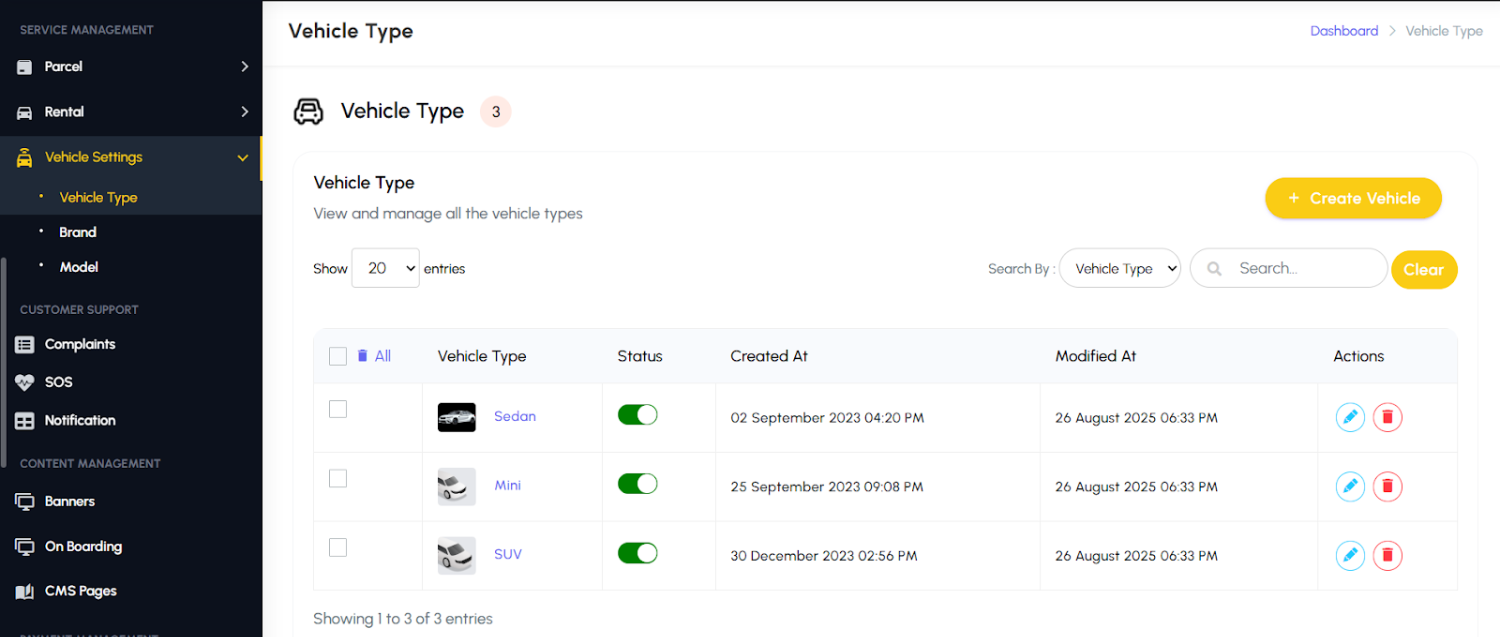
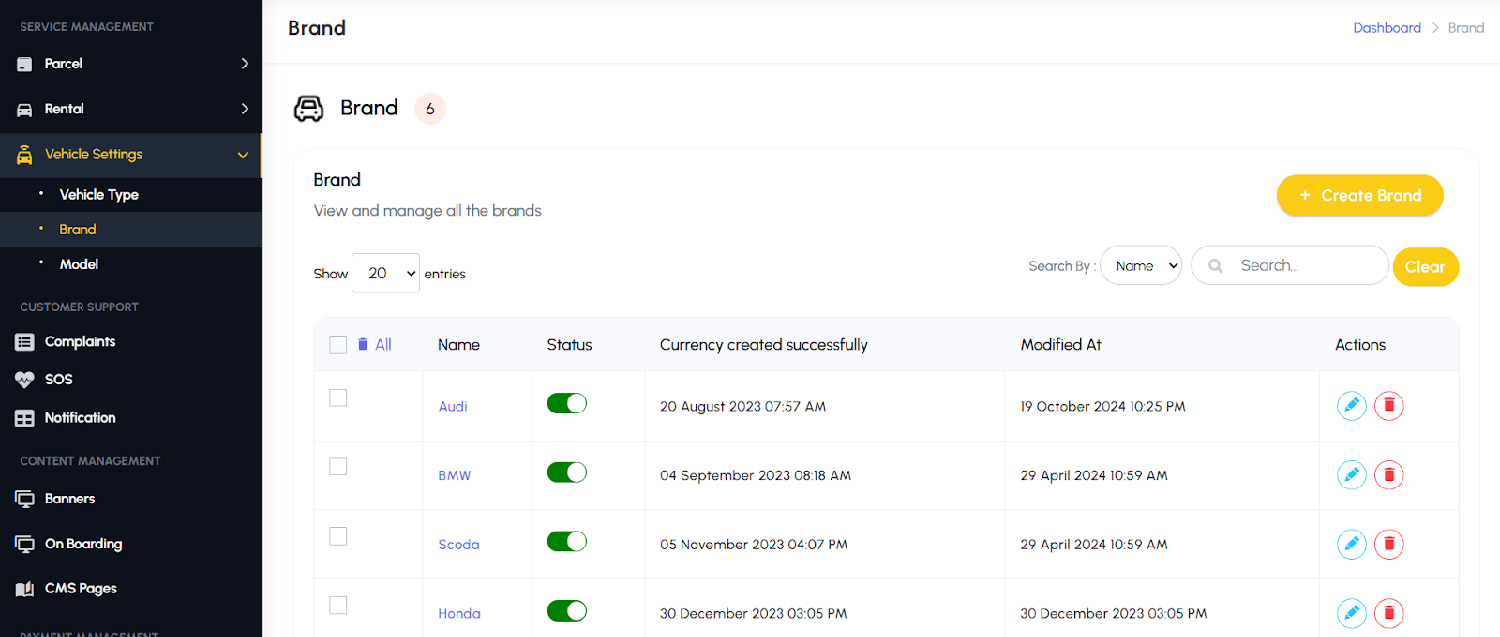
Brand: Maintain list of vehicle brands (Toyota, Honda, etc.).
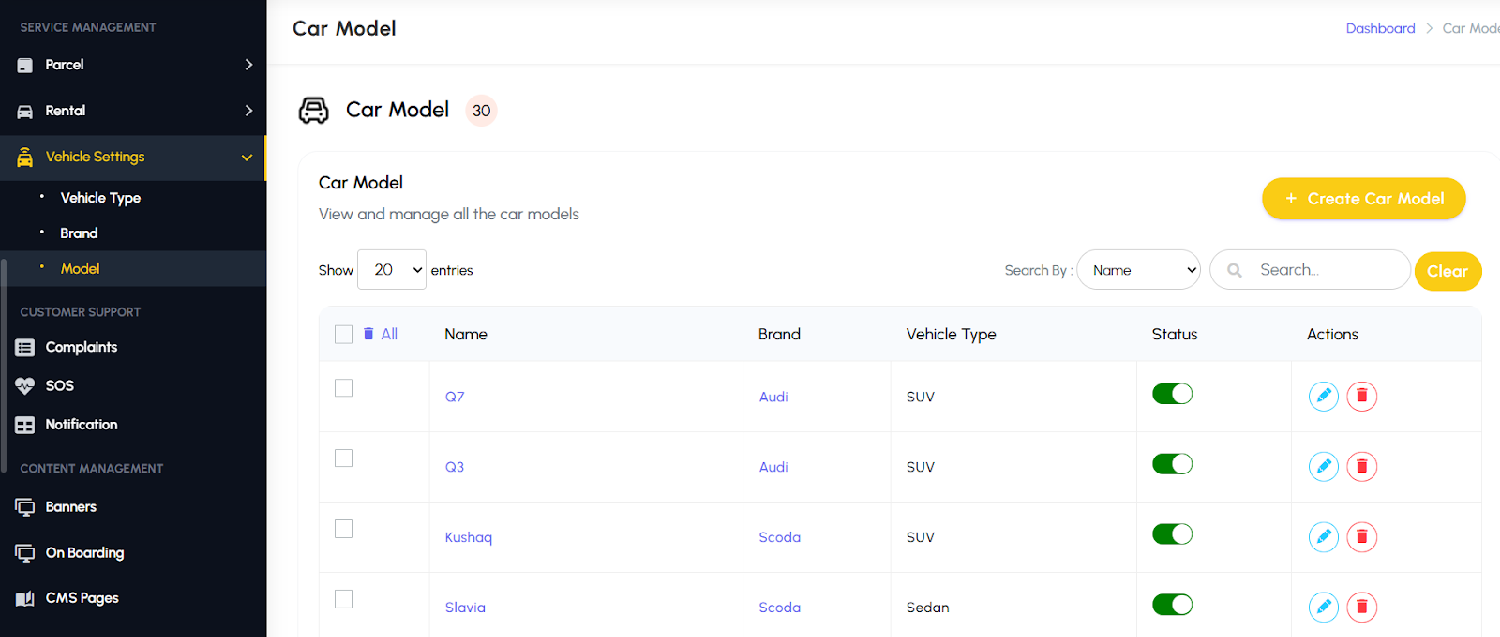
Model: Manage vehicle models under each brand.
4.10: Customer Support
Complaints
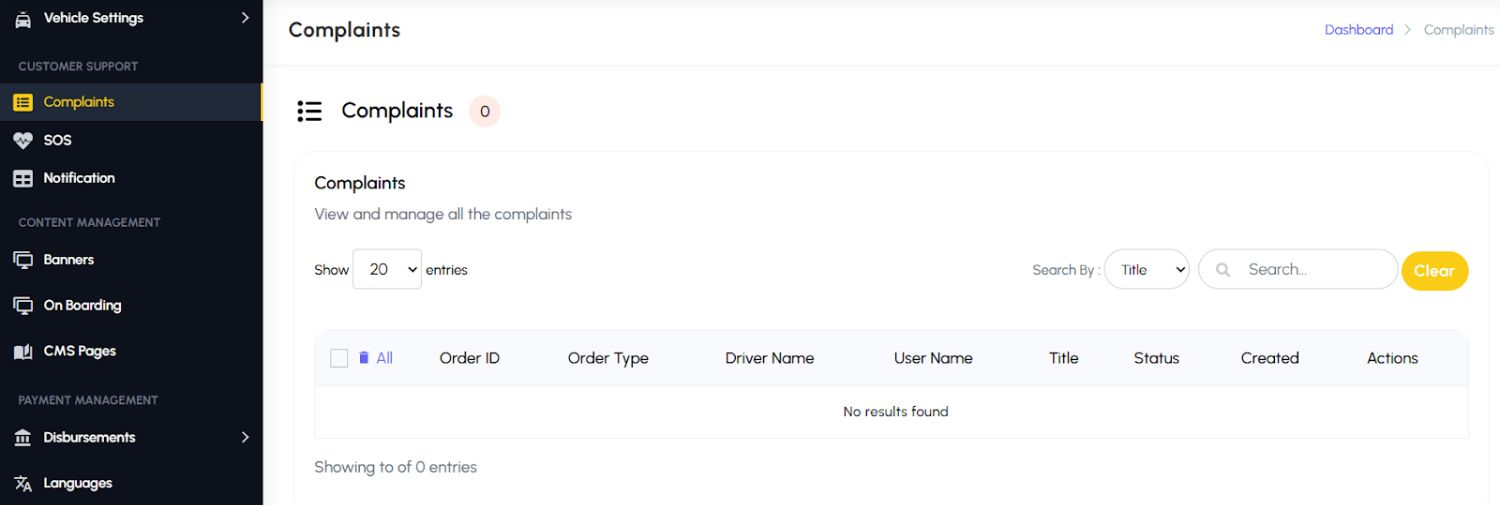
The Complaints page allows administrators to manage and resolve customer grievances effectively. Each complaint includes details such as the customer’s information, related ride or service, and the nature of the issue. Admins can track the status of complaints, assign them to the appropriate staff or department for resolution, and monitor response times. This page helps maintain high service quality by ensuring that issues are addressed promptly, patterns are identified, and corrective actions are implemented to prevent recurring problems.
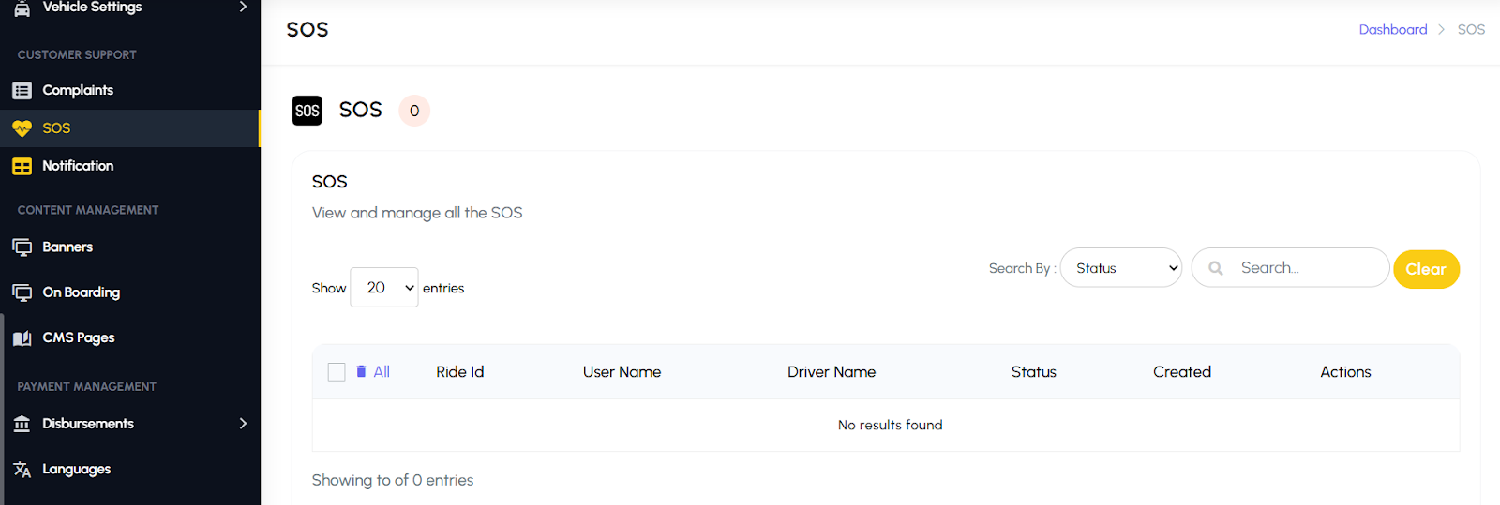
SOS
The SOS page enables administrators to monitor and manage emergency alerts raised by drivers or customers in real time. Each alert provides critical information such as the location, type of emergency, and the user involved. Admins can quickly track and respond to these SOS events, ensuring prompt assistance and intervention. This page helps improve safety across the platform by enabling rapid coordination, documenting incidents, and maintaining records for follow-up and preventive measures.
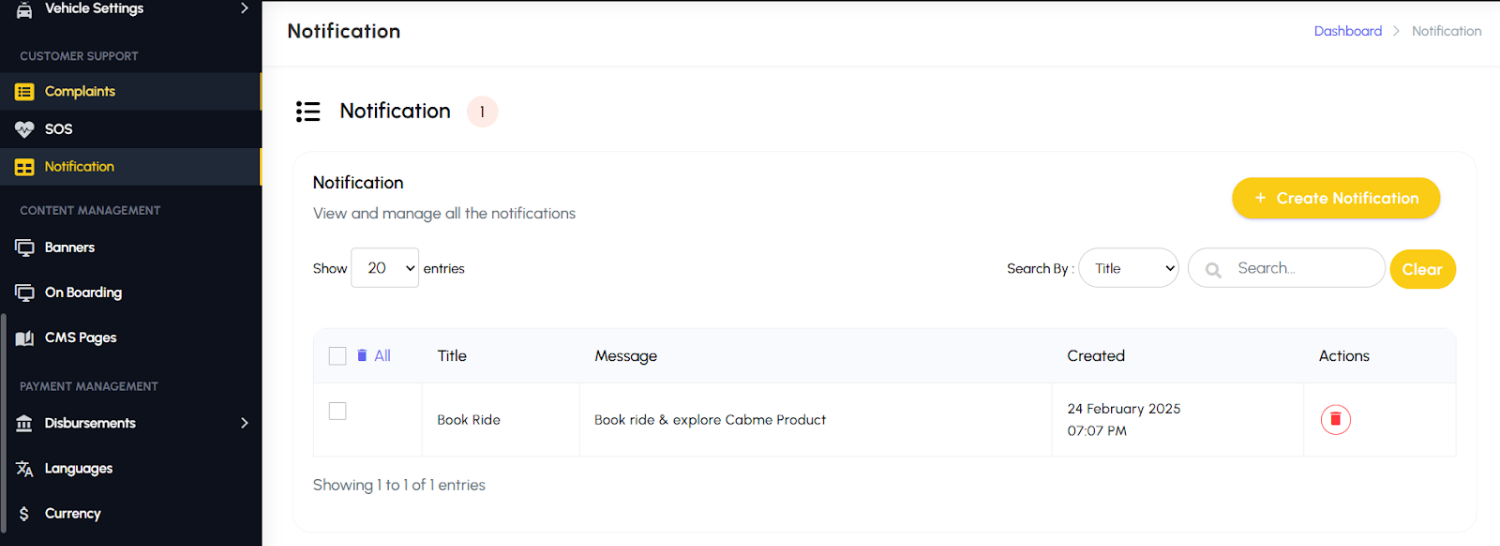
Notification
The Notification page allows administrators to send both manual and automated push notifications to drivers and customers. Notifications can include service updates, promotional offers, important alerts, or reminders. Admins can target specific users like drivers or customers. This page helps maintain effective communication, keep users informed, and engage customers and drivers for better platform interaction.
4.11: Content Management
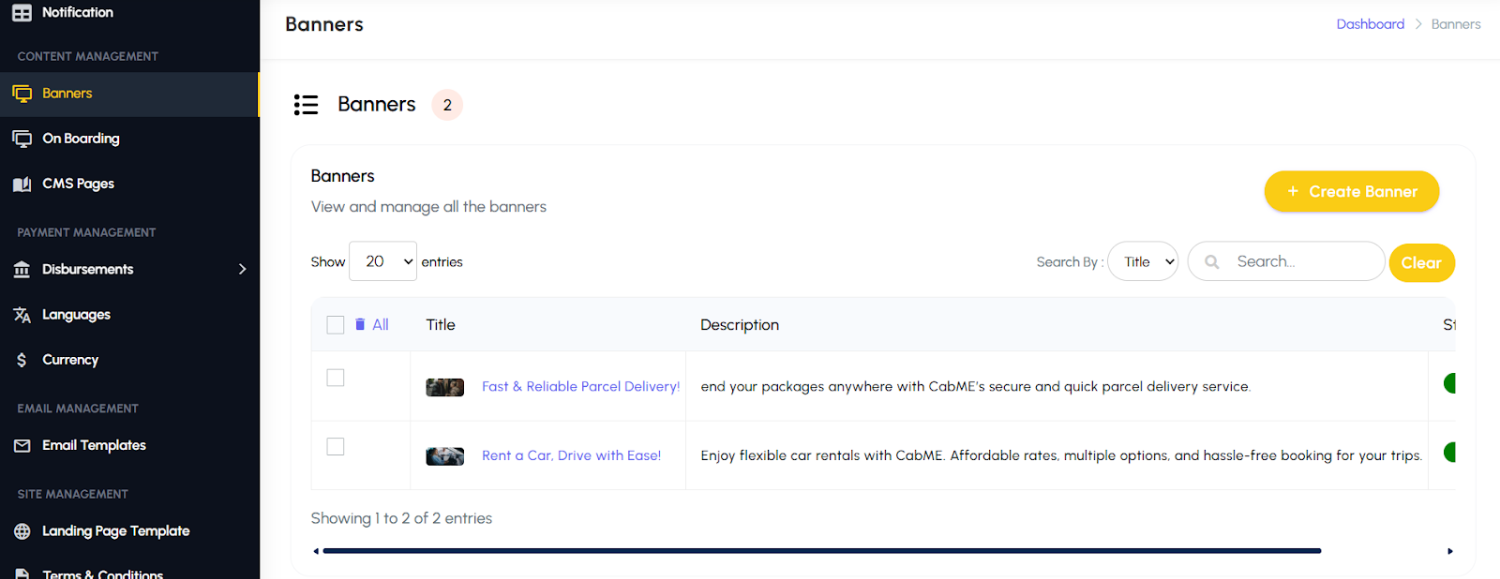
Banners
The Banners page allows administrators to create, manage, and display promotional or informational banners within the customer mobile application. Each banner can include images, title & description to highlight offers, updates, or important announcements. Admins can control the visibility of banners ensuring relevant and engaging content. This page helps enhance user experience, promote services effectively, and drive customer engagement through visually appealing notifications.
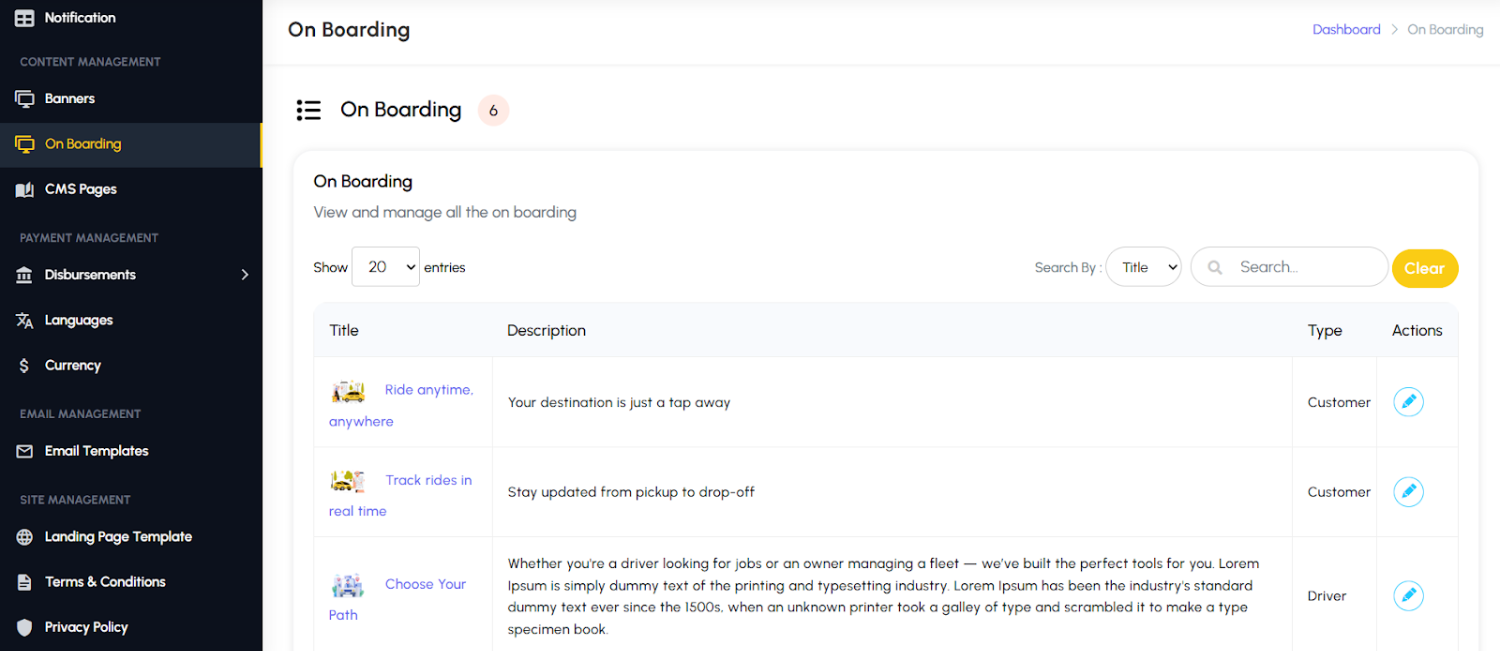
On Boarding
The On Boarding page allows administrators to configure the introductory screens shown to new users when they first open the mobile application. These screens can highlight key app features, explain how to use services, and provide tips for a smooth experience. Admins can add images, text, and interactive elements to make the onboarding process engaging and informative. This page ensures that new users quickly understand the app’s functionality, enhancing user adoption and reducing confusion during initial use.
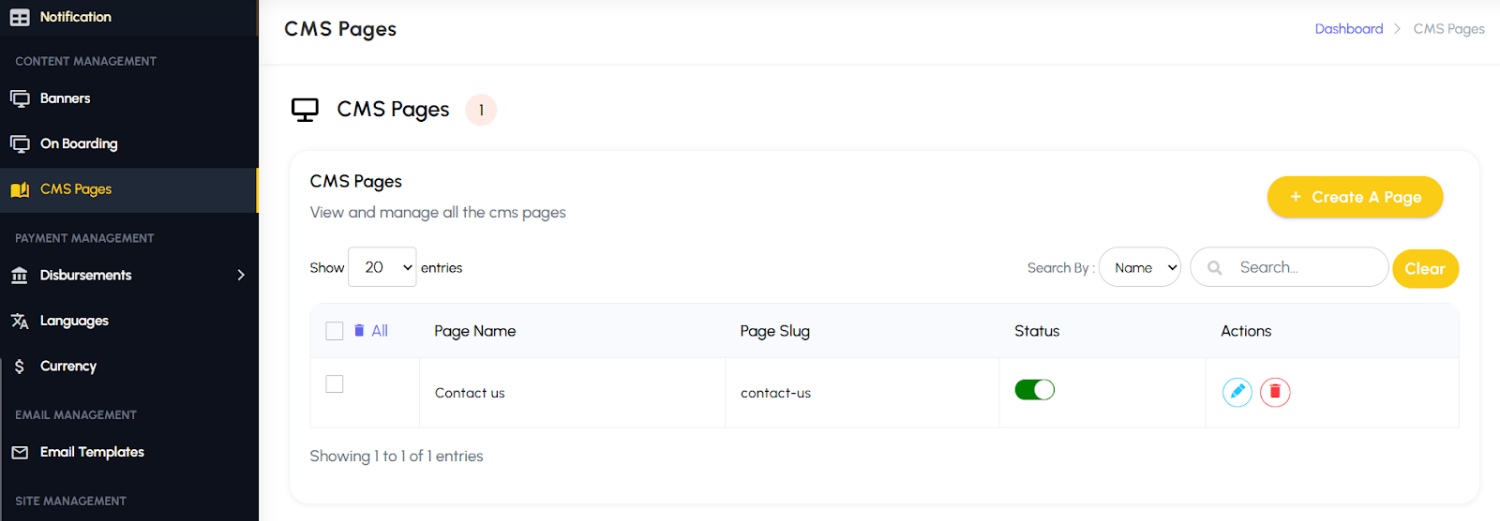
CMS Pages
The CMS Pages section allows administrators to create, edit, and manage static content pages within the app, such as About Us, FAQs, Terms & Conditions, Privacy Policy, and more. Each page can include text, images, and links, ensuring that essential information is clearly presented to users. Admins can update content anytime to reflect changes in policies, services, or company information. This page ensures that the app provides accurate and up-to-date information, improving transparency and user trust.
4.12: Payment Management
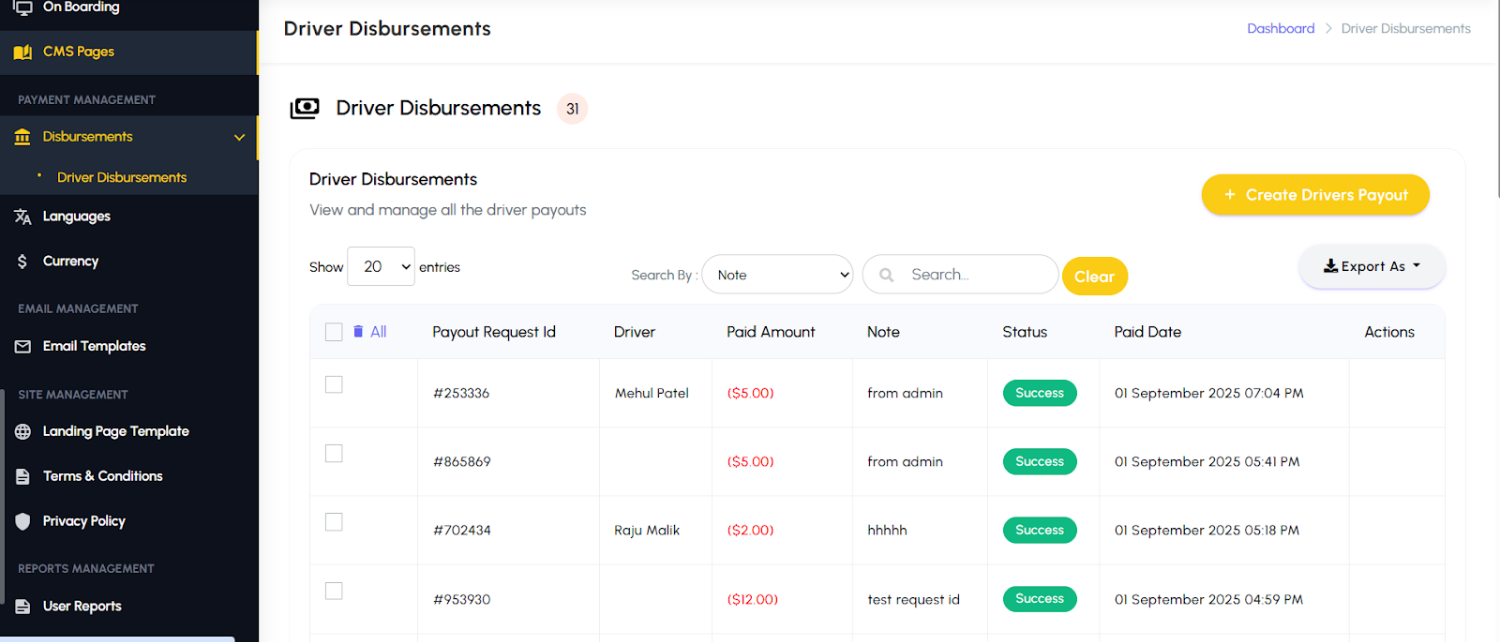
Disbursements
The Disbursements page allows administrators to manage and monitor payouts to both drivers and fleet owners. Admins can view the status of each disbursement, including pending, completed, or failed payments, ensuring transparency and accountability in financial operations.
Driver Disbursements: This section specifically focuses on payment settlements for drivers, providing a clear overview of their earnings, platform deductions, and payout history. Administrators can initiate payments, track transactions, and resolve any issues to maintain timely and accurate driver compensation.
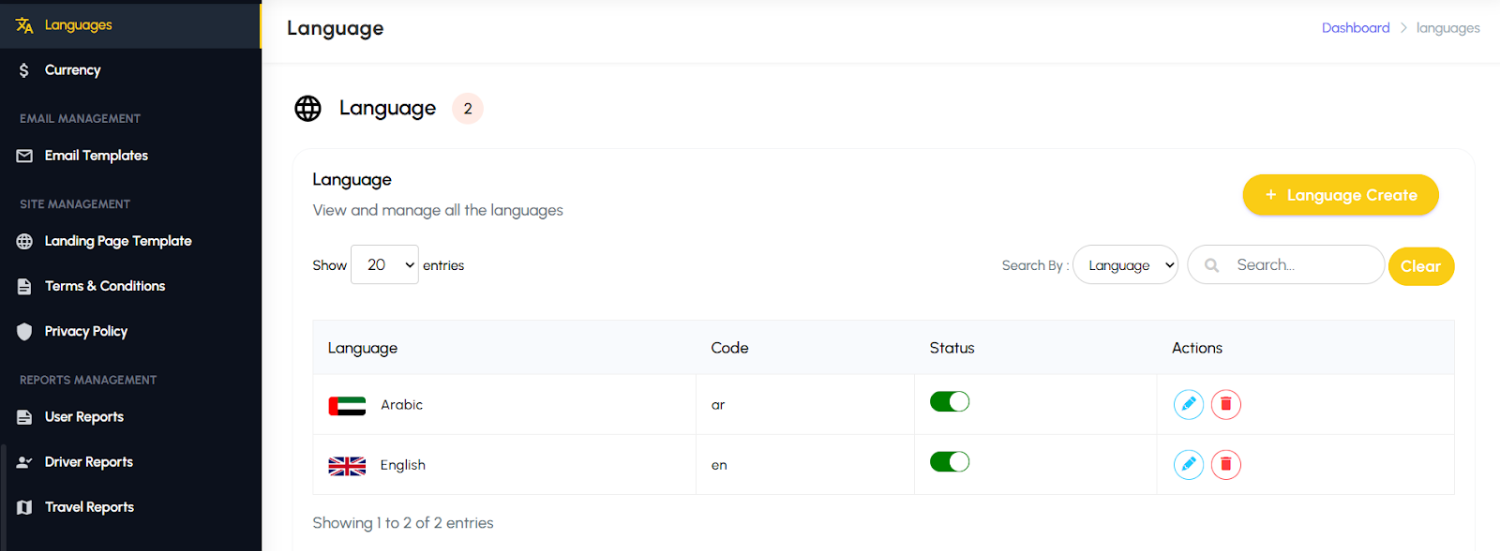
Languages
The Languages page allows administrators to manage the languages available in the admin panel. Admins can add new languages, edit the languages. This page helps maintain consistency across the admin panel, supports multi-lingual operations, and ensures that administrators can efficiently manage the platform in their preferred language.
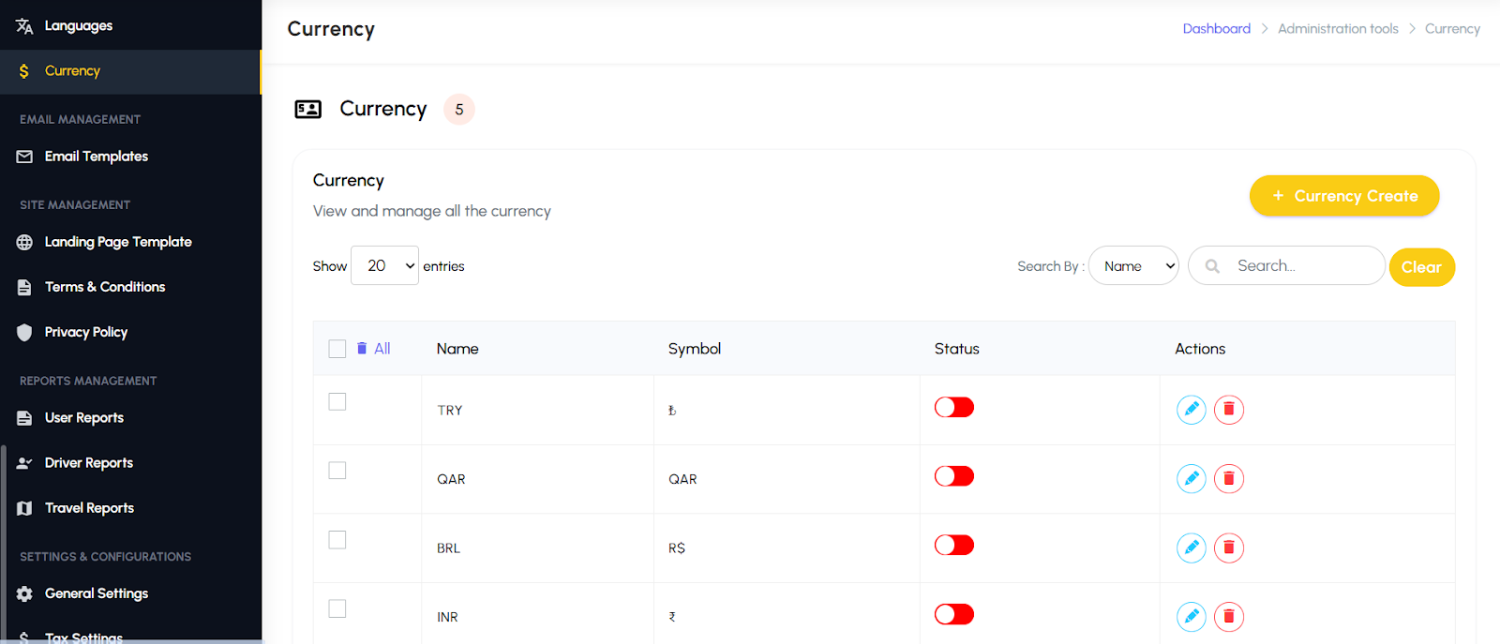
Currency
The Currency page allows administrators to define and manage the currencies supported by the platform. Admins can set default currencies, add additional currencies for global operations. This page helps maintain consistency in financial transactions, supports multi-currency operations, and ensures that both customers and drivers see correct amounts in their local currency.
4.13: Email Management
Email Templates
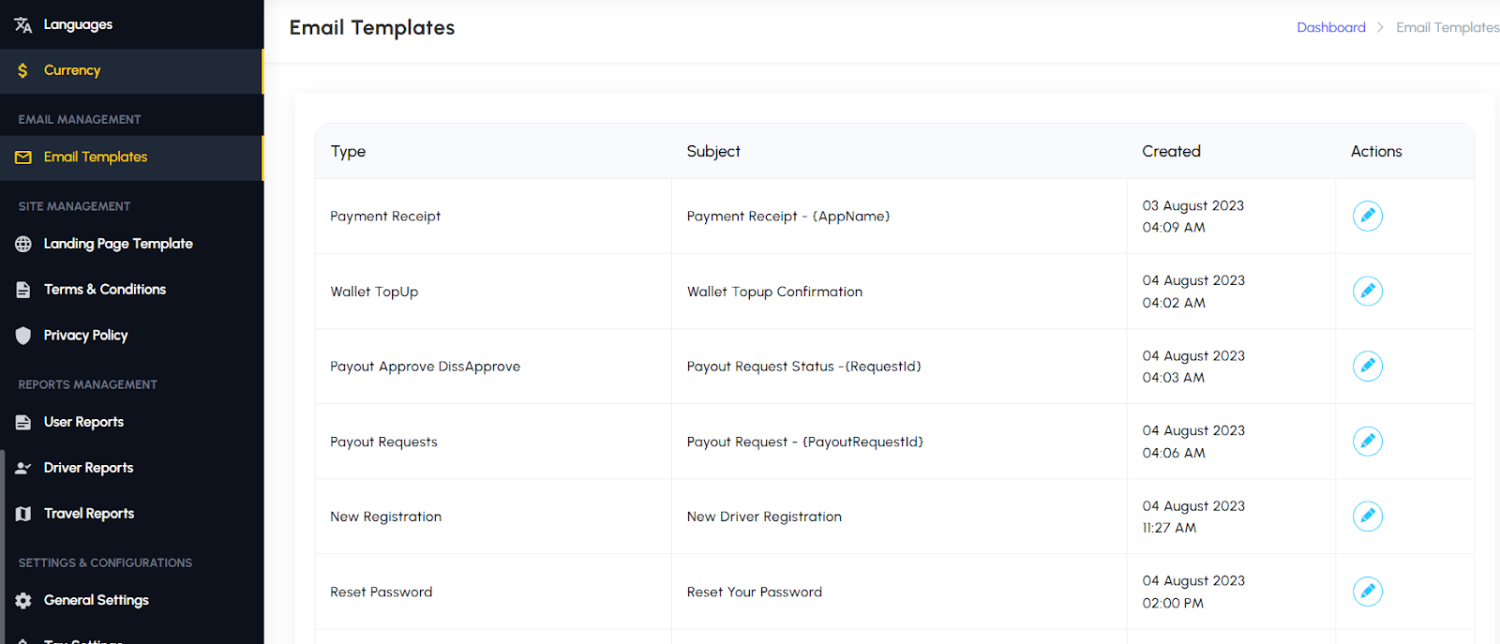
The Email Templates page allows administrators to create, edit, and manage dynamic email templates used across the platform. These templates can be customized for ride booking confirmations, parcel delivery updates, rental notifications, promotional campaigns, and other user communications. Admins can include placeholders for dynamic data such as customer names, booking details, and dates to personalize each message. This page ensures consistent branding, automates communication, and enhances user engagement by delivering timely and relevant information.
4.14: Site Management
Landing Page Template
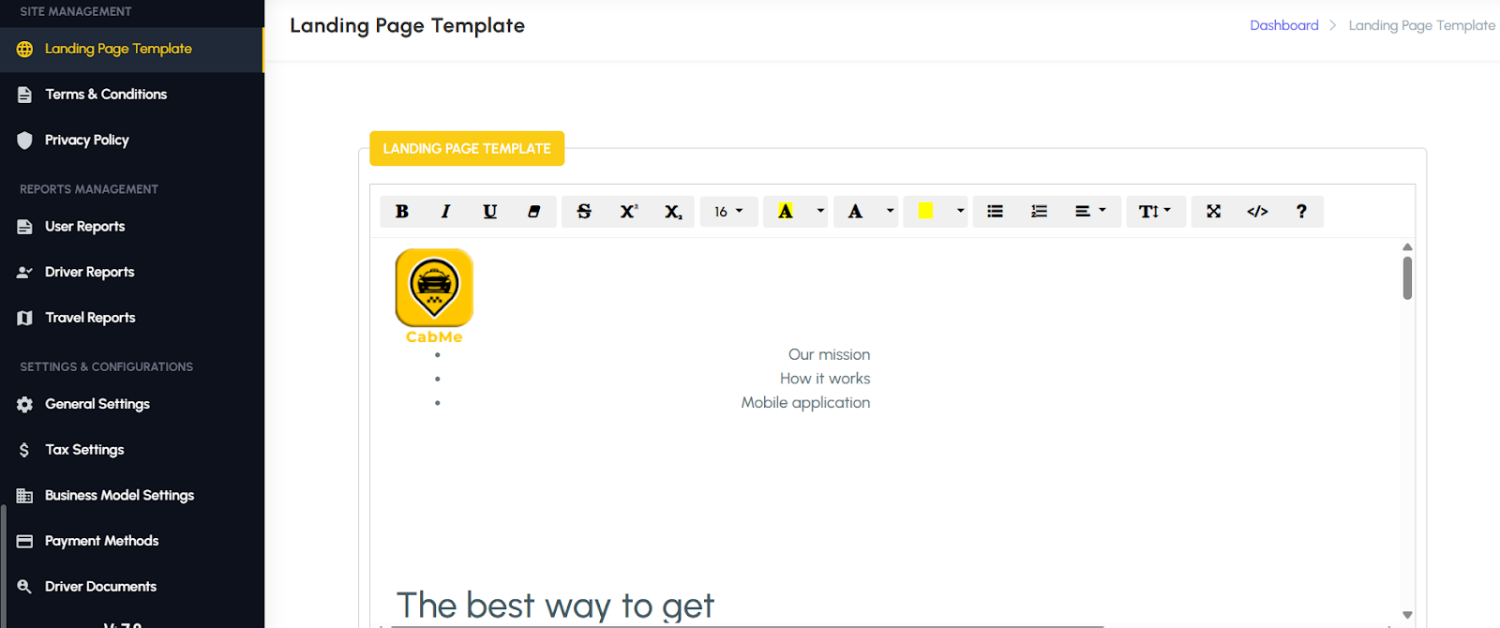
The Landing Page Template page allows administrators to manage and customize the public-facing landing page of the CabMe platform. Admins can update banners, text content, images, and branding elements to reflect current promotions, company identity, or seasonal campaigns. This page provides control over the look and feel of the landing page, ensuring it is visually appealing, informative, and aligned with marketing objectives. It helps attract new users, communicate key messages effectively, and maintain a professional online presence.
Terms & Conditions
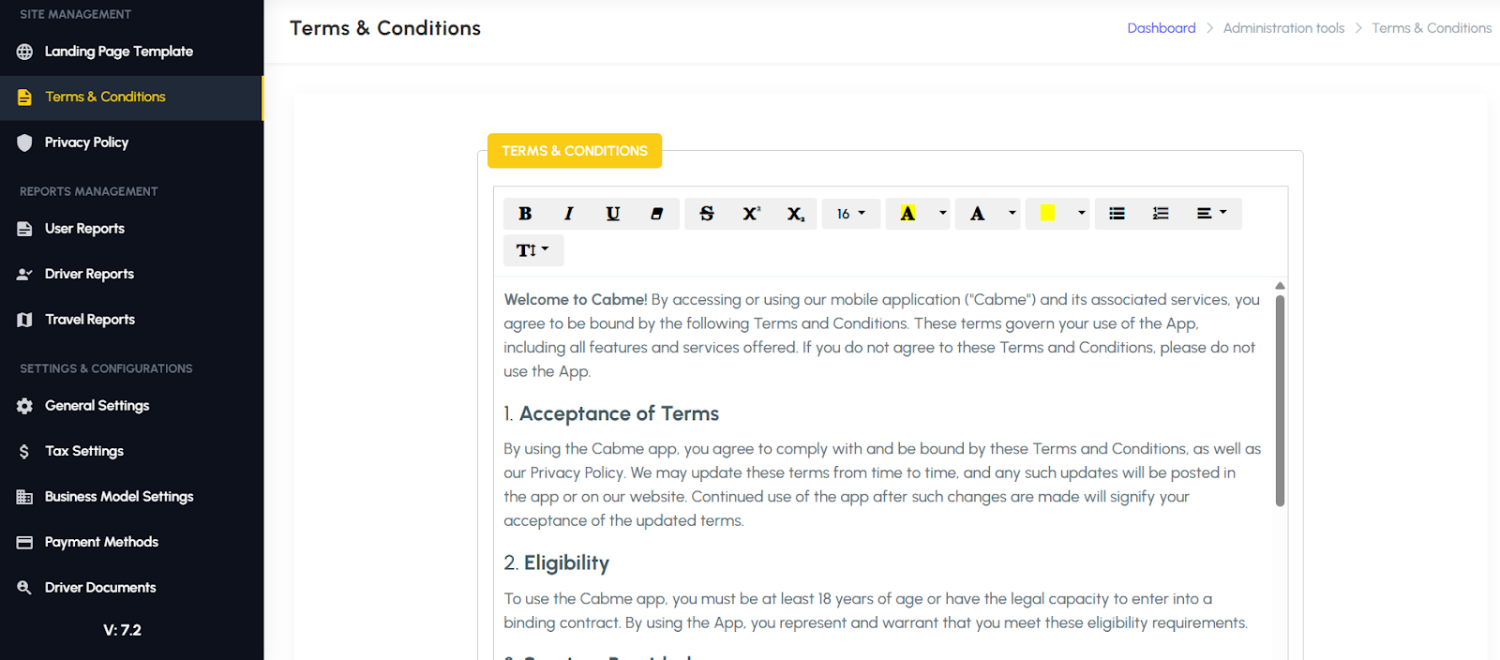
The Terms & Conditions page allows administrators to create, update, and maintain the legal agreements displayed to users within the app. Admins can edit content to reflect company policies, service rules, and regulatory requirements, ensuring that users are informed about their rights and obligations. This page helps maintain legal compliance, provides transparency, and protects both the platform and its users by clearly communicating the terms of service.
Privacy Policy
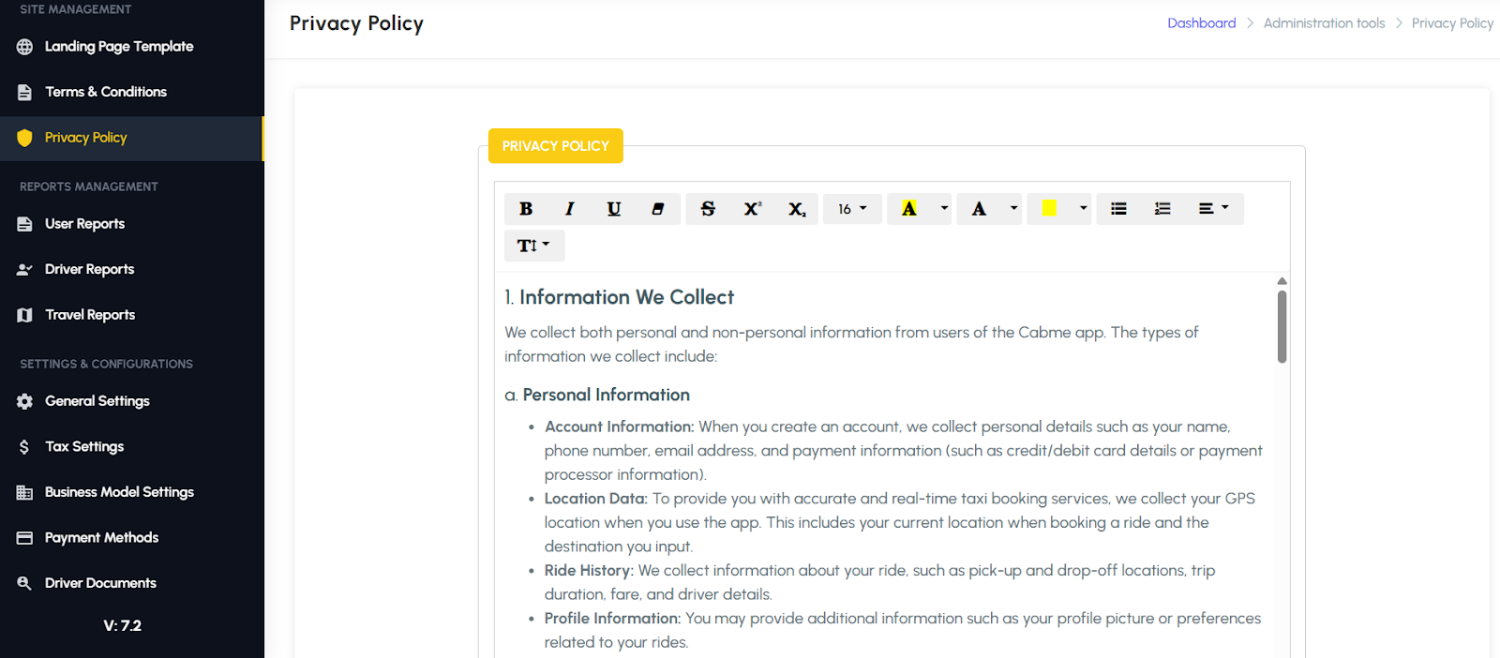
The Privacy Policy page allows administrators to create, update, and maintain the privacy policy content displayed to users within the app. Admins can ensure the policy complies with regulations such as GDPR and local data protection laws, clearly explaining how user data is collected, stored, and used. This page helps build trust with users, maintain legal compliance, and provide transparency regarding data privacy and security practices.
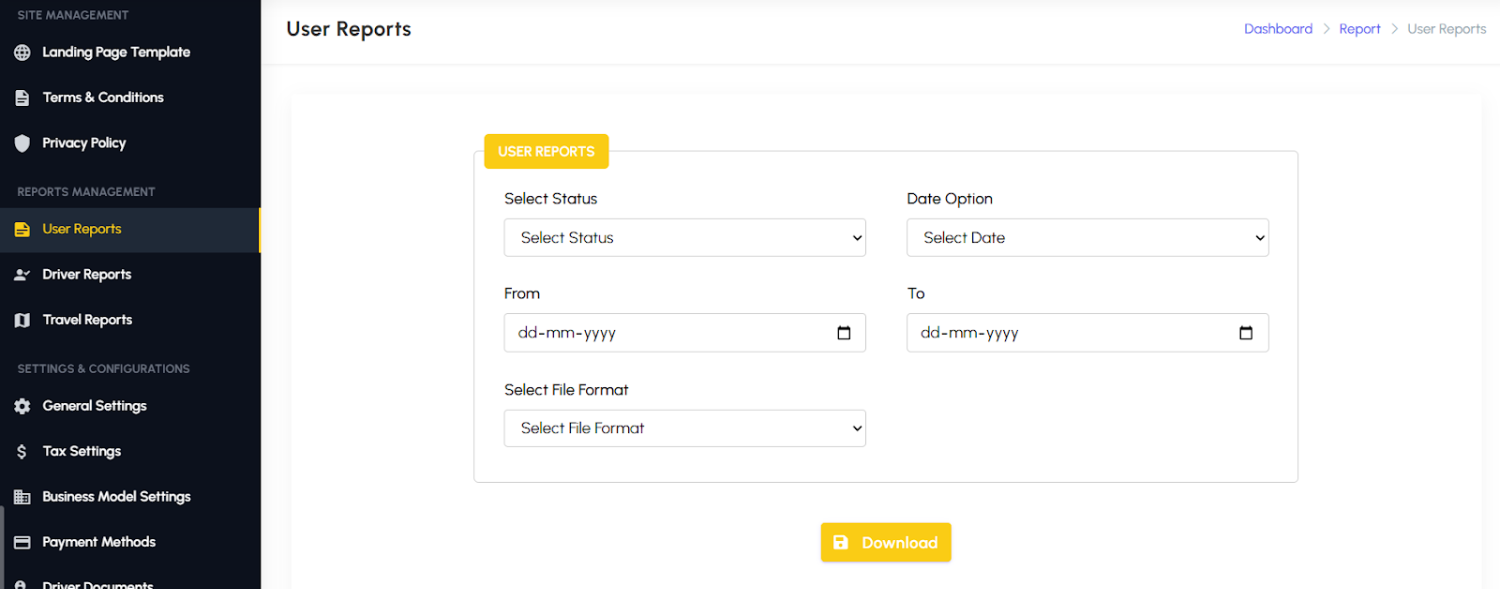
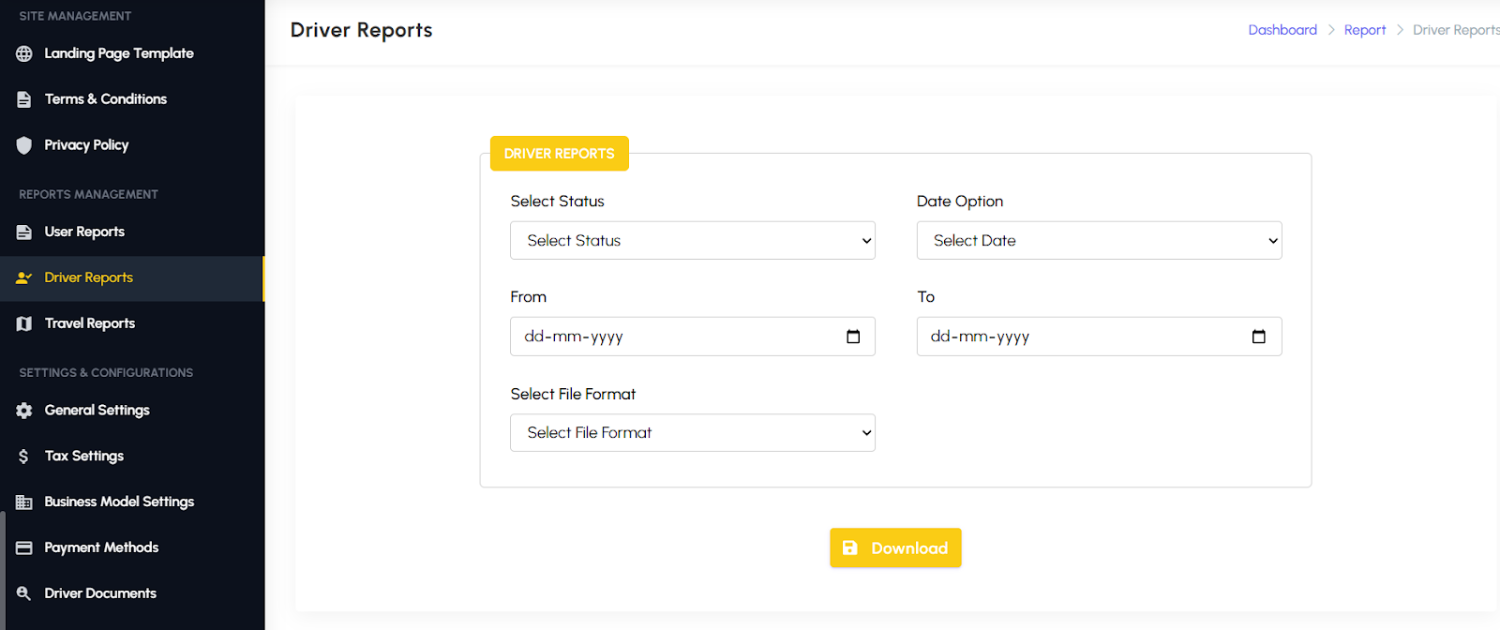
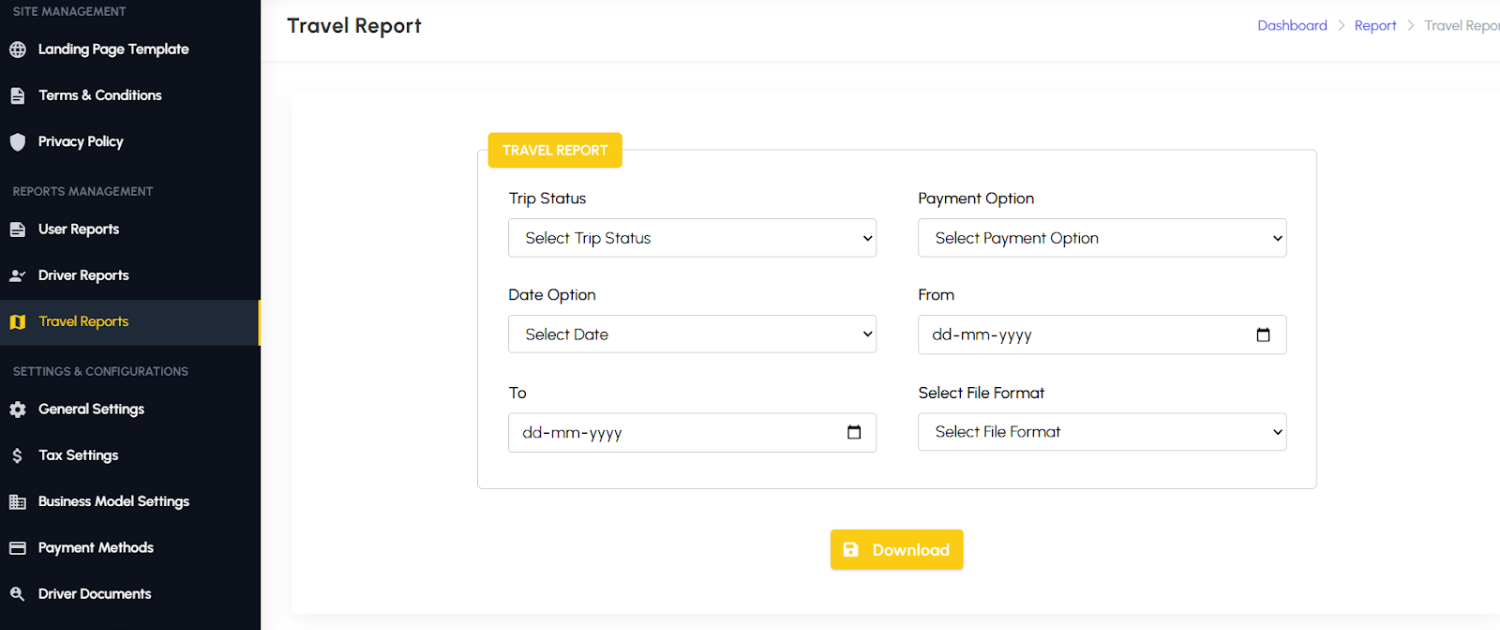
4.15: Reports Management
The Reporting and Analytics section in the admin panel provides comprehensive insights into platform activity, allowing administrators to monitor performance, make data-driven decisions, and identify trends. Reports can be customized using various filters and options to generate precise and actionable information. Key options include:
Status: Filter reports by the status of rides, trips, or transactions (e.g., completed, canceled, ongoing).
Date Options: Quickly generate reports based on preset time frames like Today, This Week, This Month, or This Year.
From & To: Select a custom date range for detailed reporting over any period.
File Format: Export reports in multiple formats such as XLS, CSV, or PDF for offline analysis, record-keeping, or sharing with stakeholders.
User Reports
The User Reports page generates detailed reports on customer activity. Administrators can track metrics such as user history. This helps identify user engagement patterns, monitor retention, and address issues impacting the customer experience.
Driver Reports
The Driver Reports page focuses on driver performance analytics. Admins can review driver details. These reports help evaluate driver efficiency and take corrective actions for underperforming drivers, ensuring high service quality.
Travel Reports
The Travel Reports page consolidates analytics across all service types, rides, parcels, and rentals. It provides insights into total number of trips, cancellations, average trip distance, and peak usage times. This data helps in resource planning, optimizing service availability, and identifying high-demand periods to enhance operational efficiency.
4.16: Settings & Configurations
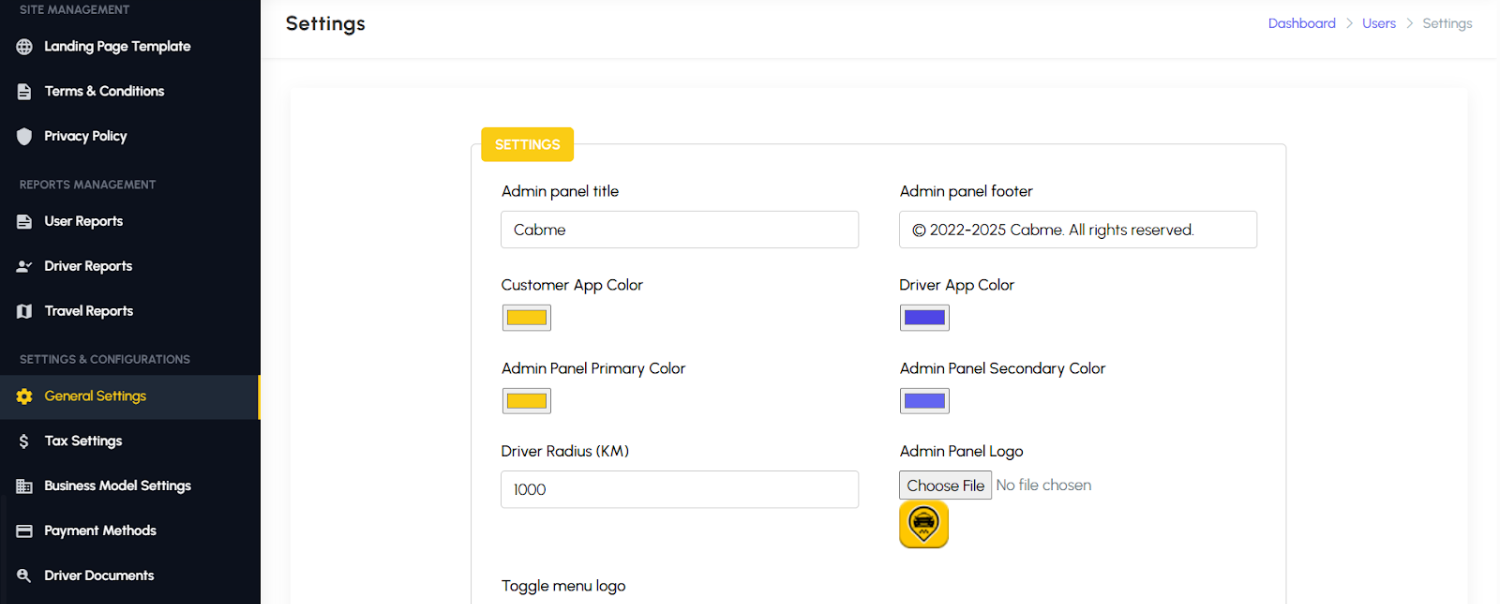
General Settings
The General Settings page allows administrators to configure all core settings for the app, web panel, and overall platform operations. These settings ensure the platform runs smoothly, maintains consistent branding, and meets operational requirements.
General
Admins can define the basic platform appearance and identity:
Title & Footer: Customize the platform’s name and footer text.
App Color, Admin Panel Primary & Secondary Colors: Set color schemes for both mobile app and admin panel for consistent branding.
Radius: Configure service coverage radius for rides, parcels, or rentals.
Logo: Upload platform or company logo for display across app and admin panel.
Google Map API Key
Enter the Google Map API Key to enable accurate location tracking, route mapping, and distance calculation for rides, deliveries, and rentals.
Ride Settings
Trip Accept/Reject Duration for Driver (in seconds): Define the time a driver has to accept or reject a ride request.
Show Ride OTP Feature: Enable or disable the one-time password feature for ride verification between driver and customer.
Delivery Charge Distance
Configure distance slabs and pricing for deliveries to calculate charges based on travel distance.
Wallet Settings (For Driver)
Minimum Wallet Amount to Receive Ride: Specify the minimum balance a driver must maintain to accept new rides.
Minimum Wallet Amount to Withdrawal: Set the minimum balance required for drivers to request payouts.
Referral Settings
Referral Amount: Define the reward amount users or drivers receive when they refer others to the platform.
Select Service Type
Choose which services are active on the platform: Ride, Parcel, Rental.
Document Verification
Enable Individual Driver Document Verification: Turn on/off verification for personal driver documents.
Enable Owner Document Verification: Enable verification for fleet owner documents to ensure authenticity and compliance.
Map Tracking Options
Map Type: Select the type of map (Google, OpenStreetMap, etc.) used in the app.
Map Tracking Option: Choose how driver locations are tracked in real-time.
Driver Location Update (meter): Configure how frequently the driver’s location is updated for accurate tracking.
Contact Us
Set platform contact details including Email, Phone, and Address, which will be visible to users in the app and web panel.
Notifications Setting
Sender ID: Configure the ID used for sending push notifications.
Upload Credentials File (JSON): Upload the required credentials file to enable notifications via Firebase messaging services.
Version
Maintain App Version and Web Version information for reference and updates tracking.
Tax Settings
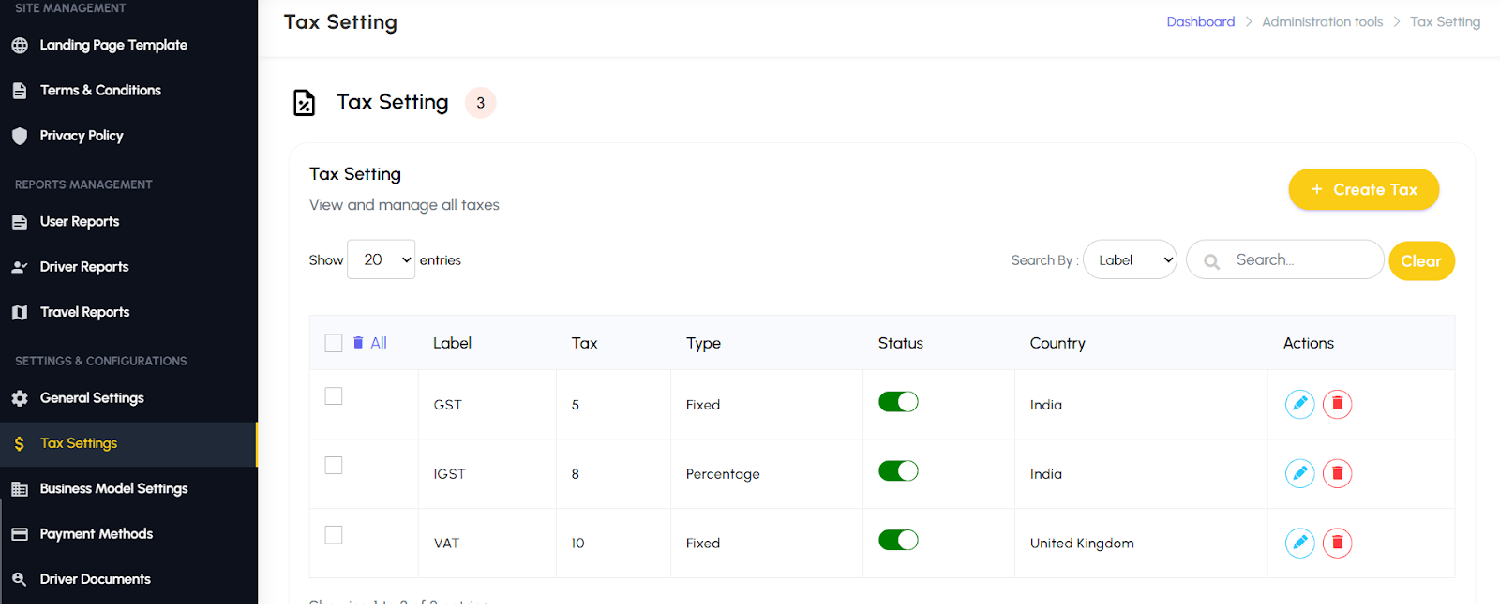
The Tax Settings page allows administrators to configure taxes applicable across all services, including rides, parcels, and rentals. Admins can define tax types such as GST, VAT, or other local taxes and specify rates for each service category. This page ensures that all fare calculations include accurate tax amounts, maintains compliance with local tax regulations, and provides transparency for customers and drivers. Proper tax configuration also helps in generating accurate financial reports and simplifies accounting and regulatory reporting.
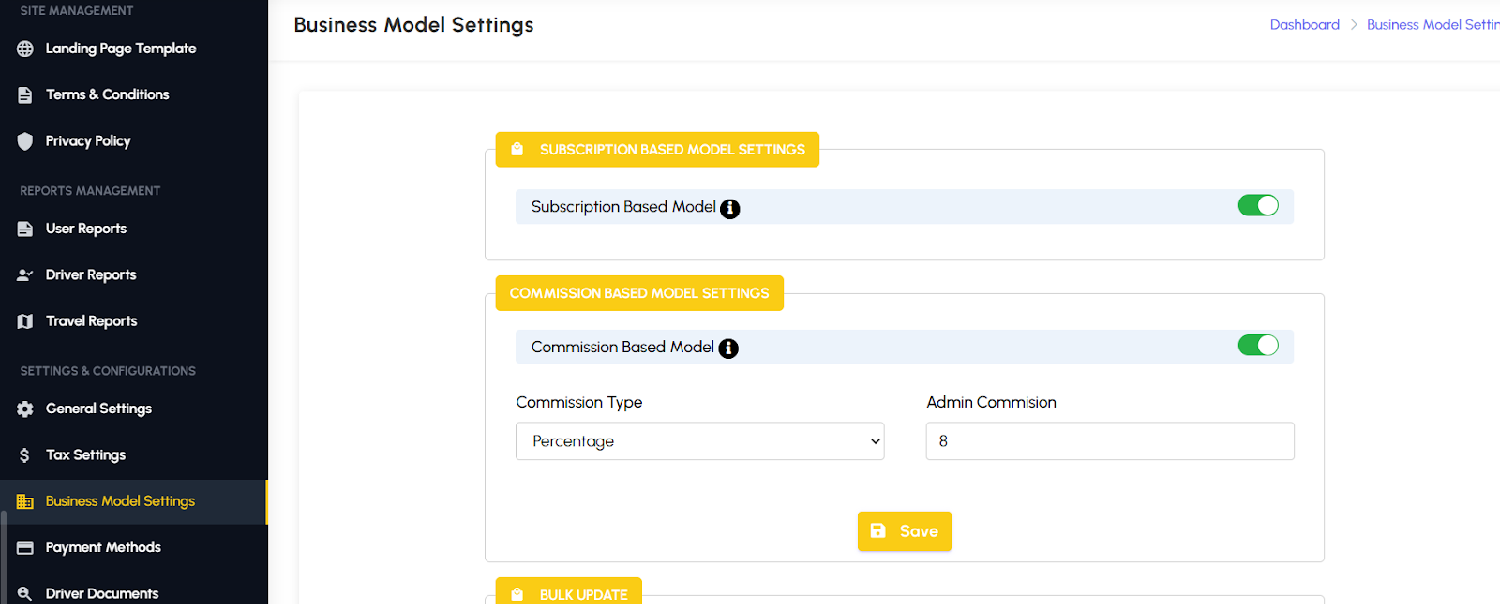
Business Model Settings
The Business Model Settings page allows administrators to define how the platform generates revenue from drivers and fleet owners. Admins can choose between different earning models:
Commission Model: The platform earns a percentage of each completed ride, parcel, or rental transaction.
Subscription Model: Drivers or fleet owners pay a recurring subscription fee to access the platform’s services.
Hybrid Model: Combines both commission and subscription-based earnings, allowing flexible revenue strategies.
This page ensures that the platform’s revenue model aligns with business objectives and provides flexibility to adapt to market demands or strategic changes. Administrators can adjust settings easily to implement the chosen model across all services.
Payment Methods
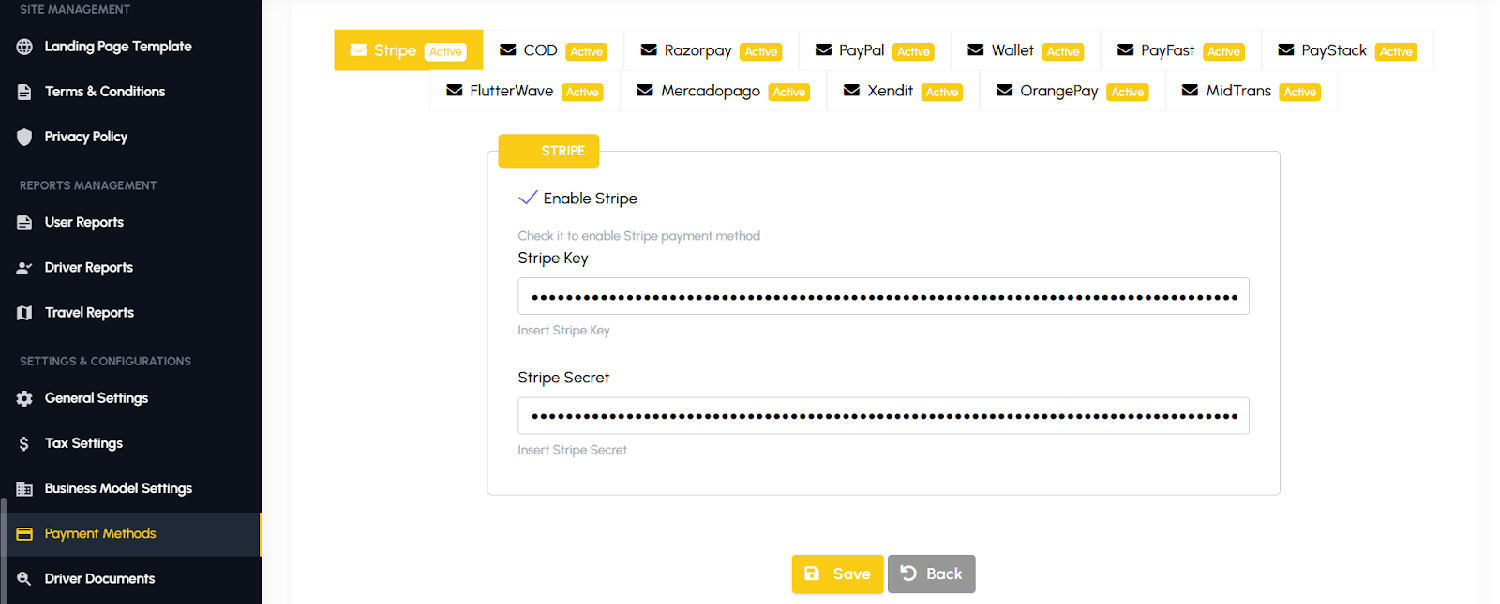
The Payment Methods page allows administrators to configure and manage the payment options available on the platform. Admins can enable or disable various gateways, including Cash, Stripe, PayPal, Razorpay, and Wallet payments, ensuring flexibility for both customers and drivers. This page ensures secure and seamless transactions, helps accommodate user preferences, and provides control over which payment methods are active for rides, parcels, and rentals. Proper configuration also enables smooth reconciliation of payments and supports accurate financial reporting.
Driver Documents
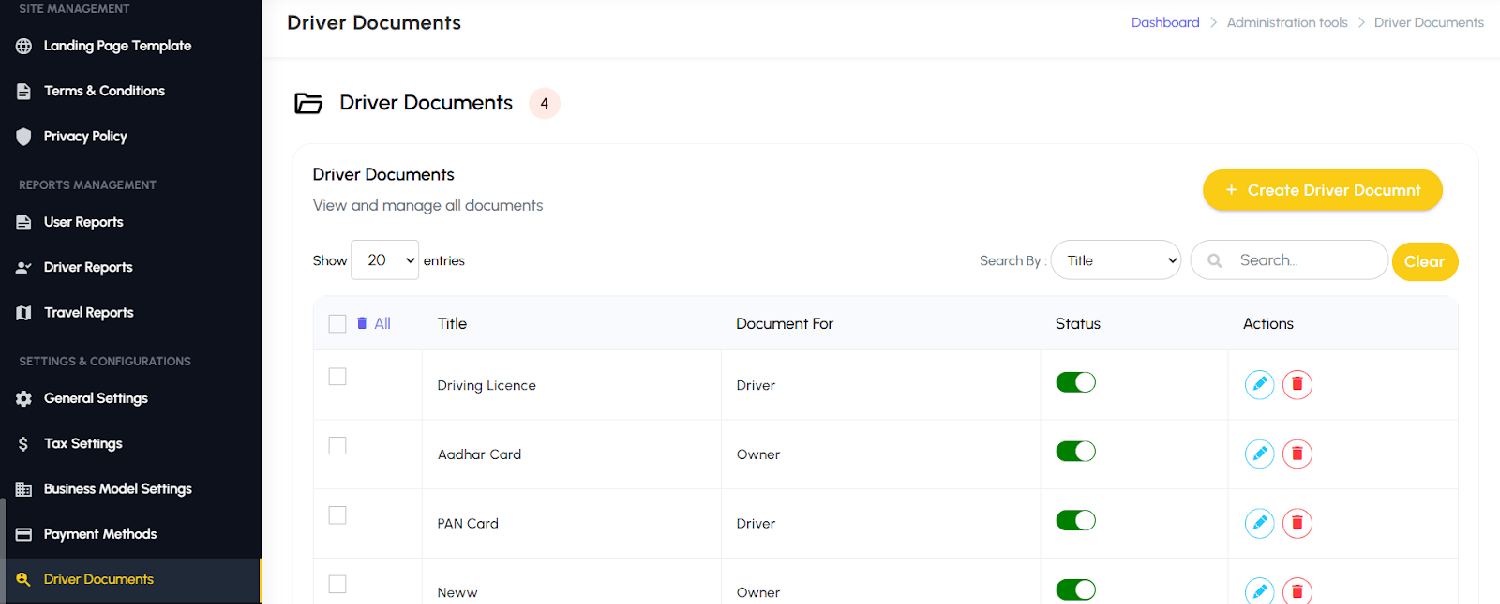
The Driver Documents page allows administrators to define and manage the documents required for verification of individual drivers and fleet owners. Admins can add new document types, such as Aadhaar Card, PAN Card, Driver License, or other ID proofs, and specify which documents must be uploaded during verification. This ensures that all necessary documentation is collected to maintain compliance, authenticity, and safety on the platform.
Dispatcher Panel Setup#
5. Dispatcher Panel Setup
The Dispatcher Panel is designed for operators responsible for managing bookings on behalf of customers. Dispatchers can create and manage ride, rental, and parcel bookings but do not have access to system-level settings such as pricing rules, commissions, or app configurations unless explicitly permitted by the admin. The Dispatcher Panel can be installed on:
Main domain (example: example.com/dispatcher)
Subdomain (example: dispatcher.example.com)
5.1 Connect to FTP and Setup
Follow these instructions to connect to your server using FTP and complete the application setup:
5.1.1: Connect to the server using FTP: Use an FTP client like FileZilla to connect to your server. Enter the server’s IP address, username, and password. Use port 21 for FTP or port 22 for SFTP.
5.1.2: Transfer the ZIP file: Upload your admin panel’s ZIP file to the server’s local path (e.g., /var/www/html).
5.1.3: Unzip the file: Navigate to the file’s location on the server and run the following command to extract the ZIP file: “sudo unzip your-application.zip” or you can do it from cpanel directly.
5.1.4: Update the .env file with your configuration: Modify the database and application settings which are mentioned in the .env file. Below is an example configuration:
5.1.5: Run the following command one by one.
php artisan key:generate
If you encounter any errors while creating a key, please run the following command to update all system packages.
composer update
5.2 Dispatcher Users, Access Control & Permissions
The Dispatcher Panel supports multiple dispatcher user types with role-based access and subscription validation. Dispatcher users are created and managed through the Admin Panel or automatically during owner registration.
5.2.1 Dispatcher User Types
The system supports the following dispatcher user types: 1. Individual Dispatcher (Admin-Created)
Created manually by the Admin from the Admin Panel.
Can log in directly to the Dispatcher Panel.
Granted permission to:
Create and manage all types of bookings.
Assign any available driver (manual or automatic).
2. Owner Dispatcher (Auto-Created)
Automatically created when:
An Owner registers via the mobile app, or
An Owner is created by the Admin Panel.
The owner account is also registered as a dispatcher user.
Login access to the Dispatcher Panel depends on the owner’s subscription plan.
Dispatcher Panel access for owner users is controlled through the subscription plan:
Each subscription plan includes a Dispatcher Panel Access option.
Owners can log in to the Dispatcher Panel only if:
They have an active subscription, and
Dispatcher Panel access is enabled in their plan.
If the subscription is expired or dispatcher access is disabled, login is restricted. This ensures controlled access and feature availability based on the owner’s plan.
5.2.3 Driver Assignment Permissions
Driver assignment behavior varies based on the dispatcher user type:
Owner Dispatcher
Can assign drivers only from their own registered drivers.
Cannot view or assign drivers belonging to other owners.
Individual Dispatcher (Admin-Created)
Can assign any available driver across the platform (if permitted by admin).
Suitable for centralized dispatch operations and call-center use cases.
5.2.4 Driver Assignment Modes
Dispatchers can assign drivers using the following methods:
Automatic Assignment:
The system automatically assigns the nearest available driver based on location and availability.
Manual Assignment:
Dispatchers can manually select a driver from the available driver list, subject to role-based restrictions.
5.3 Dispatcher Panel Menus Overview
5.3.1: Dashboard
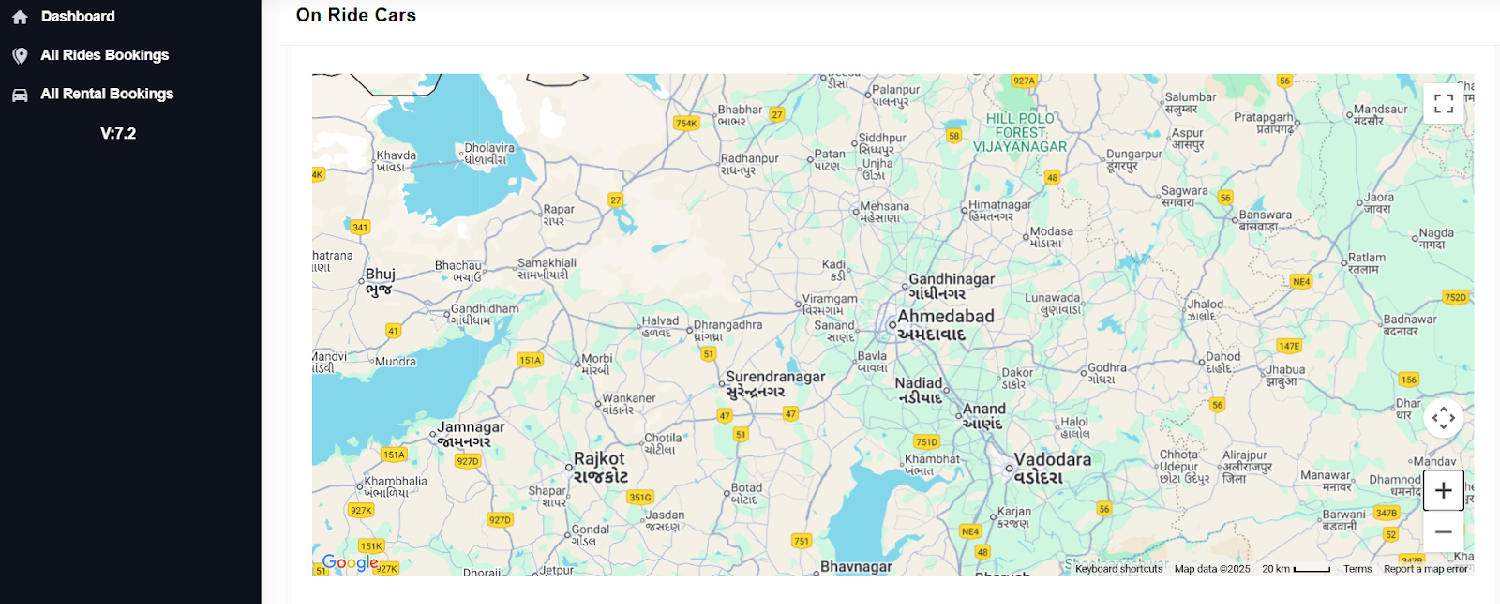
The Live Map Tracking page allows dispatchers to monitor drivers and vehicles in real time on an interactive map. This feature helps manage ongoing rides, track driver locations, and ensure accountability and safety. Admins can quickly identify available drivers, intervene during issues, and provide live support to customers or drivers when necessary. The page improves operational efficiency, enhances service reliability, and gives a clear visual overview of fleet activity across all service areas.
5.3.2: Ride Bookings
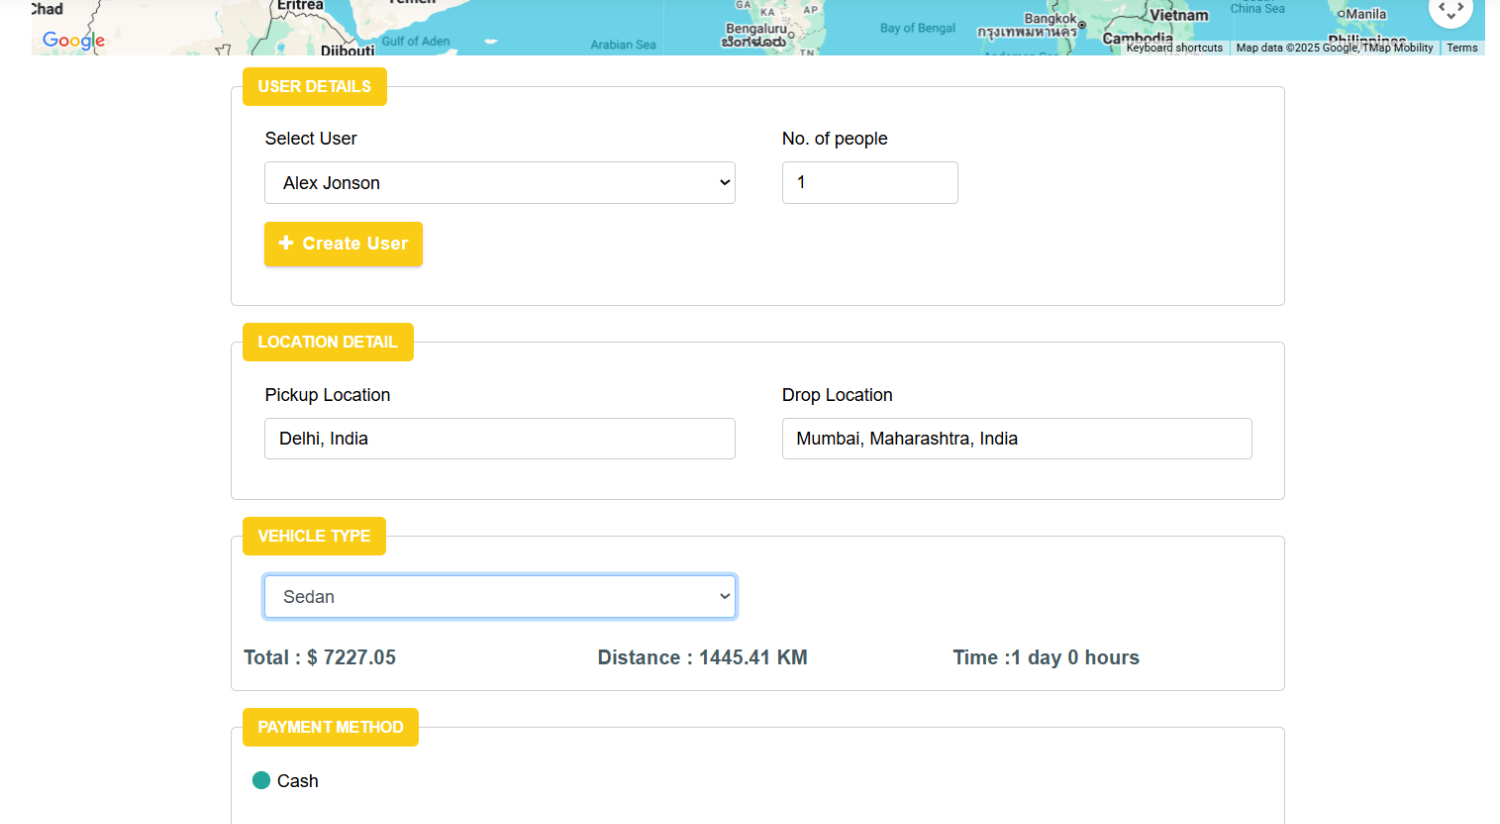
The Ride Bookings page allows dispatcher users to view all ride bookings, including completed, canceled, and ongoing trips. Each booking displays essential details such as trip information, fare breakdown, and the assigned driver and customer. In addition, dispatchers can create new ride bookings on behalf of customers, helping users who face issues with the mobile app or need assistance. This page ensures smooth coordination between drivers, customers, and dispatchers, enabling efficient ride management and improved customer support.
Steps to Create a Normal Ride Booking
Click “Book Now”.
Select User (if user not exist then you can create new user by clicking on Create User button)
Add No.of people, pickup location and drop-off location.
Select Vehicle Type (Sedan, Mini, SUV, etc.).
Review Fare Estimate and trip summary.
Select Payment Method (Currently only cash payment mode available).
Driver Assignment (Automatic or Manual).
Automatic Assignment: The system automatically assigns the nearest available driver based on location and availability.
Manual Assignment: Dispatchers can manually select a preferred available driver from the driver list when specific assignment is required.
Click on the “Book” button to create customer booking.
Monitor ride progress in real time from the Dashboard (Live Map).
5.3.3: Rental Bookings
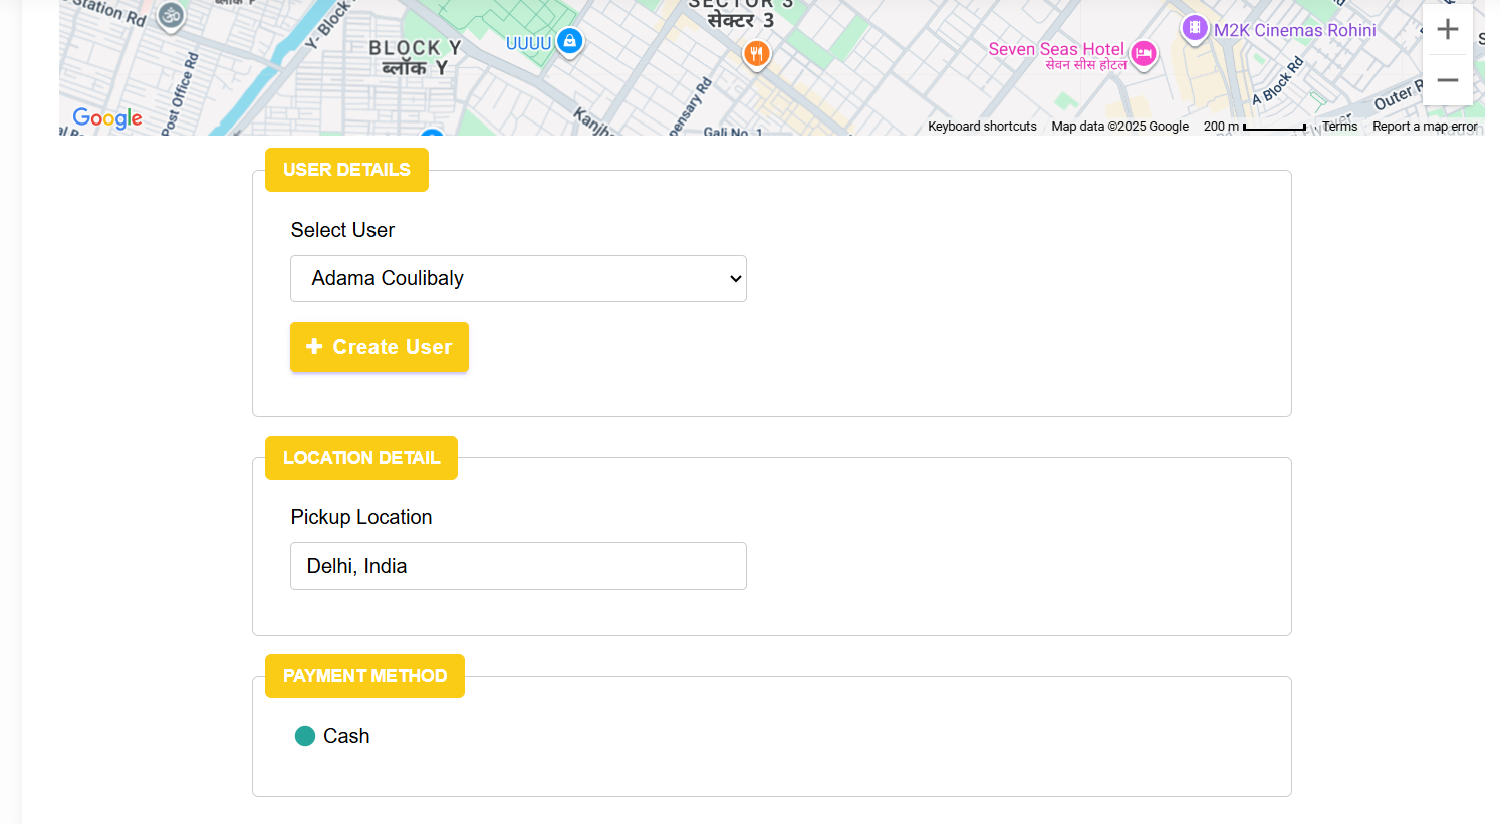
The Rental Bookings page allows dispatcher users to view all rental ride bookings, including completed, canceled, and ongoing trips. Each booking provides essential details such as trip information, fare breakdown, and the assigned driver and customer. Dispatchers can also create new rental bookings on behalf of customers, assisting users who may face difficulties with the mobile app or require direct support. This page ensures efficient management of rental services, smooth coordination between drivers and customers, and enhanced customer satisfaction.
Steps to Create a Rental Ride Booking
Click “Book Now”.
Select User (if user not exist then you can create new user by clicking on Create User button)
Select Payment Method (Currently only cash payment mode available).
Driver Assignment (Automatic or Manual).
Automatic Assignment: The system automatically assigns the nearest available driver based on location and availability.
Manual Assignment: Dispatchers can manually select a preferred available driver from the driver list when specific assignment is required.
Click on the “Book” button to create customer booking.
Monitor ride progress in real time from the Dashboard (Live Map).
5.3.4: Parcel Bookings
The Parcel Bookings page allows dispatcher users to manage parcel delivery requests on behalf of customers. Dispatchers can view all parcel bookings, including pending, ongoing, completed, and canceled deliveries. Each booking displays key information such as pickup and drop-off locations, parcel details, assigned driver, and delivery status.
This feature is useful for customers who need assistance creating parcel delivery requests or who prefer to place orders via call or support. It ensures smooth coordination between dispatchers, drivers, and customers while maintaining real-time visibility and operational control.
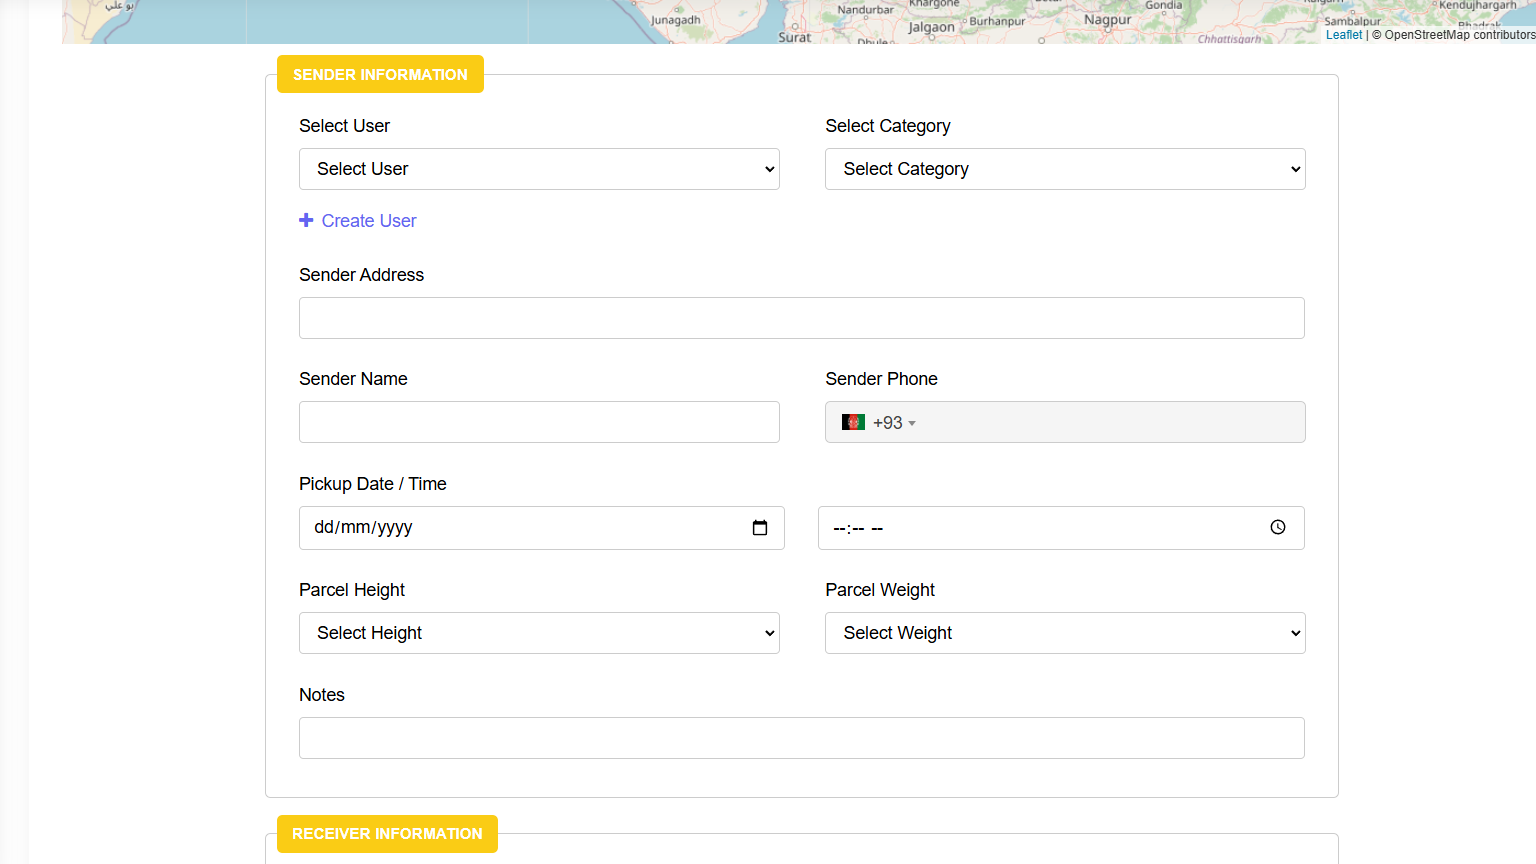
Steps to Create a Parcel Booking
Click “Book Now”.
Add Sender Information
Select User (if user not exist then you can create new user by clicking on Create User link)
Select Category
Sender Address
Sender Name
Sender Phone
Select Pickup Date / Time
Parcel Height
Parcel Weight
Notes
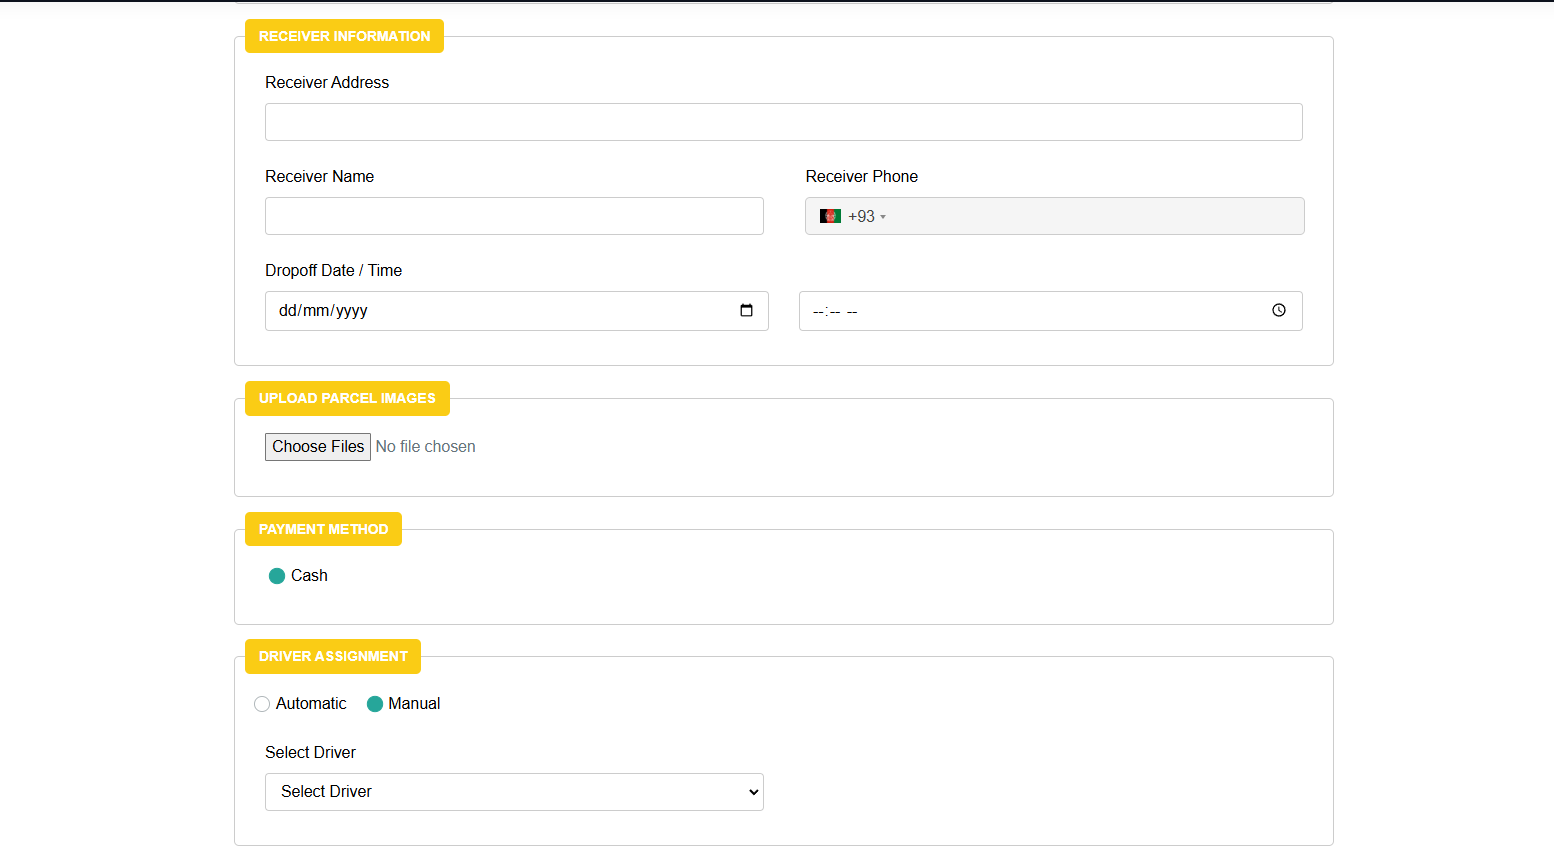
Add Receiver Information
Receiver Address
Receiver Name
Receiver Phone
Dropoff Date / Time
Upload Parcel Images
Select Payment Method (Currently only cash payment mode available).
Driver Assignment (Automatic or Manual).
Automatic Assignment: The system automatically assigns the nearest available driver based on location and availability.
Manual Assignment: Dispatchers can manually select a preferred available driver from the driver list when specific assignment is required.
Click on the “Book” button to create customer booking.
Monitor ride progress in real time from the Dashboard (Live Map).
This module improves delivery efficiency, enables quick manual booking, and ensures reliable parcel transportation services through centralized dispatcher control.
5.4 Accessing the Dispatcher Panel
Default Dispatcher User Credentials
URL: Your desired URL where the dispatcher panel is set up.
Email: dispatcher@cabme.com
Password: 12345678
Landing Panel Setup#
6. Landing Panel Setup
The landing panel can be installed on either a domain or a subdomain.
Please follow same step number 5.1 to setup landing panel also.
Note:
Please use the same admin panel database credentials for the dispatcher & landing panel.
Key Features#
7. Key Features
7.1 Ride Booking
Quick ride booking with real-time driver assignment.
Live tracking of drivers and rides for safety and transparency.
Fare estimation including distance, time, taxes, discounts, and optional tip.
CabMe is an advanced and scalable taxi/cab booking application built with secure, modern technologies:
Flutter for Android & iOS mobile applications
Laravel/PHP Framework for the powerful Admin Panel
CabMe empowers startups, entrepreneurs, and established cab companies to efficiently manage their fleets, drivers, and bookings in real-time. With multi-service support (Ride, Parcel, Rental), it enables businesses to expand beyond just passenger transport.
Setting up Flutter#
2. Setup Setting up Flutter involves several steps.
2.1. System Requirements:
Ensure your system meets the minimum requirements for Flutter development. Flutter supports development on Windows, macOS, and Linux. Make sure your system has the necessary hardware and software requirements as specified by Flutter documentation.
Extract the downloaded file to a location on your system. For example, on macOS or Linux, you can extract it to /usr/local and on Windows to C:\.
Add the Flutter bin directory to your system PATH to run Flutter commands from the command line. This step is important for executing Flutter commands globally in your system.
2.3. Install Development Tools:
For Android: Install Android Studio and configure the Flutter plugin. Android Studio provides the Android SDK, which Flutter uses to develop for Android. Ensure you have the Android SDK and the necessary tools installed through Android Studio.
For iOS: You need a macOS system with Xcode installed to develop and deploy Flutter apps for iOS.
2.4. Set up Android Emulator or iOS Simulator:
For Android development, set up an Android Virtual Device (AVD) using Android Studio’s AVD Manager.
For iOS development, use the iOS Simulator provided by Xcode.
Run flutter doctor:
Open a terminal and run flutter doctor. This command checks your system for any dependencies needed for Flutter development.
It will provide feedback on any missing or outdated components and instructions on how to resolve them.
2.5. Install Flutter and Dart plugins for your preferred IDE:
If you’re using VS Code, install the Flutter and Dart plugins to enhance your development experience.
Android Studio also has built-in support for Flutter, but make sure to install the Flutter plugin if it’s not already installed.
2.6. Create your first Flutter project:
Use the flutter create command to create a new Flutter project.
Navigate to the project directory and explore the file structure. You’ll find the main Dart file (main.dart) in the lib directory, where you’ll write your Flutter code.
2.7. Run your Flutter app:
Connect a device or start an emulator/simulator.
Navigate to your Flutter project directory in the terminal and run flutter run.
This will compile your Flutter app and launch it on the connected device or emulator.
2.8. Start Developing:
Once your app is running, you can start developing your Flutter UI and logic. Flutter’s hot reload feature allows you to see your changes instantly without restarting the app.
2.9. Learn and Explore:
Flutter has an extensive set of widgets and libraries. Explore the official Flutter documentation and community resources to learn more about Flutter development.
Flutter Android Setup#
3. Flutter Android Setup
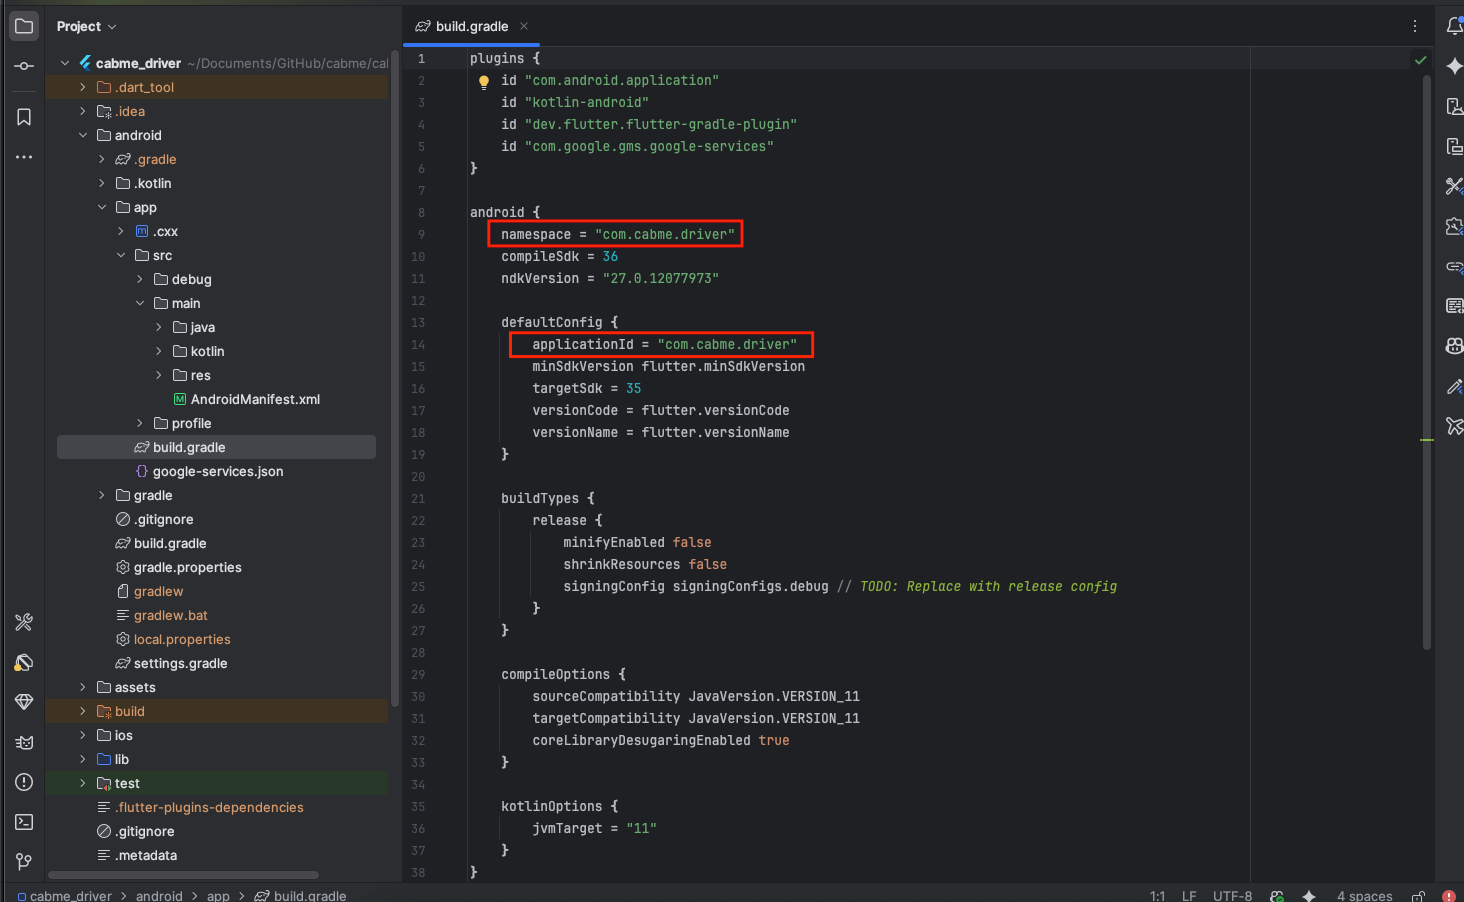
3.1 Changing the package name:
Navigate to the android directory within your Flutter project.
Open the AndroidManifest.xml file located in the app/src/main directory.
Find the package attribute in the tag and change its value to your desired package name.
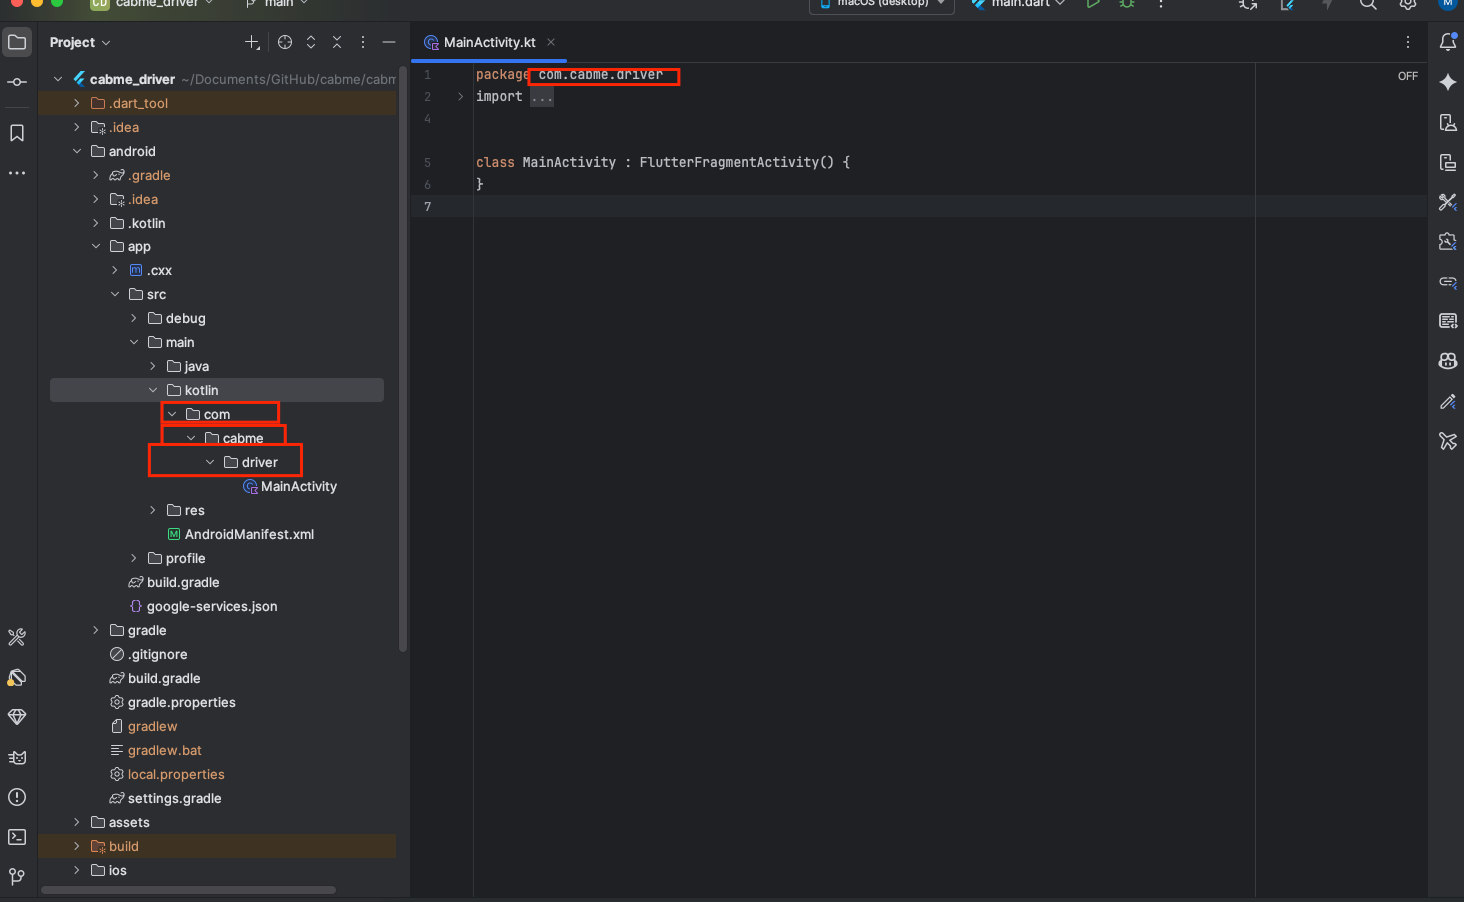
3.2 Update Android source code references:
Open the MainActivity.java file located in android/app/src/main/java/com/your_old_package_name.
Replace occurrences of the old package name with the new package name.
3.3 Change the launcher icon :
3.3.1. Prepare Your New Icons:
First, prepare the new launcher icon images in the required sizes. Android and iOS have different size requirements. You typically need icons in various sizes to support different screen densities.
For Android, you need to replace the existing launcher icon files with your new ones. The launcher icons for Android are stored in the mipmap folders inside the android/app/src/main/res directory.
Replace the existing icon files (ic_launcher.png) in the mipmap folders with your new icon files. Make sure to maintain the same file names and sizes.
You may need to replace icons in various drawable folders for different screen densities (e.g., mipmap-hdpi, mipmap-mdpi, mipmap-xhdpi, mipmap-xxhdpi, mipmap-xxxhdpi).
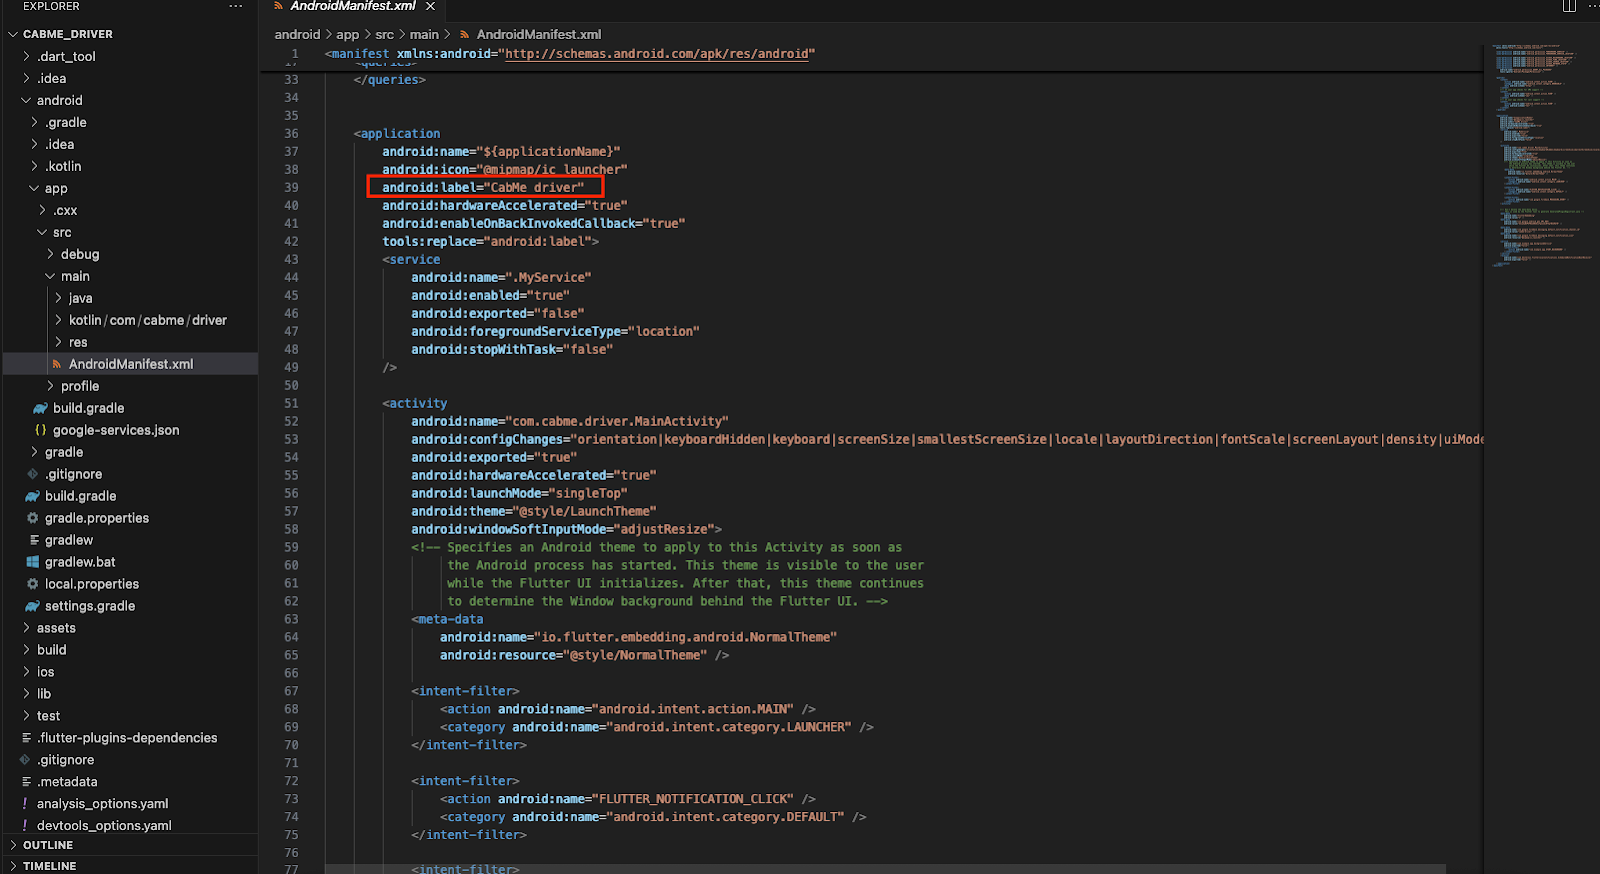
3.4. Change the app name
3.4.1. For Open the android/app/src/main/AndroidManifest.xml file.
3.4.2. Locate the tag.
3.4.3. Change the value of the android:label attribute to your desired app name.
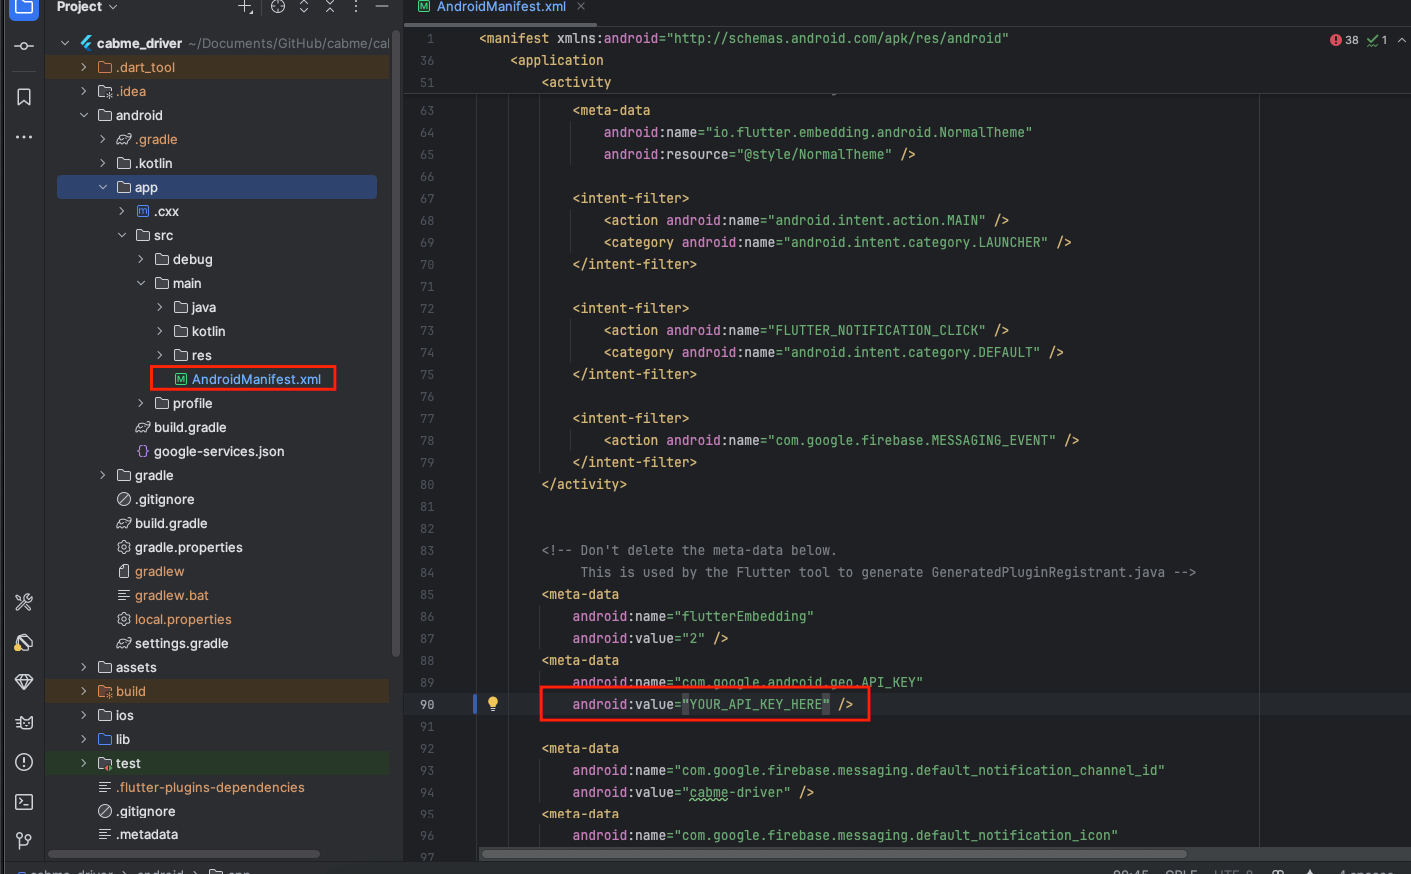
3.5. Change the Google Maps API key :
3.5.1. Navigate to your Flutter project’s android/app/src/main/AndroidManifest.xml file.
3.5.2. Inside the element, locate the tag with the name com.google.android.geo.API_KEY.
3.5.3. Replace the android:value attribute with your new Google Maps API key.
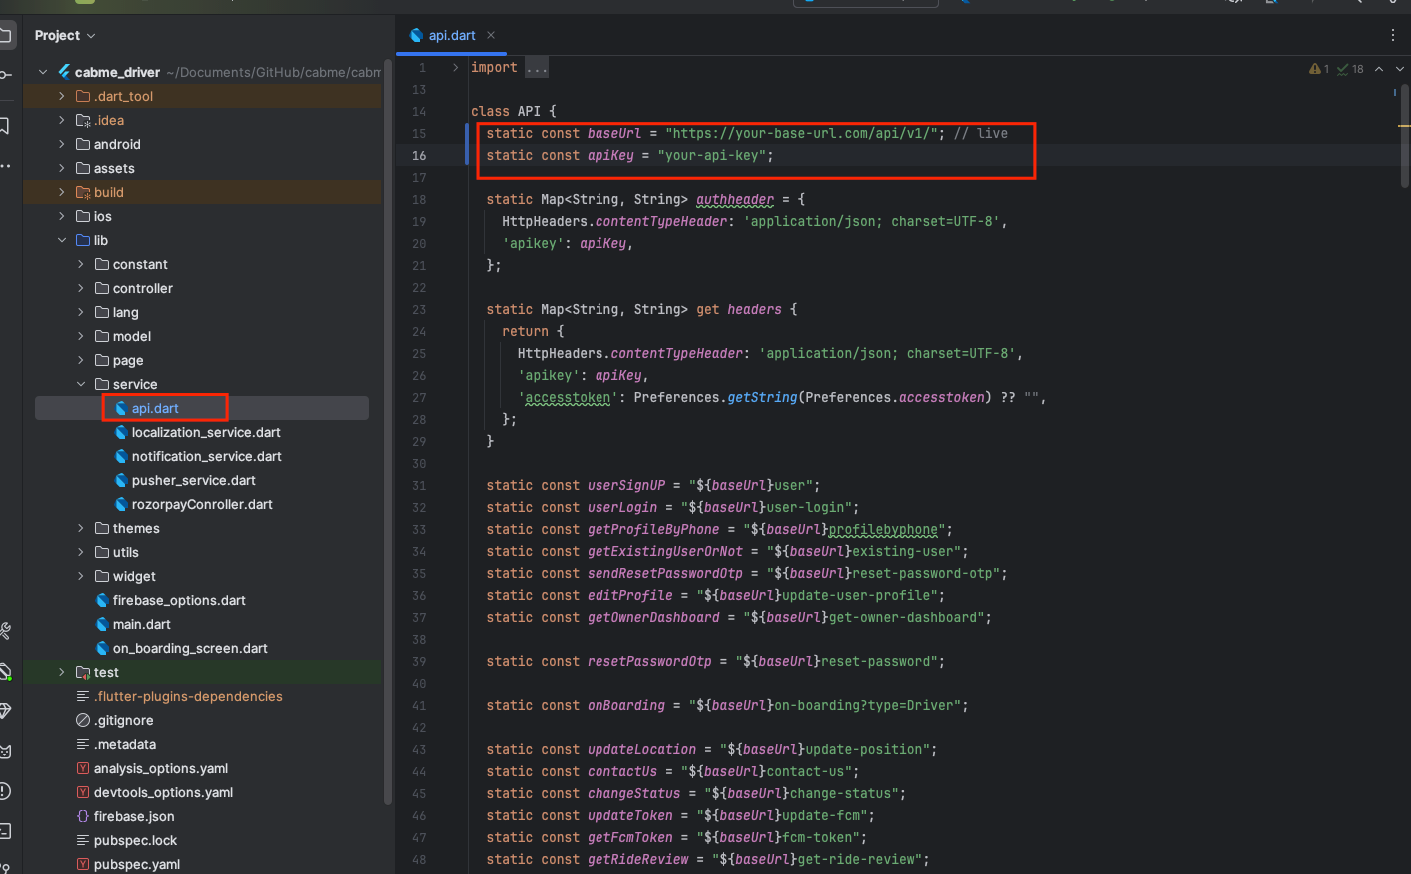
3.6.1. Open the pp/lib/service/api.dart file: Navigate to the specified file path in your Flutter project directory. Open the app/lib/service/api.dart file using a text editor or an IDE.
3.6.2. Locate the fields for API key and base URL: Look for variables named baseUrl and apiKey within the api.dart file.
3.6.3. Update the API key and base URL: Modify the values of baseUrl and apiKey variables with your new base URL and API key respectively.
3.6.4. The API key will be fetched from the .env configuration file of the laravel admin panel. Open the .env file and copy the APP_KEY variable value
3.6.5. Save the changes:
After updating the api.dart file, save the changes.
3.6.6. Rebuild your Flutter application:
If your Flutter app is currently running, stop it. Rebuild your Flutter application to apply the changes made to the api.dart file.
3.7.2.1.-keystore: The path where the .jks file will be created (~/my-release-key.jks for Unix/macOS, C:\Users\YourName\my-release-key.jks for Windows).
3.7.2.2. -keyalg RSA: Algorithm used.
3.7.2.3. -keysize 2048: Key length.
3.7.2.4. -validity 10000: Validity in days (~27 years).
3.7.2.5. -alias my-key-alias: Name of the key within the keystore.
3.7.3. Enter Required Info
3.7.3.1. Keystore password
3.7.3.2. Key password
3.7.3.3 Your name, organization, city, state, and country code
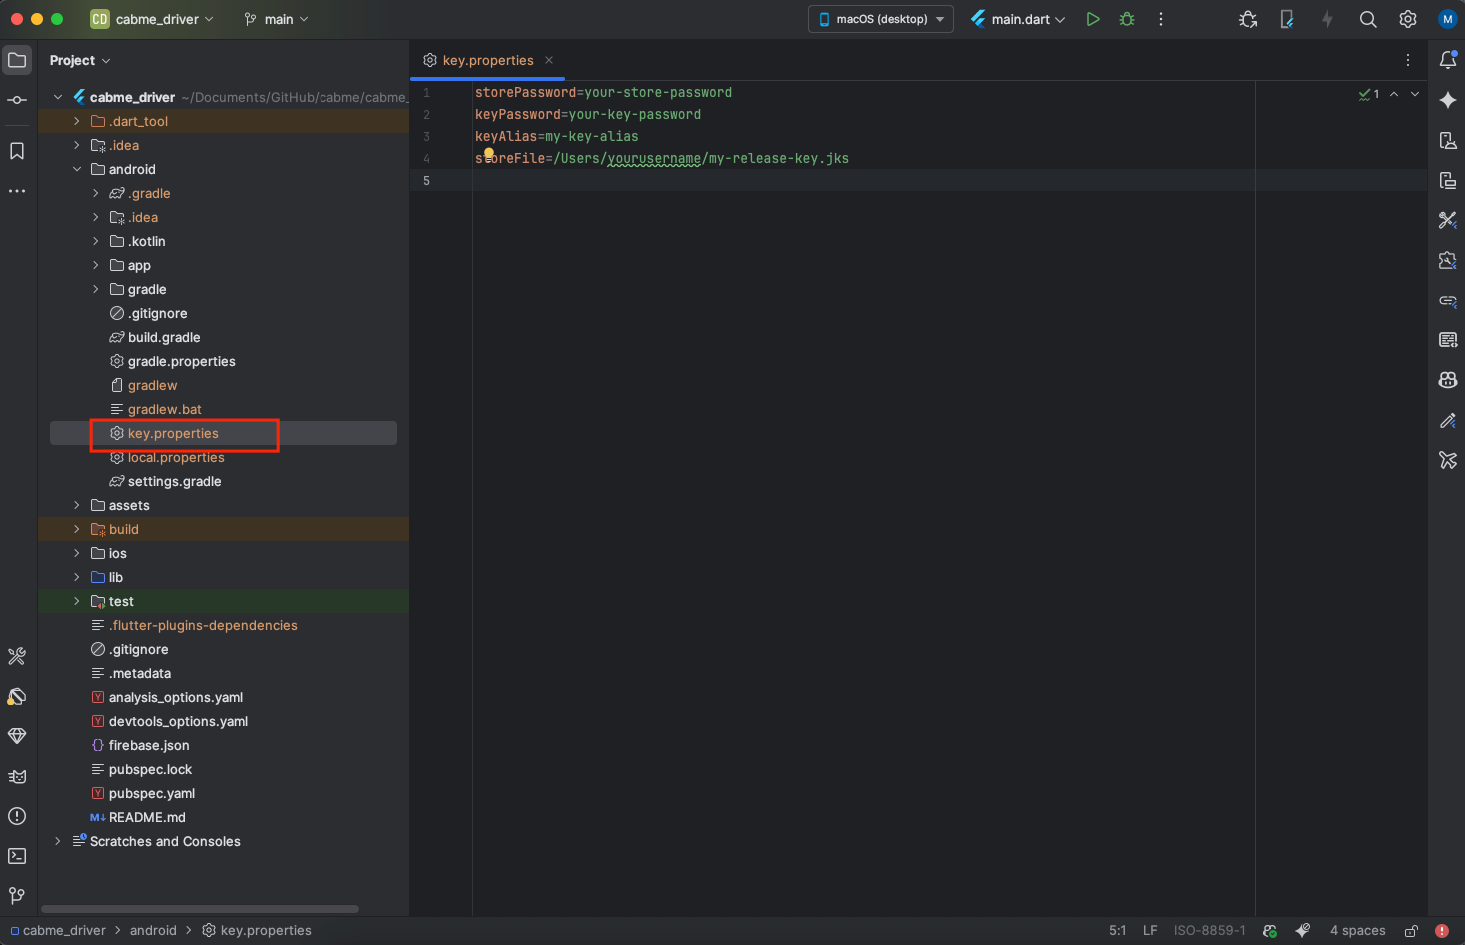
3.7.4. Configure key.properties in Flutter Project
3.8.2.1. Open your Flutter project in Android Studio.
3.8.2.2. In the Android view, navigate to app -> Gradle Scripts -> build.gradle (Module: app).
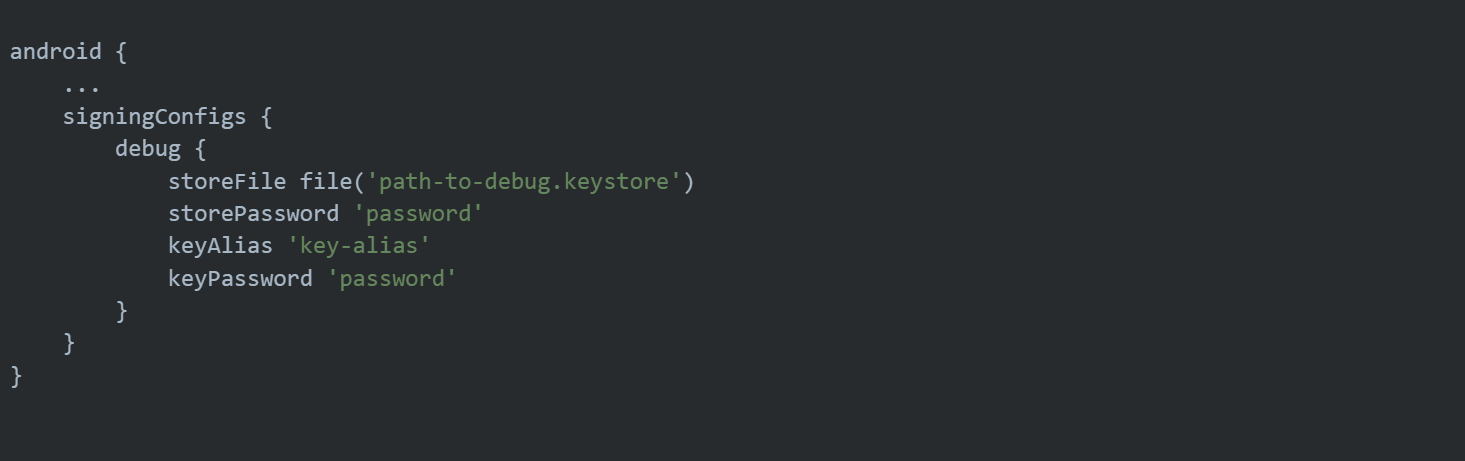
3.8.2.3. Add the following lines to the android block
3.8.2.4. Replace path-to-debug.keystore, password, and key-alias with your keystore file path, password, and key alias respectively. 3.8.2.5. Sync your project to apply changes. 3.8.2.6. Run the following Gradle task in the terminal to get the SHA-1 and SHA-256 keys
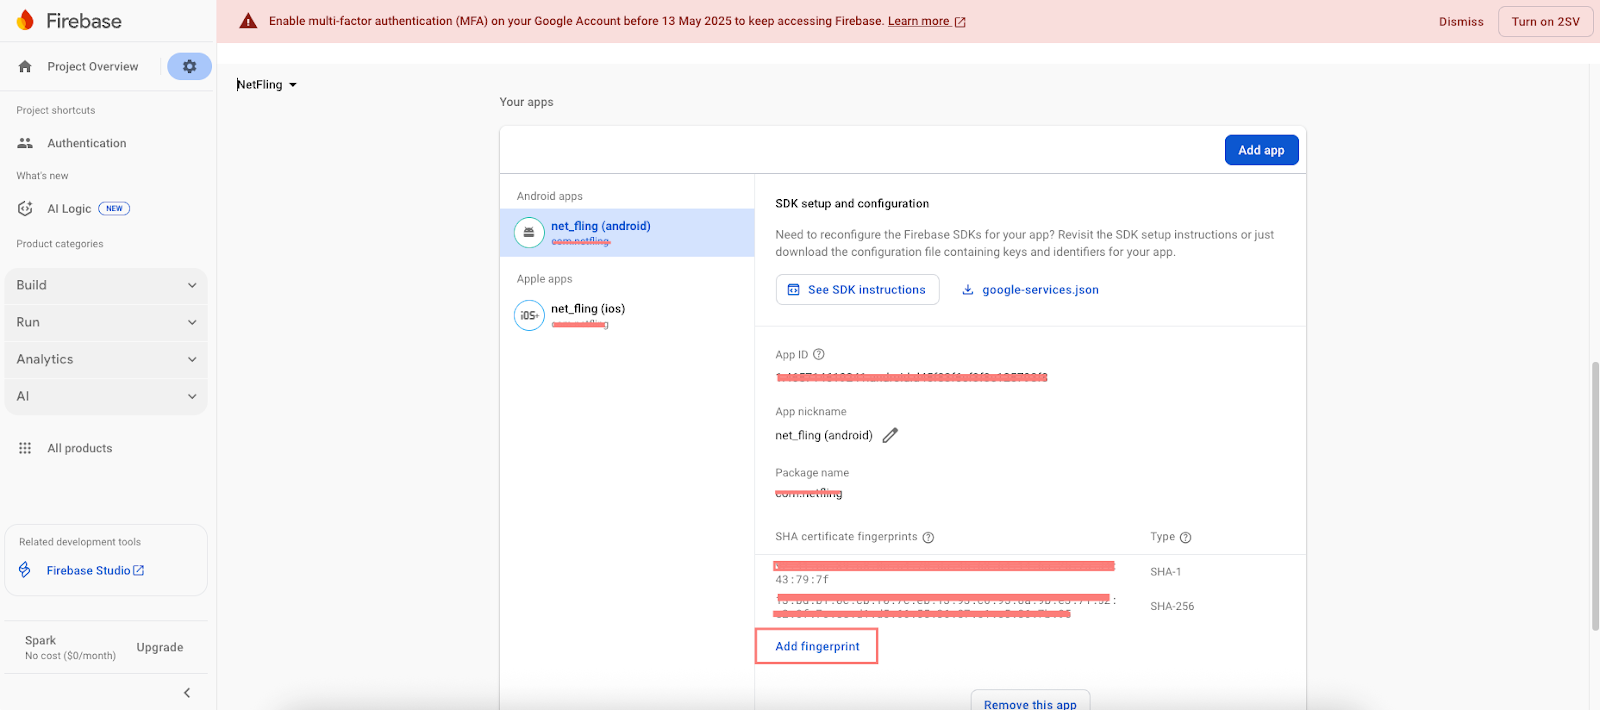
3.8.3. Adding Keys to Firebase Console:
3.8.3.1. Go to the Firebase Console.
3.8.3.2. Select your project.
3.8.3.3. For Android:
Click on the Android icon to add an Android app.
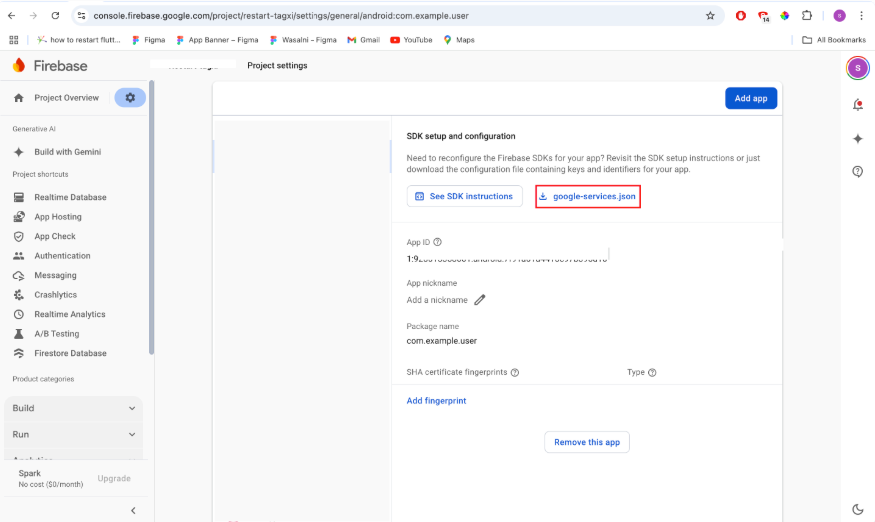
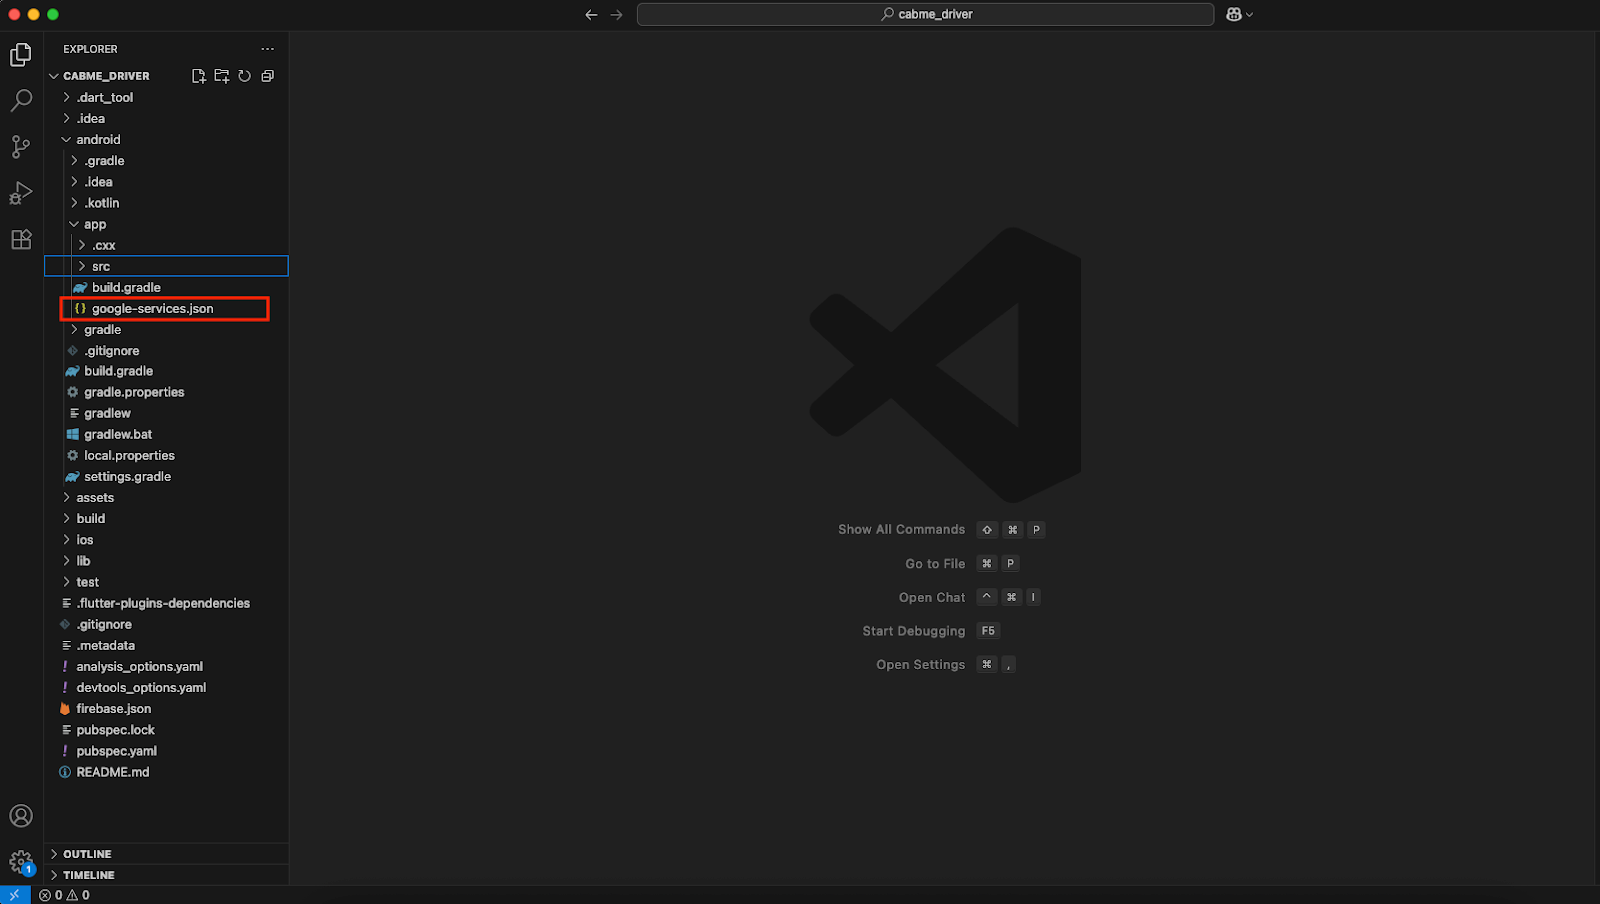
Follow the setup instructions, including adding the google-services.json file to your Flutter project’s android/app directory.
During setup, you’ll be asked for your SHA-1 key. Paste the SHA-1 key you generated earlier.
After setup is complete, you’ll have the option to download the google-services.json file again. Replace the existing file in your project if needed.
3.8.3.4. For IOS:
Click on the iOS icon to add an iOS app.
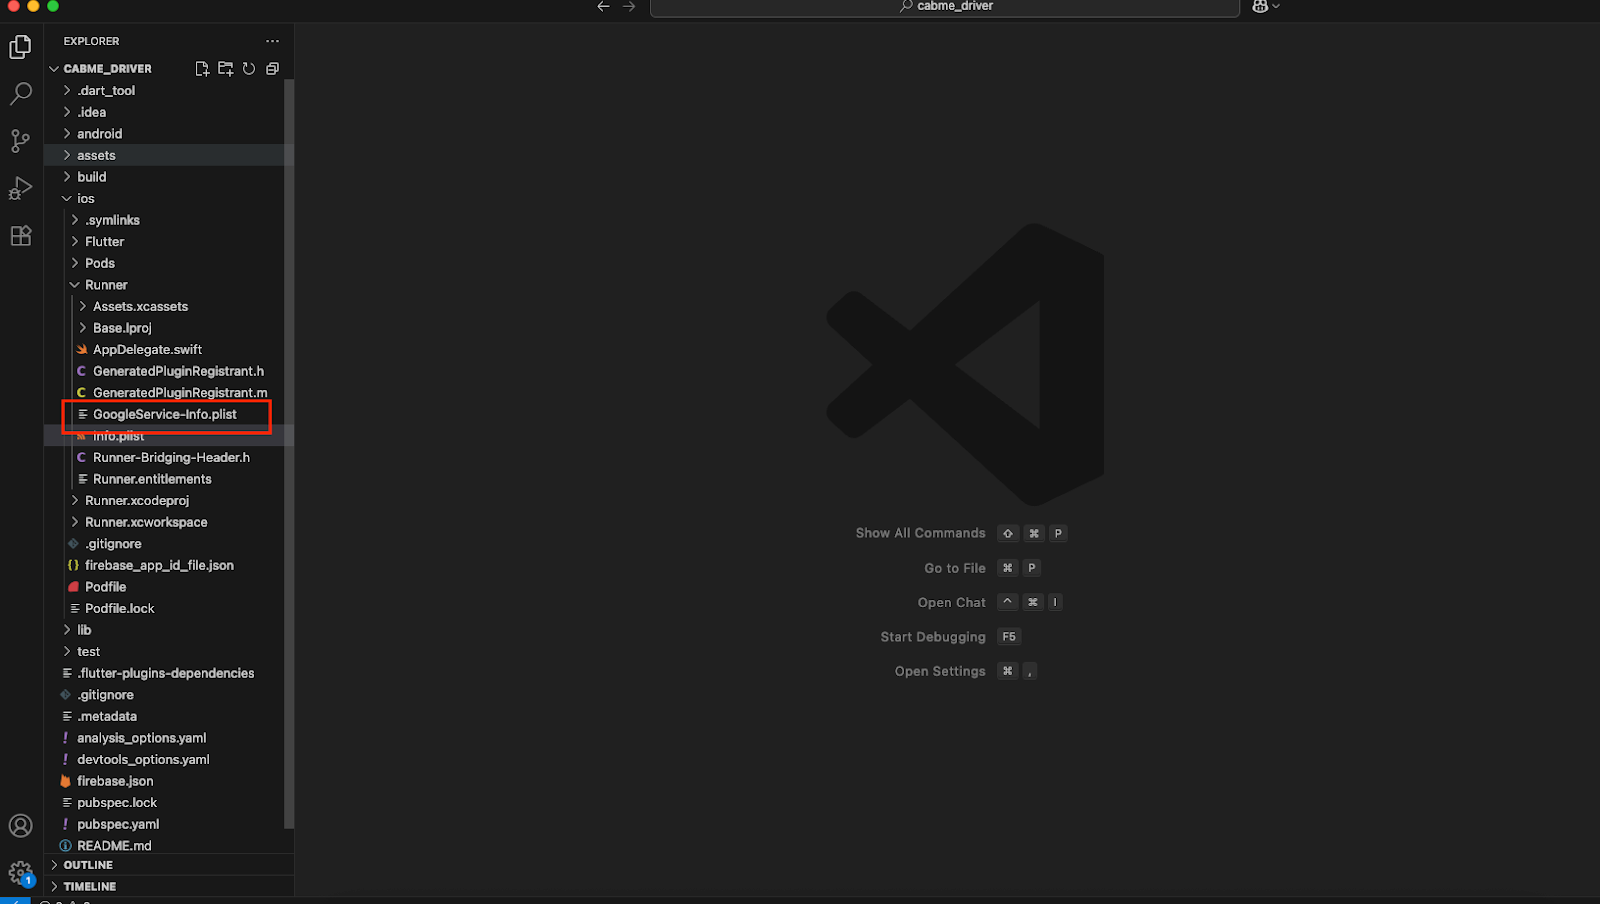
Follow the setup instructions, including downloading the GoogleService-Info.plist file.
There’s no need to add SHA-1 or SHA-256 keys for iOS.
Add the downloaded GoogleService-Info.plist file to your Flutter project’s ios/Runner directory.
Flutter IOS setup#
4.Flutter IOS setup
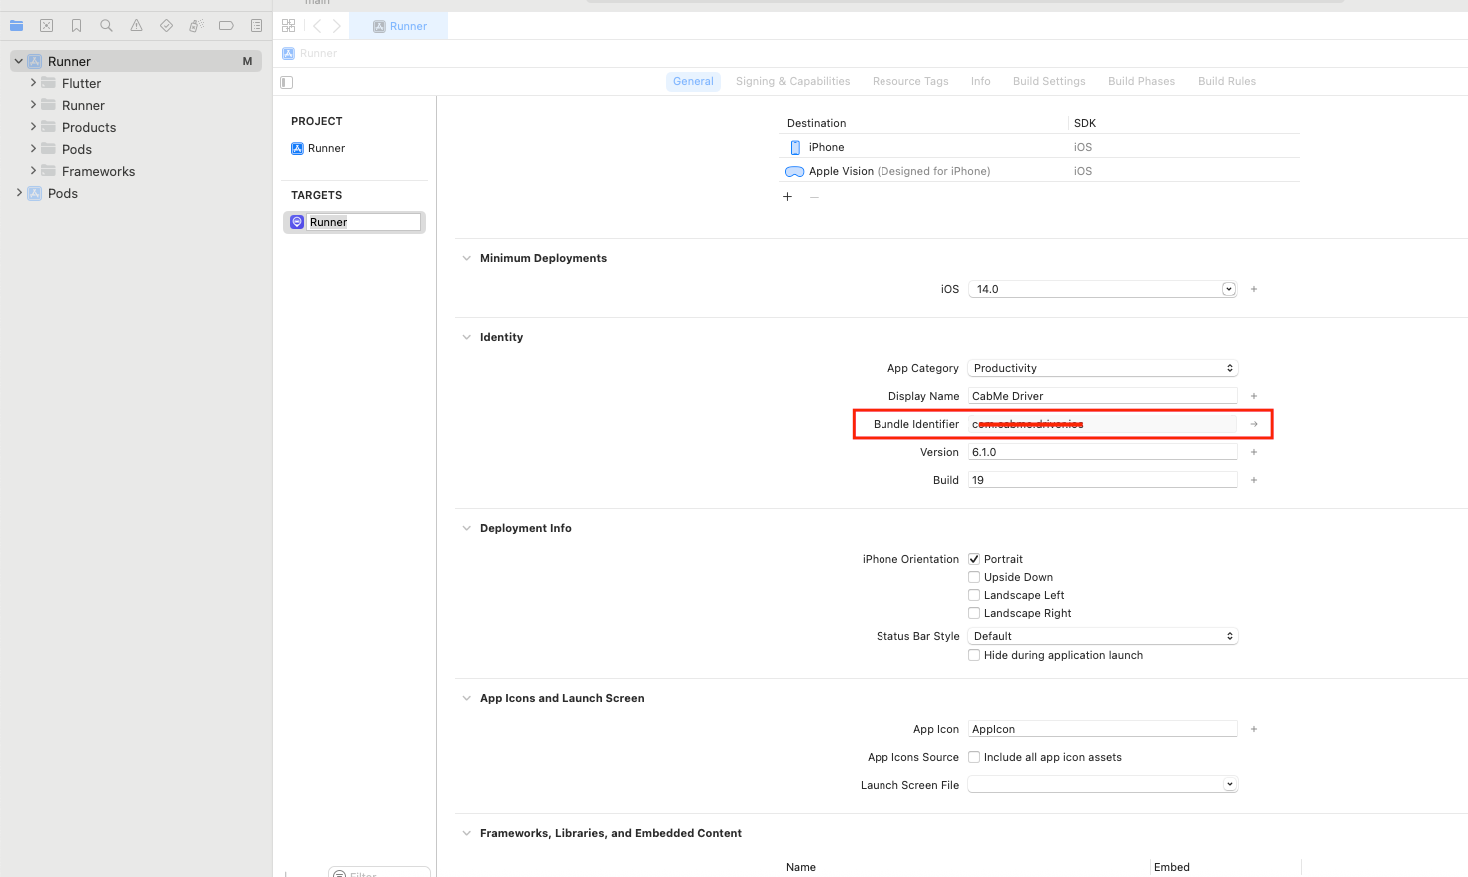
4.1. Change the iOS bundle identifier:
Navigate to the ios directory within your Flutter project.
Open the Runner.xcodeproj project file using Xcode.
In Xcode, select the Runner project from the project navigator.
Go to the Runner target’s settings.
Under the General tab, find the Bundle Identifier field and change it to your desired bundle identifier.
4.2. To change the launcher icon
4.2.1. For iOS, you need to replace the existing icon files with your new ones. The icons for iOS are stored in the Assets.xcassets directory in the ios/Runner directory.
4.2.2. Open your Flutter project in Xcode by navigating to the ios directory and opening the .xcworkspace file with Xcode.
4.2.3. In Xcode, navigate to Runner > Assets.xcassets.
4.2.4. Replace the existing AppIcon with your new icon files. You’ll typically find different sizes labelled for various devices (e.g., iPhone, iPad).
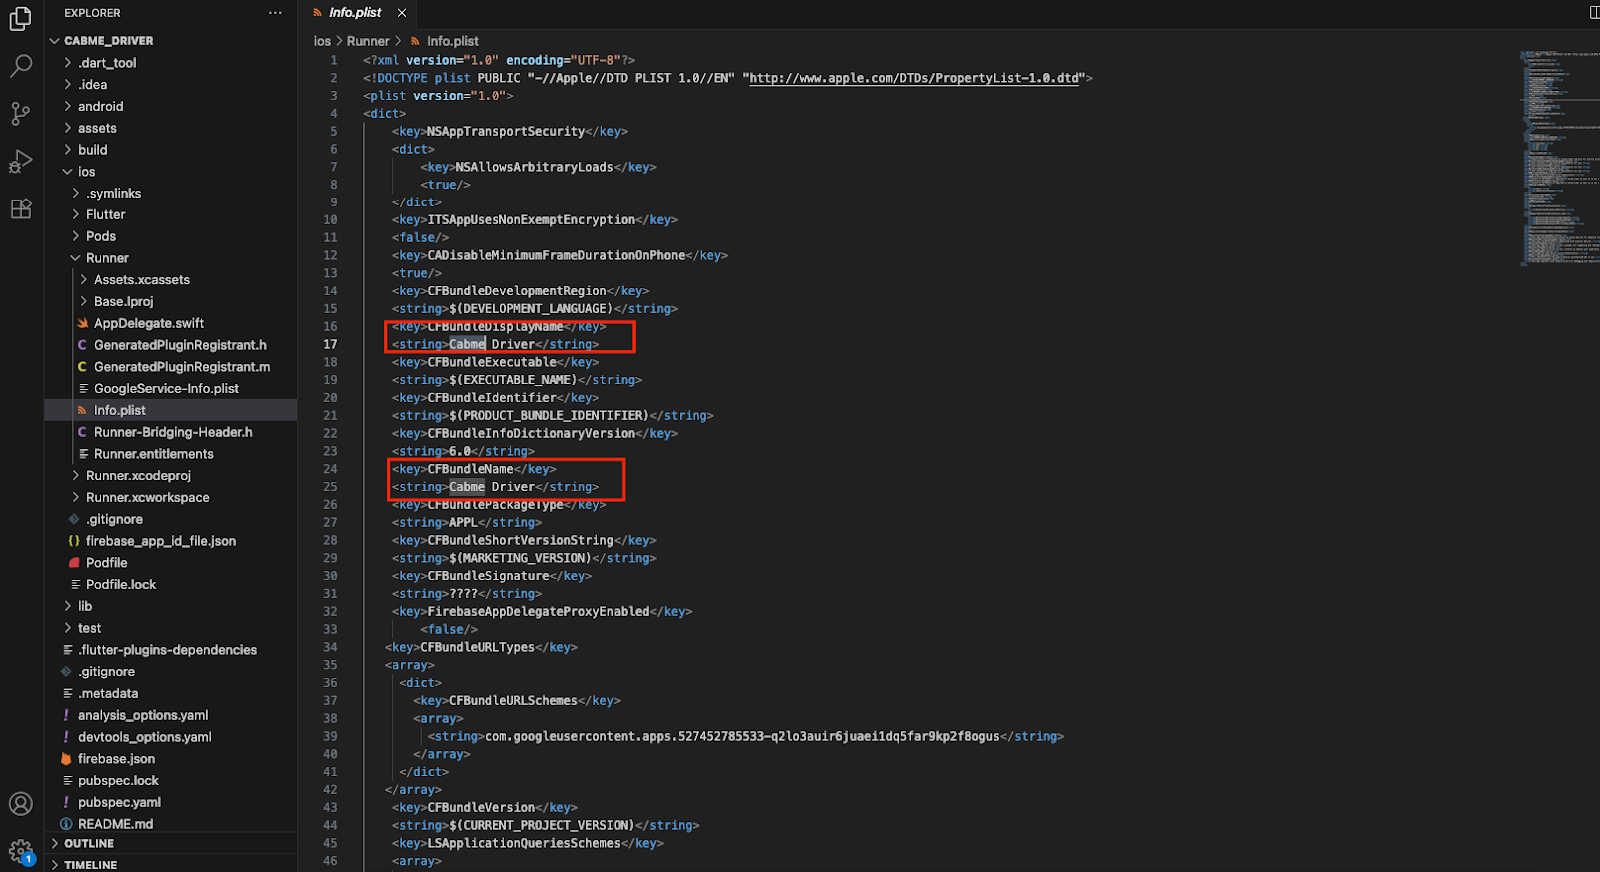
4.3. Change Application Name in IOS.
4.3.1. Open the ios/Runner/Info.plist file.
4.3.2. Locate the CFBundleDisplayName entry.
4.3.3. Change the value associated with to your desired app name.
4.4. To change the Google Maps API key.
4.4.1. Open your Flutter project in a text editor or IDE.
4.4.2. Navigate to the ios/Runner directory within your Flutter project.
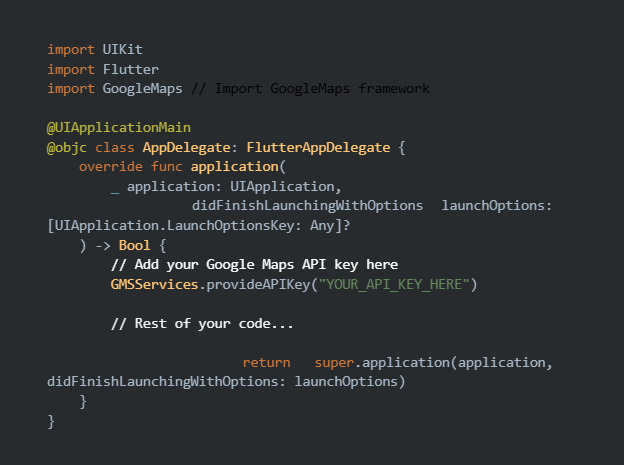
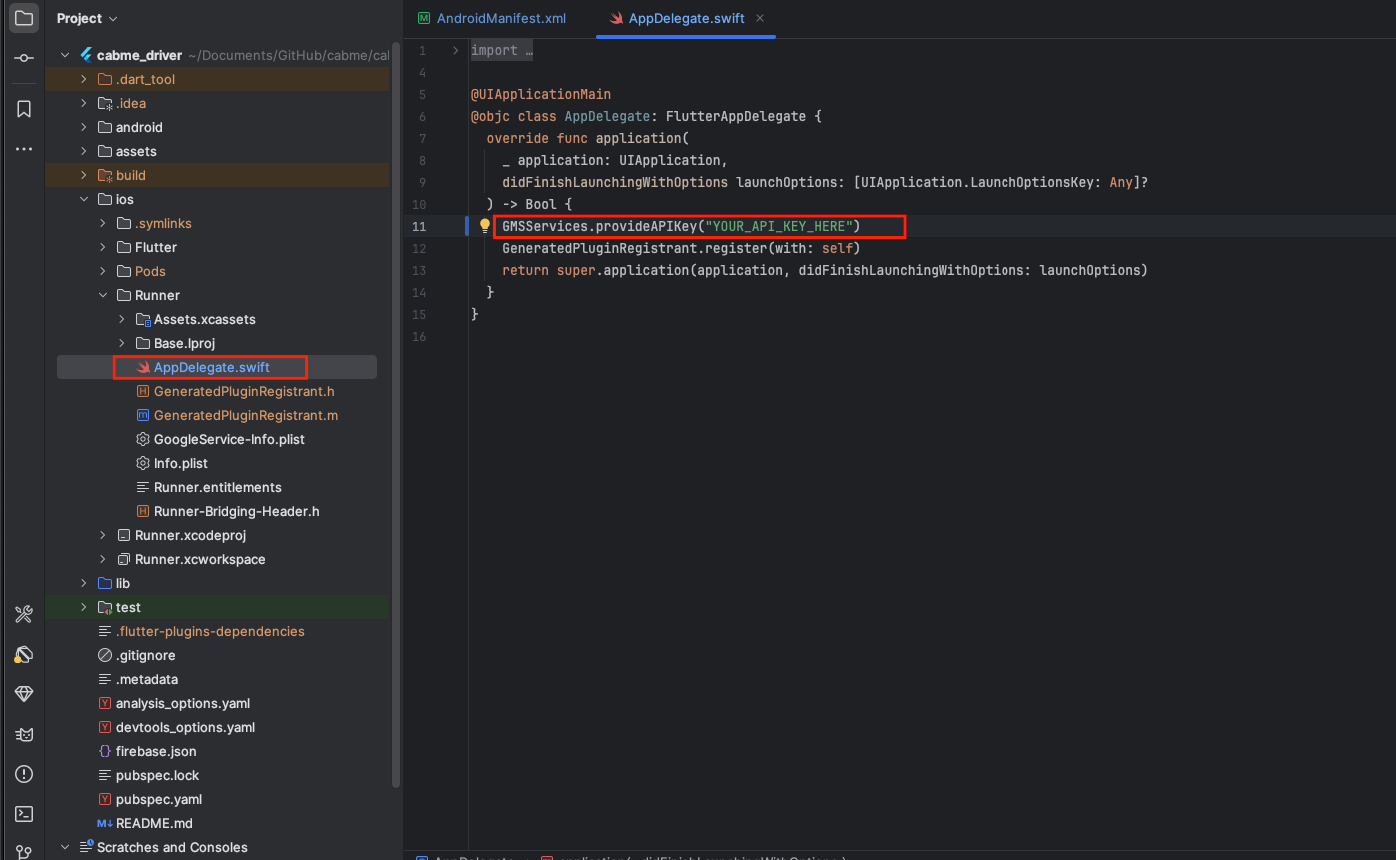
4.4.3. Locate the AppDelegate.swift file.
4.4.4. In the didFinishLaunchingWithOptions method, set the Google Maps API key.
Replace “YOUR_NEW_API_KEY_HERE” with your actual Google Maps API key.
After updating the API key in the AppDelegate.swift file, rebuild your Flutter app for iOS to apply the changes.
By following these steps, your Flutter app will use the new Google Maps API key specifically for iOS. Make sure you’ve also updated the API key in the Android configuration as described earlier if you want to apply changes to both platforms.
Flutter Firebase Setup#
5. Flutter Firebase Setup
5.1. Setting up Firebase for a Flutter project using the Firebase CLI involves several steps. Below is a detailed guide on how to do it:
5.1.1. Install Firebase CLI:
First, you need to install the Firebase CLI if you haven’t already. You can install it via npm (Node Package Manager) by running the following command in your terminal or command prompt:
5.1.2. Login to Firebase:
After installing the Firebase CLI, log in to your Firebase account by running the following command:
This will open a browser window prompting you to log in to your Google account associated with Firebase.
5.1.3. Create a Firebase Project:
If you haven’t already created a Firebase project, you can create one using the Firebase CLI by running:
Follow the prompts to create a new project.
5.1.4. Initialize Firebase in Your Flutter Project:
Navigate to your Flutter project directory in the terminal.
Initialize Firebase in your project by running:
This command will prompt you to select the Firebase features you want to set up. Choose the Firebase services you intend to use, such as Authentication, Firestore, etc.
5.1.5. Configure Firebase:
During the initialization process (firebase init), you’ll be asked to select the Firebase project you created or configured earlier. Choose the appropriate project from the list.
5.1.6. Install Required Dependencies:
After selecting the Firebase features, Firebase CLI will generate the necessary configuration files for your project.
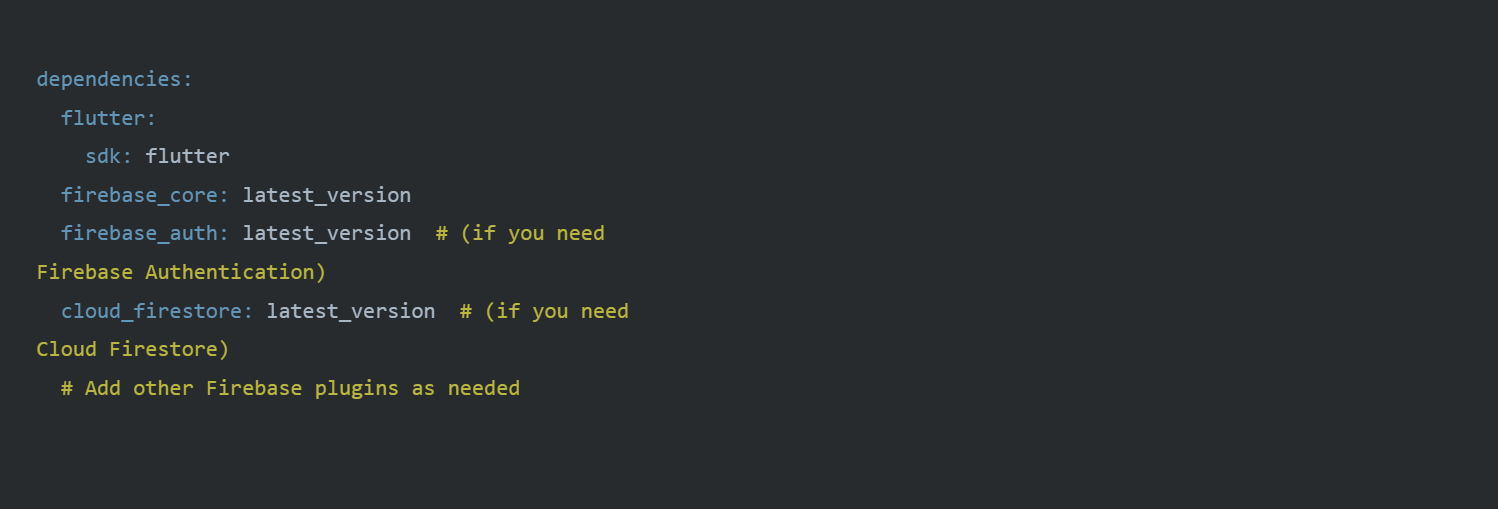
Next, you need to install the required Firebase packages in your Flutter project. You can do this by adding the dependencies to your pubspec.yaml file:
Replacelatest_versionwith the actual version numbers of the Firebase plugins you want to use. You can find the latest versions on pub.dev.
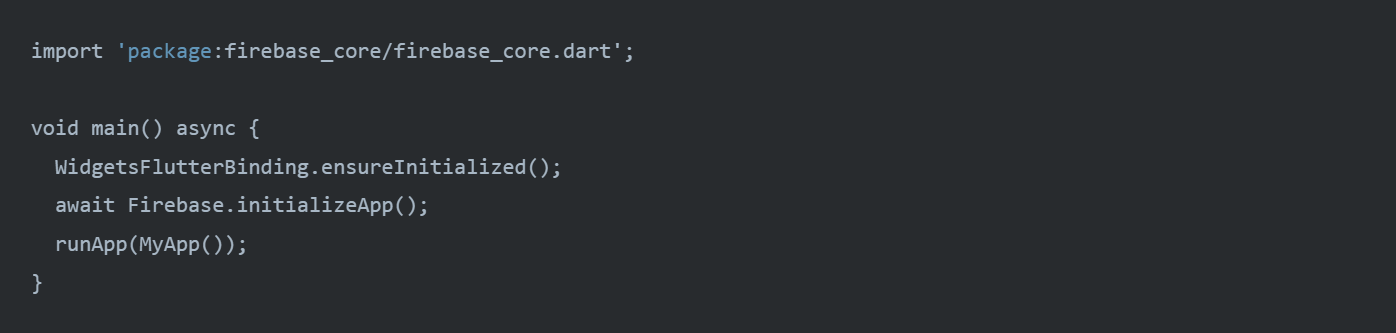
5.1.7. Initialize Firebase in Your Flutter App:
5.1.8. Using Firebase Services:
Now you can use Firebase services in your Flutter app. Import the necessary Firebase packages and follow the respective documentation for each service you want to use (e.g., Firebase Authentication, Cloud Firestore).
5.1.9. Testing:
Run your Flutter app on a device or emulator to verify that Firebase services are correctly integrated and working.
5.2. Configuring and setting up FlutterFire in your Flutter project involves several steps. Here’s a detailed guide on how to do it:
Click on “Add Project” and follow the instructions to create a new project.
Once your project is created, you’ll be redirected to the project dashboard.
5.2.2. Add an App to Your Firebase Project:
In the Firebase console, select your project.
Click on the “Add app” button (usually represented by an Android or iOS icon).
Follow the setup instructions to register your app with Firebase.
Download the google-services.json file for Android or GoogleService-Info.plist file for iOS. These files contain your Firebase project configuration details.
5.2.3. Flutter Project Setup:
Open your Flutter project in your preferred editor.
Navigate to the android/app directory for Android or ios/Runner directory for iOS, and paste the google-services.json (for Android) or GoogleService-Info.plist (for iOS) file that you downloaded earlier.
5.2.4. Add Firebase SDK to Your Flutter Project:
Open your Flutter project’s pubspec.yaml file.
Add the following dependencies:
Replacelatest_versionwith the latest version numbers of the Firebase plugins you want to use. You can find the latest versions on pub.dev.
5.2.5. Using Firebase Services:
You can now use Firebase services in your Flutter app. Import the necessary Firebase packages and follow the respective documentation for each service you want to use (e.g., Firebase Authentication, Cloud Firestore).
5.2.6. Testing:
Run your Flutter app on a device or emulator to verify that Firebase services are correctly integrated and working.
Payment Methods#
6. Payment Methods Configuration
Path:
Administration Settings > Payment Methods
1. Stripe
Enable Stripe: Checkbox to activate the Stripe payment gateway.
Stripe Key: Field for entering the public API key provided by Stripe.
Stripe Secret: Field for entering the secret API key for secure server communication.
Steps to Configure:
Go to Administration Settings > Payment Methods > Stripe.
Check Enable Stripe.
Enter the Stripe Key and Stripe Secret.
Click Save.
2. COD (Cash on Delivery)
Enable COD: Checkbox to activate the COD payment method.
Steps to Configure:
Go to Administration Settings > Payment Methods > COD.
Check Enable COD.
Click Save.
4. Razorpay
Enable Razorpay: Checkbox to activate the Razorpay payment gateway.
Razorpay Key: Field for entering the Razorpay API key.
Razorpay Secret: Field for entering the Razorpay secret key.
Steps to Configure:
Go to Administration Settings > Payment Methods > Razorpay.
Check Enable Razorpay.
Enter the Razorpay Key and Razorpay Secret.
Click Save.
5. PayPal
Enable PayPal: Checkbox to activate the PayPal payment gateway.
Client ID: Enter the PayPal Client ID.
Client Secret: Enter the PayPal Secret Key.
Steps to Configure:
Go to Administration Settings > Payment Methods > PayPal.
Check Enable PayPal.
Enter the Client ID and Client Secret.
Click Save.
6. Wallet
Enable Wallet: Checkbox to activate the internal wallet system.
No additional configurations required beyond enabling the wallet feature.
7. PayFast
Enable PayFast: Checkbox to activate the PayFast gateway.
Merchant ID: Enter the PayFast Merchant ID.
Merchant Key: Enter the PayFast Merchant Key.
Steps to Configure:
Go to Administration Settings > Payment Methods > PayFast.
Check Enable PayFast.
Enter the Merchant ID and Merchant Key.
Click Save.
8. PayStack
Enable PayStack: Checkbox to activate the PayStack gateway.
PayStack Key: Enter the PayStack API Key.
PayStack Secret: Enter the PayStack Secret Key.
Steps to Configure:
Go to Administration Settings > Payment Methods > PayStack.
Check Enable PayStack.
Enter the PayStack Key and PayStack Secret.
Click Save.
9. FlutterWave
Enable FlutterWave: Checkbox to activate the FlutterWave payment gateway.
Public Key: Enter the FlutterWave Public Key.
Secret Key: Enter the FlutterWave Secret Key.
Steps to Configure:
Go to Administration Settings > Payment Methods > FlutterWave.
Check Enable FlutterWave.
Enter the Public Key and Secret Key.
Click Save.
10. MercadoPago
Enable MercadoPago: Checkbox to activate the MercadoPago payment gateway.
Public Key: Enter the MercadoPago Public Key.
Access Token: Enter the MercadoPago Access Token.
Steps to Configure:
Go to Administration Settings > Payment Methods > MercadoPago.
Check Enable MercadoPago.
Enter the Public Key and Access Token.
Click Save.
11. Xendit
Enable Xendit: Checkbox to activate the Xendit payment gateway.
API Key: Enter the Xendit API Key.
Steps to Configure:
Go to Administration Settings > Payment Methods > Xendit.
Check Enable Xendit.
Enter the API Key.
Click Save.
12. OrangePay
Enable OrangePay: Checkbox to activate the OrangePay gateway.
API Key: Enter the OrangePay API Key.
Steps to Configure:
Go to Administration Settings > Payment Methods > OrangePay.
Check Enable OrangePay.
Enter the API Key.
Click Save.
13. MidTrans
Enable MidTrans: Checkbox to activate the MidTrans payment gateway.
Merchant ID: Enter the MidTrans Merchant ID.
API Key: Enter the MidTrans API Key.
Steps to Configure:
Go to Administration Settings > Payment Methods > MidTrans.
Check Enable MidTrans.
Enter the Merchant ID and API Key.
Click Save.
FAQ#
7. Frequently Asked Questions
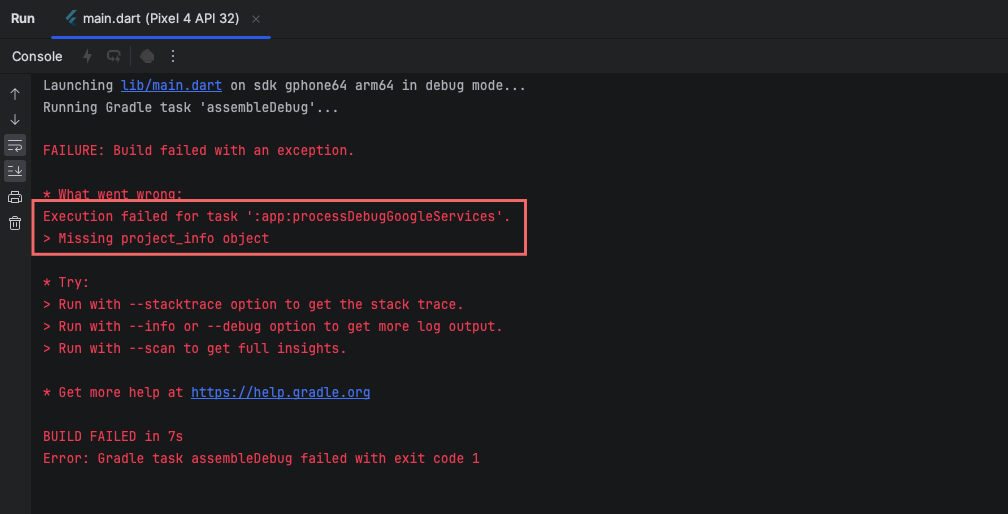
7.1. What should I do if I get the error message “Missing project_info object” in my Flutter project?
The error message you’re encountering, “Missing project_info object,” typically arises in Flutter projects when there’s a misconfiguration or missing information related to Firebase services. Here’s how you can troubleshoot and potentially resolve this issue
Solution :
1. Check google-services.json: If you’re using Firebase services in your Flutter app, ensure that you have the google-services.json file placed in the correct location within your Android project. This file contains important configuration information for Firebase services. It should be located in the android/app directory of your Flutter project.
2. Verify Firebase Setup: Double-check that you’ve completed all the necessary steps to set up Firebase for your Flutter project. This includes adding your app to the Firebase project using the Firebase Console, downloading and adding the google-services.json file to your Android project, and configuring Firebase services in your Flutter app’s code (if applicable).
3. Update Google Services Plugin: Ensure that you’re using the latest version of the Google Services Gradle plugin in your Android project. You can check the latest version on the Google Services Gradle Plugin page and update the version number in your android/build.gradle file accordingly.
4. Check Flutter and Firebase Versions Compatibility: Make sure that you’re using compatible versions of Flutter and Firebase. Sometimes, using outdated versions of either can lead to compatibility issues. Refer to the Firebase Flutter documentation and ensure compatibility with your Flutter version.
5. Sync Gradle Files: After making any changes to your Android project configuration, such as updating the google-services.json file or modifying the Gradle build files, make sure to sync your Gradle files in Android Studio. This can be done by clicking on the “Sync Project with Gradle Files” button.
6. Rebuild the Project: After ensuring all configurations are correct, try rebuilding your Flutter project. You can do this by running flutter clean followed by flutter pub get and then rebuilding the project (flutter run or flutter build).
7. Check for Error Logs: Look for more detailed error messages or stack traces in the console output or build logs. These can provide additional clues about the underlying issue causing the “Missing project_info object” error.




 info@siddhiinfosoft.com
 https://siddhiinfosoft.com/